background image

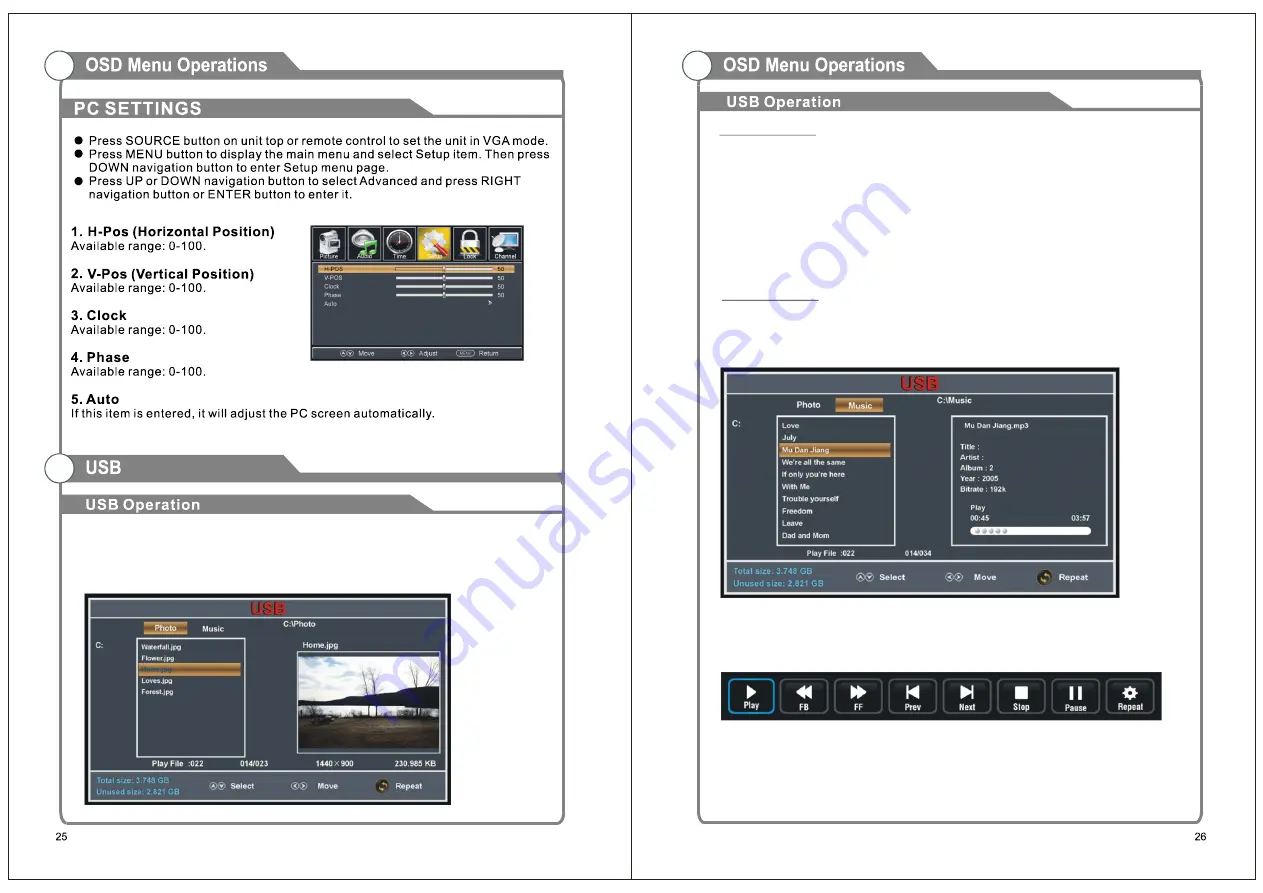
• Insert a USB memory device, which contains Photo or Music files, into USB slot.
• Press SOURCE button on the remote control to switch this unit to USB (or Media) mode.

Press LEFT/RIGHT navigational button to choose between the Photo or Music page.

Press UP/DOWN navigational button to select and press the OK button to open the file.

Photo Playback

- Select Photo 

tab on the USB page

.

Press UP/DOWN navigation button to select preferred folder/file and press 

the ENTER button to enter a folder or play selected file

.

Durning playback

-Press UP/DOWN navigation button to play previous/next photo. 

-Press LEFT/RIGHT navigation button to rotate a photo counterclockwise/

clockwise. 

-Press EXIT button to return to Photo menu page. 

Durning Playback

-Press INFO button to display/hide the tool bar. 

Music Playback

-Select the MUSIC tab on the USB page. 

-Press UP/DOWN navigation button to select preferred folder/file and press the 

ENTER button to enter a folder or play selected file. 

-Press LEFT/RIGHT navigation button to select preferred option and 

press ENTER button to confirm it. 

Summary of Contents for NTD-4050

Page 1: ...MODEL NO NTD 4050 39 5 CLASS WIDE SCREEN FHD LED TV WITH DVD PLAYER ...

Page 2: ...g with an extension cord receptacle or other outlet unless the blades can be fully inserted to prevent blade exposure Do not expose this appliance to rain or moisture CAUTION b RISK OF ELECTRIC SHOCK DO NOT OPEN J iiRISQUE DE CHOC ELEC TRIOUE NE PAS OUVRIR Important Safety Instructions Read these instructions Keep these instructions Heed all warnings Follow all instructions Please unplug the TV po...

Page 3: ...s it will lead to product damage of the panel and cabinet Safety Do not place the LED TV on an unstable surface To avoid tripping or damage to the power cord do not place the power cord or cables across a walkway Do not overload the electrical outlet or extension cable The power plug should easily plug and unplug from the electrical socket Do not force the plug into out of the socket Do not disass...

Page 4: ...pports American TV Standards 8VSB Free 64 256QAM NTSC System ATSC System Connect directly to computer to achieve a TV monitor Zero X radiation complies with green environment protection requirement Advanced Chroma Processing Closed captioning Program Control SAP STEREO MONO ATSC HDMI input USB input Input terminals used for external equipment connection ...

Page 5: ...Toggles between all the available input sources MENU Press to see an on screen menu of your TV Press this button when the power is on the disc will eject Press it again the disc is pulled in automatically After placed a disc in the disc tray press this button to play the disc and press it again to pause STANDBY Press STANDBY button to toggle between normal and standby mode 1 2 3 5 4 7 6 2 8W 1920 ...

Page 6: ...ay the closed caption 14 MTS Press to select the audio channels 15 MENU TV system setup 16 SOURCE Press to change input source 17 ARROW buttons Use to move cursor up down left right 18 ENTER Validation key 19 EXIT Press to exit menu 20 ZOOM Press to change the screen scale 21 S MODE Press to cycle through the different sound settings 22 VOL Press to increase decrease the sound level 23 CH Press to...

Page 7: ...Press the third time and it repeats All Press the forth time and the repeat function cancel the Title below DVD T T 00 07CH 00 01 30 002 003 CD TRK 00 01 30 HDCP 01 15 ...

Page 8: ... as indicated Do not mix old and new batteries or different types of batteries 3 Close the cover Batteries should last for 1 year under normal use If you do not intend to use the remote control for a long period of time remove the batteries to prevent damage due to leakage Do not use old and new batteries together The batteries or battery pack shall not be exposed to excessive heat such as direct ...

Page 9: ...COAX OUT CVBS Y Pb Pr IN IN L R AC 100 240V 50 60Hz COAX OUT CVBS Y Pb Pr IN IN L R AC 100 240V 50 60Hz OUT OUT ...

Page 10: ... MP3 and Photo JPG multimedia files playback 2 This TV is compatible with most USB devices in the market However we cannot guarantee the compatibility of all USB devices due to multiple technology standards used COAX OUT CVBS Y Pb Pr IN IN L R AC 100 240V 50 60Hz COAX OUT CVBS Y Pb Pr IN IN L R AC 100 240V 50 60Hz OUT OUT ...

Page 11: ...Up to 1920 60Hz COAX OUT CVBS Y Pb Pr IN IN L R AC 100 240V 50 60Hz COAX OUT CVBS Y Pb Pr IN IN L R AC 100 240V 50 60Hz Not supplied OUT OUT 1080 ...

Page 12: ...Input Source AV YPbPr HDMI 1 HDMI 2 HDMI 3 VGA USB DVD TV Highlight Auto Scan press ENTER to search and store all available channels button control or STANDBY button on the LED TV ...

Page 13: ...SOUND ...

Page 14: ...ess Enter to display available devices Connect Turn on off the audio receiver Root Menu Press Enter button into the root menu CEC Control Device Auto Power Off Turn on off the device auto power off TV Auto Power On If this function is enabled the TV will power on autimatically after turningon an externally connected CEC device ...

Page 15: ...t Picture Mode Default Volume Max Volume Boot Source Boot Channel Channel Select won t work if no TV signals Hotel Lock turn on off Tuner Lock Keypad Lock or Menu Lock Power Save select desired Power Save time TV to USB export data to USB device USB to TV import data from USB device Reset Hotel Setting reset above hotel setting ...

Page 16: ...older file and press the ENTER button to enter a folder or play selected file Durning playback Press UP DOWN navigation button to play previous next photo Press LEFT RIGHT navigation button to rotate a photo counterclockwise clockwise Press EXIT button to return to Photo menu page Durning Playback Press INFO button to display hide the tool bar Music Playback Select the MUSIC tab on the USB page Pr...

Page 17: ...input source during DISC playback and then back to DVD input source again this unit will resume playback from the point where last playback was stopped if LAST MEMORY is ON 3 1 TV SYSTEM Select desired TV system 3 2 DEFAULT It is used to reset to factory settings STEREO MONO L R MIX MONO screen when a Multi angle disc is playing D IS C L A B E L SID E DVD ...

Page 18: ...e unit If the trouble persists contact the Customer Care Center see back page for contact details Please check antenna connection Station may be experiencing problems please tune to another station Please adjust the contrast and brightness settings Please check the power cord is plugged in and that the power outlet works Unplug the power cord plug it in after 60 seconds and restart the TV ...

Reviews: