background image

www.naxa.com  

Page 3

Before You Start

Please take note of the following before you start.

1)  Do not drop the unit. Avoid forceful shaking of the 

display to prevent damage or unusual operation.

2)  Do not touch the unit with metal or sharp

objects to avoid short circuit or damage.

3)  Schedule  regular  backup  of  your  data  to  prevent 

the  loss  of  important  data.  Always  backup  your
data before upgrading the firmware. 

4)  Do not disassemble. Do not wipe the surface of the 

unit with alcohol, thinner or benzene.

5)  Do not disconnect the tablet while it is formatting 

or  uploading/downloading.  Doing  so  may  corrupt 
your data. 

6)  Do not allow water or foreign objects to enter the 

tablet. 

7)  Do not use the tablet in places that are extremely 

hot, cold, dusty, or humid.

8)  Please charge your tablet when the Low Battery 

icon is displayed, system turns off automatically,
or keys are not responsive. 

9)  It is normal for the tablet to become slightly warm 

during the charging process.

10)  The USB port is for transferring data only. The port 

is not used to charge any devices. 

11)  Specifications are subject to change without 

prior notice.

Summary of Contents for NID-1055

Page 1: ...NID 1055 Instruction Manual Please read carefully before use and keep for future reference 10 1 Core Tablet with Android OS 10 BT Keyboard Keyboard Folio Case...

Page 2: ...her product material at our website Come visit us on the web at www naxa com and see all that we have to offer In the Box Please take a moment to make sure that you have ev erything in the list below...

Page 3: ...of the unit with alcohol thinner or benzene 5 Do not disconnect the tablet while it is formatting or uploading downloading Doing so may corrupt your data 6 Do not allow water or foreign objects to en...

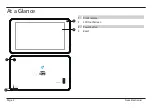
Page 4: ...Page 4 Naxa Electronics At a Glance 1 Front camera 2 LCD touchscreen 3 Power button 4 1 0 FCC ID 2AKAIMID10X 9 Micro SD CARD SLOT Reset 55...

Page 5: ...www naxa com Page 5 Memory Card Slot 5 Headphone Jack 6 7 Backspace ESC 8 Micro USB Port 9 Rear Camera 10 Microphone DC Jack 11 11...

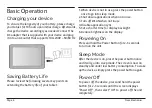
Page 6: ...use press the power button once to go into sleep mode 2 Shut down applications when not in use 3 Turn off WLAN when not in use 4 Disable application sync 5 Set a shorter time for display backlight 6 R...

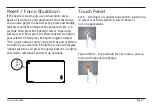
Page 7: ...n to confirm your selection Then press ESC button again to select Yes delete all user data and press the power button to confirm your selection Finally the screen will display reboot system now press...

Page 8: ...g browsing page and display screen Drag drag an icon to relocate the position Double Click Double click to enlarge or shrink the display size of the picture or while browsing a website Shut Use two fi...

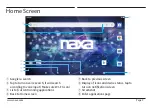
Page 9: ...oice search it will search according to voice input Make sure WI FI is on List of current running applications Back to Home screen Back to previous screen Display of icons and device status tap to tur...

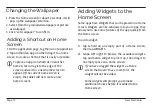
Page 10: ...Tap and hold an app icon then drag it to a home screen to create a shortcut that is easily accessible Adding Widgets to the Home Screen Some apps have Widgets that can be placed on a Home screen Widge...

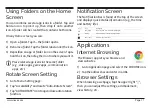
Page 11: ...1 Go to Menu Setting page 2 Tap Accessibility and locate Auto Rotate Screen 3 Tap AUTOROTATE icontoopen closeautorotation function Noti cation Screen The Notification Bar is found at the top of the sc...

Page 12: ...ion page and select G Mail 2 Click to compose an email 3 Type in the receipient s email address use when entering more than 1 address 4 Input a message subject 5 In the body compose your message 6 Tap...

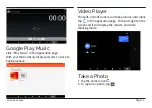
Page 13: ...c Library displayed select a track to begin playback Video Player The built in front camera can take pictures and videos Tap in the Application page then slide right on the screen and it will display...

Page 14: ...In camera and video mode tap to access the setup menu File Explorer Go to the Application page and select Files View a File In Files you can view and manage files in an memory card Internal Storage a...

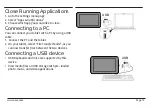
Page 15: ...nnecting to a PC You can connect your tablet with a PC by using a USB cable 1 Connect the PC and the tablet 2 On your tablet select File Transfer Mode as you can now transfer files between the two dev...

Page 16: ...networkingtechnologythat can provideinternet access at distances of up to 100 meters depending on the Wi Fi router and your surroundings To use Wi Fi you connect to a wireless access point or hotspot...

Page 17: ...dify its settings tap hold the network name You may want the tablet to forget a network if you don t want to connect automatically or if you no longer use the network Modify a network s settings to ch...

Page 18: ...d the tablet become damaged for something that was downloaded Troubleshooting 1 Can not Power on Connect the power cable to charge the device check back in a few minutes and try again If it still can...

Page 19: ...s should be retained for future reference 3 Heed Warnings All warnings on the product and in the operating in structions should be adhered to 4 Follow Instructions All operating and usage instructions...

Page 20: ...tective Attachment Plug The product may be equipped with an at tachment plug with overload protection This is a safety feature See the operating instructions for replacement or directions to reset the...

Page 21: ...here is no guarantee that interference will not occur in a particular installation If this equipment does cause harmful interference to radio or television reception which can be de termined by turnin...

Page 22: ...ctivity Headphone out 3 5 mm Built in microphone Built in stereo speakers 1 W Camera Rear 2 0 MP Front 0 3 MP Audio MP3 WMA FLAC APE OGG Video MPEG4 sp ASP WMV H 264 H 265 1080P Power adapter AC 100 2...

Page 23: ...in this manual Please also visit us on the web at www naxa com to get up to the minute news alerts and documentation for your device For additional assistance please contact Naxa Technical Support NA...

Reviews: