background image

10 

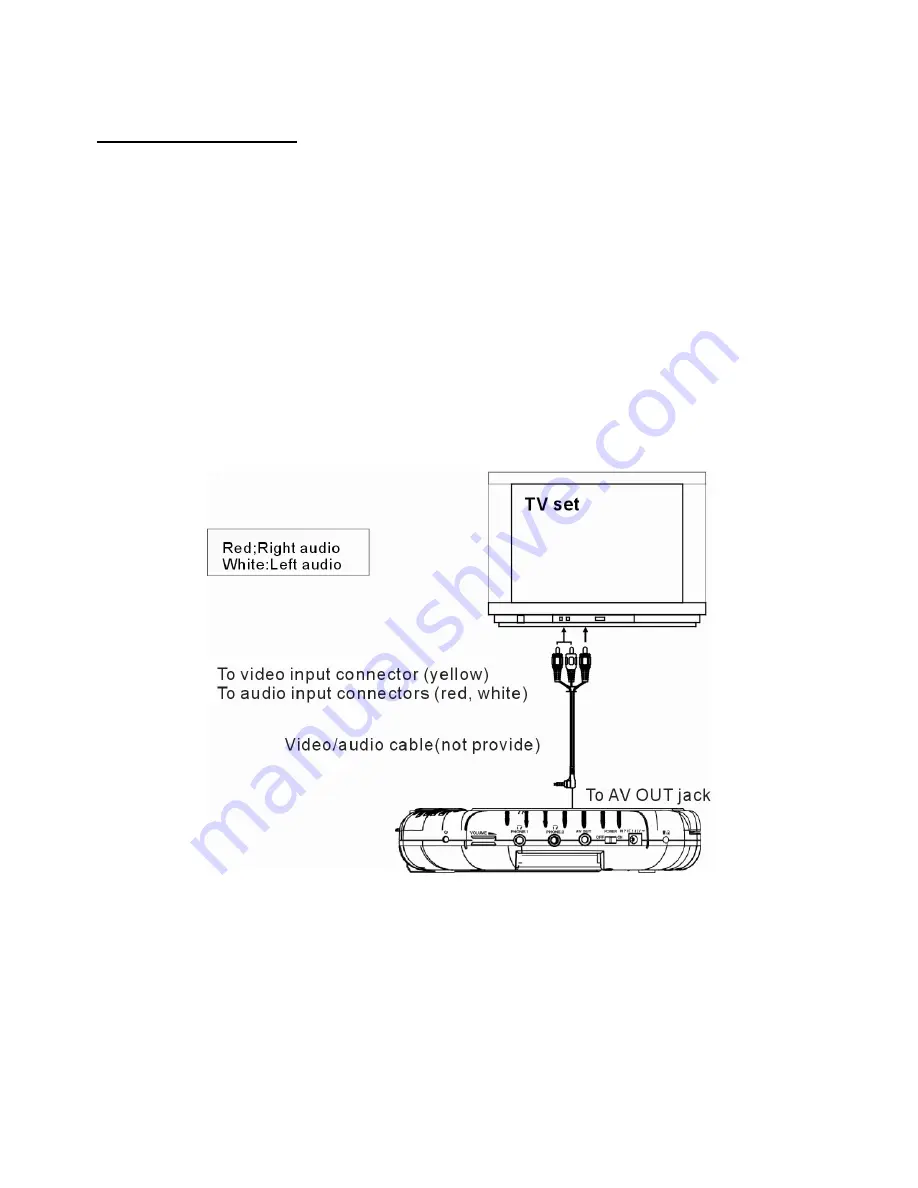
Connecting to TV set 

l


It is recommended to connect a multi-system TV. 

l


Disconnect the AC adaptor before commencing connection. 

l


Do not block ventilation holes of equipment and arrange them so that air can circulate freely. 

l


Read through the instructions before connecting other equipment. 

l


Ensure that you observe the color coding when connecting audio and video cables. 

Note: 

During DVD play, the TV volume may be at a lower level than during TV broadcasts, etc. If this is the 
case, adjust the volume to the desired level. If the DVD/VCD/CD player is connected to the TV through 
a video cassette recorder, the picture may not be played back normally with some DVDs. If this is the 
case, do not connect the player via the VCR. 

Summary of Contents for NCV-813

Page 1: ...Instruction Manual 7 DUAL SCREEN TFT LCD MULTIMEDIA ENTERTAINMENT SYSTEM MODEL NO NCV 813 BEFORE USING THIS PRODUCT READ UNDERSTAND AND FOLLOW THESE INSTRUCTIONS Save this booklet for future reference...

Page 2: ...OR SHOCK HAZARD DO NOT USE THIS PLUG WITH AN EXTENSION CORD RECEPTACLE OR OTHER OUTLET UNLESS THE BLADES CAN BE FULLY INSERTED TO PREVENT BLADE EXPOSURE TO PREVENT FIRE OR SHOCK HAZARD DO NOT EXPOSE...

Page 3: ...at a distance from the player LASER SAFETY This set employs an optical laser beam system in the CD mechanism designed with built in safeguards Do not attempt to disassemble Exposure to this invisible...

Page 4: ...ying Video CD with playback control 18 USB playback 19 CARD playback 20 On screen display information 21 Advanced Operation Program play 21 Repeat play 22 A B repeat play 22 TFT MODE 22 GO TO 22 Chang...

Page 5: ...screen USB CARD READER FUNCTION This player can play USB SD MMC card containing files in VCD SVCD DVD MUSIC WMA MOVIE JPEG CD format SLIDE SHOW IN 17 MODES MULTI AUDIO FUNCTION The audio soundtrack ca...

Page 6: ...enu for DVD or to turn on off the PBC for VCD 12 STOP button Press this button to halt playing 13 JAG Push it up to open the cover 14 PLAY PAUSE button Press this button to start or pause playing the...

Page 7: ...nguage for DVD 14 USB CARD DVD Press this button continuously to switch the unit among USB CARD DVD mode 15 N P button Press this button to select NTSC or PAL system for DVD only 16 OSD button Press O...

Page 8: ...back time depends on battery pack capacity and the temperature condition Generally speaking the battery needs to be charged about 2 hours in POWER OFF mode 3 Using and maintaining rechargeable battery...

Page 9: ...enu mode 4 RIGHT button Press it to move right to adjust the level of different OSD item higher in OSD menu mode 5 EXIT button Press it to exit the menu 6 BUILT IN SPEAKER 7 TFT screen display SIDE VI...

Page 10: ...9 2 Connecting to AC power source 3 Connecting to DVD player...

Page 11: ...fore connecting other equipment l Ensure that you observe the color coding when connecting audio and video cables Note During DVD play the TV volume may be at a lower level than during TV broadcasts e...

Page 12: ...1 Connecting to audio equipment Connect Headphones 1 Connect the Headphones Adjust the volume to minimize the volume Connect the headphones to phone jack 2 Adjust the Volume to the level that you want...

Page 13: ...le heat or throw the battery into the fire l Do not drop step on or otherwise impact the remote control This may damage the parts or lead to malfunction l If the remote control is not going to be used...

Page 14: ...to switch it to the ON position again you should wait at least 2 seconds otherwise some abnormal phenomenons may appear in this case please turn the unit off then turn it on it will work normally aga...

Page 15: ...g ahead or back Skipping ahead Press NEXT button during play A chapter DVD or a track Video CD CD is skipped each time the button is pressed Skipping back Press PREV button during play A chapter DVD o...

Page 16: ...folder you want to play by the navigation buttons and press the ENTER button to confirm 3 The files in this folder are displayed and select the desired song by navigation buttons then press the PLAY...

Page 17: ...ton to start playback 4 Press the NEXT or PREV button play the next or previous file 5 Press the GO TO button to play the disc from the certain point as you want to 6 Press the DISP button to display...

Page 18: ...elect any file to play SINGLE play one file only REPEAT ONE repeat one file REPEAT ALL all the files in the folder will be played repeatedly FOLDER OFF cancel repeat mode Skip to next previous picture...

Page 19: ...PBC status on the screen 2 After a few seconds a menu will appear on the screen 3 Press numeric buttons to select corresponding track if the track number is under 10 choose one of the numeric buttons...

Page 20: ...TER button to confirm 5 The files in this folder are displayed and select the desired file by navigation buttons then press the ENTER button to start playback 6 Press NEXT or PREV button to turn the c...

Page 21: ...enu page 7 Press REPEAT button to change repeat playing mode SHUFFLE All the files will be randomly sorted and played by the order RANDOM randomly select any file to play SINGLE play one file only REP...

Page 22: ...on the menu to see the next page Up to 20 memories can be stored NOTE Leading zero is not necessary If the track number is more than 10 press the 10 key first and then the unit digit Example Track 12...

Page 23: ...ottom at right of screen will display as the picture at right Press this button continuously to select BRIGHTNESS CONTRAST SHARPNESS SATURATION HUE or screen mode 16 9 4 3 Then press the LEFT or RIGHT...

Page 24: ...roll across the enlarged picture Changing audio soundtrack language DVD VCD CD disc It is possible to change the audio soundtrack language to a different language from the one selected at the initial...

Page 25: ...entered it is retained in memory until changed the player can always be operated under the same conditions l The settings will be retained in the memory until the settings are changed even after setti...

Page 26: ...creen when a Multi angle DVD disc is playing Options On Icon will be displayed Off Icon will be turned off 1 4 OSD LANG It is used to choose the desired language for different user In this player you...

Page 27: ...veness 2 2 EQUALIZER It is used to compensate for frequency distortion to improve its frequency response in audio systems not applicable Options SOUND MODE It is for selecting the Equalizer Type in th...

Page 28: ...a CD Angle Recorded onto some DVD discs are scenes which have been simultaneously shot from a number of different angles the same scene is shot from the front from the left side from the right side e...

Page 29: ...r 12 cm double sided single layer 8 cm single sided single layer 8 cm single sided dual layer 8 cm double sided single layer 2 Compact disc VIDEO CD 12 cm disc 8 cm disc Video output level 1 Vp p Audi...

Page 30: ...The batteries are exhausted replace them with new ones l Point remote control at the remote control sensor and operate l Operate the remote control unit at a distance of not more than 6 m from the re...

Page 31: ...ch will not cause distortion If you wipe the discs using a circular motion circular scratches are likely to occur which will cause distortion If the disc is brought from a cold to a warm environment m...

Reviews: