background image

www.naxa.com  

Page 7

Operating Instructions


The Naxa HD Dash Cam can record video, take photos, 

preview and and be ultilized as a PC camera .

Select the function you would like to use and please

remember to insert a Memory card before using. 


Power 

A) Use supplied Li-ion battery and place in battery 

compartment [8]. Dash Cam can be activated

after it has been placed on a vehicle by pressing the

Power Switch [11] for 3 seconds and turn off by pressing

it again. 

B) Connect with Car Charger. Dash Cam will record 

automatically when the car starts. When the car turns

off, it will save the last file and shut down. 


Recording

The Dash Cam will enter the default recording mode 

when it is turned on. The work indicator will flash to 

let you know its recording. The recoding file will save

to the Memory card. To stop, press the recrod

[12] button.  


Camera Mode

Turn on the Dash Cam and press the Mode Button [17] to 

enter the Camera Mode. Press the Snap button [12] to 

take a photo. 


Preview & Delete

Turn on the Dash Cam and press the Mode Button [17] 

twice to enter Preview Mode. Press Up [16] or Down [15]

to select the preview file. To playback a video, press the 

REC button [12] to pause or resume playback. If you want 

to delete the file, press the Menu button [14] to enter

Delete mode and you can select All or specific files by 

using the UP/DOWN buttons and pressing REC to confirm

deletion. You can also select Thumbnail Mode and Volume

(from 1 to 6) under the Preview Mode. 

Turn on the Dash Cam and press the Menu Button [17]

under Video Mode or Camera Mode to enter the setting 

interface. Confirm by pressing the REC button [12]

and selecting UP/DOWN for the following setting. Press 

the Menu Button again to exit when completed. 


Function Settings

Summary of Contents for NCV-6001

Page 1: ...Portable HD Video Dash Cam NCV 6001 Instruction Manual Please read carefully before use and keep for future reference ...

Page 2: ... to technology thank you for choosing us here at Naxa Electronics Established in 2001 in Los Angeles CA we are dedicated to delivering products that entertain and delight Please take a moment to make sure that you have everything in the list below Although we make every effort to ensure that each Naxa device is securely packed and sealed we know a lot can happen in between us and you If antyhing i...

Page 3: ...ing instructions should be adhered to 4 Follow Instructions All operating and usage instructions should be followed 5 Cleaning Unplug this product from the wall outlet before cleaning Do not use liquid cleaners or aerosol cleaners Use a damp cloth for cleaning 6 Attachments Use only attachments recommended by the manufacturer Use of other attachments may be hazardous 7 Water and Moisture Do not us...

Page 4: ...t plug that has the same overload protection as the original plug as specified by the manufacturer 14 Lightning For added protection for this product unplug it from the wall outlet during a lightning storm or when it is left unattended and unused for long periods oftime This will prevent damage to the product due to lightning or power line surges 15 Overloading Do not overload wall outlets extensi...

Page 5: ...g The product should be mounted to a wall or ceiling only as recommended by the manufacturer 22 Heat The product should be situated away from heat sources such as radiators heat registers stoves or other products including ampli WARNING This product contains lead a chemical known to the State of California to cause cancer and birth defects or other reproductive harm Wash hands after handling www n...

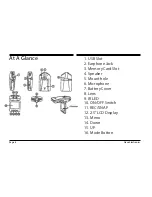
Page 6: ...B Slot 2 Earphone Jack 3 Memory Card Slot 4 Speaker 5 Mount hole 6 Microphone 7 Battery Cover 8 Lens 9 IR LED 10 ON OFF Switch 11 REC SNAP 12 2 5 LCD Display 13 Menu 14 Down 15 UP 16 Mode Button Naxa Electronics Page 6 ...

Page 7: ...ding file will save to the Memory card To stop press the recrod 12 button Camera Mode Turn on the Dash Cam and press the Mode Button 17 to enter the Camera Mode Press the Snap button 12 to take a photo Preview Delete Turn on the Dash Cam and press the Mode Button 17 twice to enter Preview Mode Press Up 16 or Down 15 to select the preview file To playback a video press the REC button 12 to pause or...

Page 8: ...t the Dash Cam to a computer by using the supplied USB cable A removeable disk will appear on your PC and you can now transfer the files stored from the Dash Cam Naxa Electronics C Setting Mode Whether under Video Mode or Capture Mode press the Menu Button twice to enter the Setup interface 1 Format Select if you want to Erase the Memory Card 2 Language Select English Simplified Chinese Traditiona...

Page 9: ...Resolution 1280x960 720x480 640x480 pixels 2 Video Format AVI 3 Repeat Storage by selection 1 3 5 10 minutes 4 Power Source Rechargeable Battery or 12V 24V Car Charger 5 Supports Memory Card 1GB to 32GB Max 6 Microphone Built in 7 2 5 LCD 270 Degree Swirl Specifications Note 1 Please insert the Memory card before recording 2 This Dash Cam records in cycles of 1 3 5 10 minute intervals If storage i...

Page 10: ...Page 10 NCV 6001 V1 0 ...

Reviews: