background image


14 


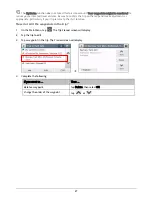
2.


Tap Large vehicle and then select On. 

3.


On the prompted screen, tap Yes. Read the warning message and then tap OK. 

4.


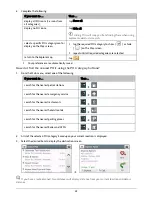
Complete the following: 

If you want to … 

Then … 

set the details for your large 
vehicle, 

enter the following data of the vehicle: 

ƒ


total truck weight


ƒ


maximum axle weight


ƒ


total truck length


ƒ


maximum truck width


ƒ


maximum truck height


You must complete the details of the settings before you 

can use Large vehicle mode to plan your route.


set how you want to receive the 
speed limit alerts, 

tap Speed limit display / Speed limit alerts to turn it on or off. 

5.


The Large vehicle mode is turned on. Your route will be displayed using the Large vehicle icon: 


Summary of Contents for MY ESCAPE Series

Page 1: ...MY Series MY ESCAPE Series Hardware User Manual...

Page 2: ...familiarise yourself with your device and its operation On main roads the distance to an exit calculated by your Navman may be further than the distance shown on road signs Road signs show the distan...

Page 3: ...ay burst or explode if mishandled releasing hazardous chemicals To reduce the risk of fire or burns do not disassemble crush or puncture the battery Recycle or dispose of the battery safely and proper...

Page 4: ...lease check the marking labels on your Navman and refer to the corresponding statements in this chapter Some notices apply to specific models only The user needs to switch off the Navman when exposed...

Page 5: ...the power switch 10 How do I charge the battery 11 How do I charge the battery in a vehicle 11 How do I charge the battery via my computer 11 How do I charge the battery at home or work 11 How do I in...

Page 6: ...scribe user actions Term Description Press Press and release a button quickly Tap Press and release an item displayed on the touch screen Select Tap an item in a list or tap a command from a menu Disc...

Page 7: ...reception In this instance please mount your Navman where there is a clear area usually just beneath the rear view mirror To protect your Navman against sudden surges in current connect the in car ch...

Page 8: ...ion via the in car charger which is used as an antenna Please ensure your car charger is connected to your Navman and power source to receive TMC live traffic information For information on using traf...

Page 9: ...on n Power button o Slot for microSD memory card p Cradle slot q Screw holes for securing the cradle r Speaker s Touch screen t Microphone not on all models u Connector for in car charger USB cable ho...

Page 10: ...then tap Sleep Your Navman will enter a suspended state When you next turn it on your Mio will return to the last screen that you used To lock the screen press the Power button briefly and then tap L...

Page 11: ...attery in a vehicle To charge your Navman in a vehicle plug the in car charger into on the attached cradle and the other end into the vehicle power socket How do I charge the battery via my computer 1...

Page 12: ...card slot 2 Hold the microSD card by the edges and gently insert it into the slot as shown in the above diagram of your Navman Do not apply pressure to the centre of the memory card 3 To remove a car...

Page 13: ...e If a memory card is inserted in the device it is also recognised as an external storage device a removable disk A USB Connection screen appears to prevent you from using your Navman DO NOT delete an...

Page 14: ...obile phone If your Navman isn t paired with your mobile phone then the Bluetooth screen will display Not all phones with Bluetooth wireless technology are compatible with your Navman For a list of co...

Page 15: ...n or snow may have a negative effect on your reception To obtain a faster GPS fix ensure car is stationary and battery is fully charged once per month Caring for your Navman Taking good care of your N...

Page 16: ...to the sky If this fails to resolve the issue please reset the GPS chip through the Settings menu of your unit If the fault is still not resolved please visit our self help site see the information be...

Page 17: ...MY ESCAPE Series Software User Manual MY Series...

Page 18: ...How do I search for a POI 20 How do I find the nearest POIs 20 How do I search for a POI by type 23 How do I search for a POI by Smart Find Keyword 24 How do I create a trip with multiple stops 26 My...

Page 19: ...h for a POI using TrueLocal com au 47 How do I receive weather information using NAVMAN CONNECT 48 How do I search for roadside assistance 49 How do I control my Navman using Voice Command 50 How do I...

Page 20: ...1 CONNECT 85 For more information 87 Online support 87 Navman Customer Support 87 Speed Limit 87 Safety Camera POIs 87 Point of Interest categories 87 Traffic and other TMC Events 90 Third party recip...

Page 21: ...nguage Read the Safety Agreement message To confirm that you have read and understood the message tap Accept Due to legal requirements this Agreement must always be selected It cannot be turned off 6...

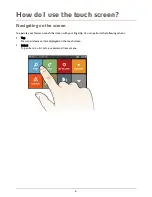
Page 22: ...gating on the screen To operate your Navman touch the screen with your fingertip You can perform the following actions Tap Press and release an item displayed on the touch screen Select Tap an item in...

Page 23: ...imulation mode Plan the routes to avoid tight bends and low bridges while driving a large vehicle e g a truck Set your Navman to avoid the Four wheel tracks or not and to display hide the POIs along t...

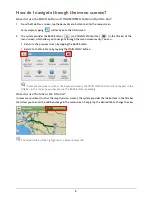
Page 24: ...y You can Return to the previous screen by tapping the BACK button Return to the Main Menu by tapping the MAIN MENU button In some menu screens such as the Keyboard screen the MAIN MENU button will no...

Page 25: ...oard screen can display with various layouts depending on the information you need to enter including alphabet number alternate characters and combinations of these How do I enter characters numbers T...

Page 26: ...ND wizard allows you to search the location easily 1 On the Main Menu tap to display the FIND screen 2 Complete the following If you want to Then search all information on the device city streets name...

Page 27: ...ical operation on your Navman 1 On the Main Menu tap Complete the following to navigate to a street address that you know using the FIND wizard 2 On the Destination screen complete the following If yo...

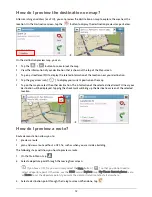
Page 28: ...tion The information of the selected street area POI near your destination will be displayed Tapping the check mark will bring up the Destination screen of the selected location How do I preview a rou...

Page 29: ...options 3 Tap Mode and then select Walking Your route will be displayed using the walking icon Large vehicle mode This feature is designed for large vehicles especially for the vehicles up to 9 tones...

Page 30: ...f the vehicle total truck weight maximum axle weight total truck length maximum truck width maximum truck height You must complete the details of the settings before you can use Large vehicle mode to...

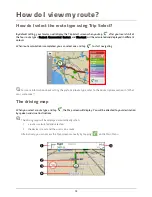
Page 31: ...can select one and tap to start navigating For more information about setting the preferred route type refer to the Route Options section in What can I customise The driving map When you select a rou...

Page 32: ...Limit icon on the Map screen The Speed Limit icon shows the speed limit of the current road If greyed out you are below this speed limit When over set limit you will be warned with an audible and vis...

Page 33: ...unmute tap The speaker icon indicates the status muted unmuted The volume buttons will automatically disappear after the map is idled for 5 seconds How do I zoom in out the map 1 From the Map options...

Page 34: ...ime to destination distance to go estimated time of arrival distance travelled time taken for trip stationary time How do I view the traffic status on my route Traffic information is not available on...

Page 35: ...e information and provide a more personalised route and accurate time of arrival the next time you plan a trip For more information about Smart Route and My Drive settings refer to the Route Options s...

Page 36: ...enu tap The Explore screen will display 2 On the Explore map you can View the information of the selected POI that is shown at the top of the screen Tap and drag the map to explore your desired local...

Page 37: ...ocation will be saved in My Places immediately explore the map tap place a phone call to the POI tap This feature is not available on all models Points of Interest POIs are grouped into categories You...

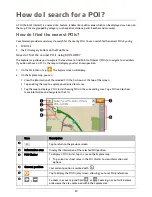
Page 38: ...eferences are automatically saved How do I find the nearest POIs using the POI category buttons 1 From the Main menu select one of the following If you want to Then search for the nearest petrol stati...

Page 39: ...enu tap 2 Tap The Find a POI screen will display 3 Complete the following If you want to Then search for the POIs near your current location tap search for the POIs in a specified city or area tap The...

Page 40: ...Tap the desired item from the list 6 Complete the following If you want to Then calculate the route and start navigating tap The Map screen will display save the location as a favourite tap The locat...

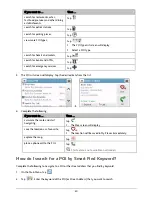
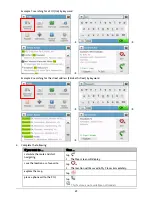
Page 41: ...eyword 3 Complete the following If you want to Then calculate the route and start navigating tap The Map screen will display save the location as a favourite tap The location will be saved in My Place...

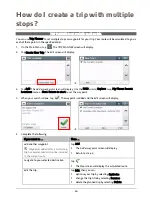
Page 42: ...y Places Recent Locations menu or Here Return to start to set the waypoint 4 When your search is done tap The waypoint is added and the Edit screen will display 5 Complete the following If you want to...

Page 43: ...stments as appropriate particularly if your trip returns to the start location How do I edit the waypoints in the trip 1 On the Main Menu tap The Trip Planner screen will display 2 Tap the trip to edi...

Page 44: ...Edit screen will display Tap The location has been set as Home How do I navigate to a location I have saved 1 On the Main Menu tap The My Places screen will display Tap the Sort by button on the top...

Page 45: ...ddress easier your Navman will automatically save all your start locations and destinations in a list of recent places 1 On the Main Menu tap The My Places screen will display 2 Tap The Recent Locatio...

Page 46: ...more information about importing the NavPix to your Navman refer to the Photo Album section in What is the NavDesk 1 On the Main Menu tap The My Places screen will display 2 Tap NavPix 3 From the list...

Page 47: ...en and start navigating How do I edit the NavPix 1 From the Album screen tap the thumbnail of the NavPix The NavPix will appear in full screen 2 Tap The NavPix Details screen will display 3 Complete t...

Page 48: ...e GPS co ordinates have been saved The location is saved in My Places How do I capture a journey To enable capturing of journeys you must first enable Capture Journey from Main Menu Route options For...

Page 49: ...he captured destination you want to travel to The Preview screen will display 3 Tap Your Navman will calculate the route from your current location The Map screen will display How to view a journey I...

Page 50: ...ion via the FM Radio Data System RDS FM radio stations transmit TMC data on a cycle of several minutes with hundreds of events able to be broadcast to TMC receivers You have to pay for TMC service in...

Page 51: ...iption or may require the Traffic Accessory Kit may be sold separately Item Description Tap to return to the previous screen Current position Your current position is marked with Event icon Displays i...

Page 52: ...l traffic events screen tap the event you want to view The Event Details screen will display Item Description Tap to return to the previous screen Event icon and description Displays details of the Ev...

Page 53: ...n This Event is not locatable This clearance is not locatable A specific location for the Event cannot be identified This Event does not affect your route This clearance does not affect your route The...

Page 54: ...tation from the list You can select Automatic to receive the traffic signal automatically Accept recommended detours automatically When the Accept recommended detours is selected your route will be re...

Page 55: ...curacy of the data contained within this database either expressed or implied How do I search for a POI in a city I am visiting using Travel Book 1 On the Main Menu tap The TRAVEL GUIDES screen will d...

Page 56: ...nal screen to display video playback from an external composite video source The AV IN function supports NTSC PAL interlace formats 1 Before you use the AV IN function connect your Navman to an AV ext...

Page 57: ...t the Bluetooth on your Navman will be turned on automatically To save power Bluetooth is set to OFF by default A list of compatible mobile phones is listed at www navman com au Australia or www navma...

Page 58: ...ernet settings screen will display 3 Complete the following If you want to Then configure the Internet settings by mobile phone s setting tap Automatic copy from phone change the operator for your reg...

Page 59: ...he last digit entered tap To clear the entire number tap and hold The number of the last call will display when you next access the Dial screen The number will be cleared as you start entering a new n...

Page 60: ...r reject the incoming call by simply saying Answer or Ignore In call options 1 When a call is in progress the in call screen will display as below 2 Complete the following If you want to Then display...

Page 61: ...history From the Call History screen you can view a list of Incoming Calls Outgoing Calls and Missed Calls The Call History screen lists the calls made during the time your Navman is connected to a m...

Page 62: ...charges are billed by your service provider Please check with your service provider for more information How do I search for a POI using Google Local Search 1 On the Main Menu tap The Google Local Se...

Page 63: ...earch for a POI then tap OK search for POI information near your current location tap the Near field to Select My Places to search for a POI information near a My Place location Select Find a Place to...

Page 64: ...nformation The Weather Information screen for the selected city will display 3 Depending on the city you have selected a range of current and forecast weather and temperature information may be displa...

Page 65: ...tion 1 On the Main Menu tap 2 Tap Yes to set the home base before using this service 3 Select your home base from the list 4 The Assistance Details screen will display 5 Complete the following If you...

Page 66: ...beep sound Address Home Intersection My Places Nearby Parking Nearby Food Nearby Hotels Motels Nearby SOS Nearby Cash Nearby Petrol Nearby Airport Library Zoo 3 Follow the prompts to finish your route...

Page 67: ...en options and the order of the options may differ depending on your region maps installed or model of Navman While changing the settings the checkbox next to the option indicates the setting status o...

Page 68: ...en the brightness scale is set high therefore use lower brightness whenever acceptable You can simply tap on the brightness bar so that the screen brightness will be set immediately at the position yo...

Page 69: ...ive the camera and safety alerts tap Speed Camera Mobile Speed Camera Red Light Camera Accident Black Spot School Zone Railway Crossing Speed Check to select No alerts Visual alert Visual Audible aler...

Page 70: ...fter your search Then you have to select one route type on the map to start navigating set types of road options for your route tap Types of road The Types of road screen will display Select your road...

Page 71: ...lable only when the Map option is set as 2D view mode display no entry icons on no entry roads on the Map screen tap Show no entry road signs to turn it on or off When turned on the map display perfor...

Page 72: ...is the NavDesk Complete the following If you want to Then change the on screen language tap Language and select your preferred language from the list change the voice scheme tap Voice and select your...

Page 73: ...rmat and then select your preferred date format type Time Zone Complete the following If you want to Then set the time zone automatically select Auto time zone change the time zone manually select Man...

Page 74: ...p Meter The Trip Meter option displays the information of your trips display the current trip display all trips Device Complete the following If you want to Then delete the saved information on your N...

Page 75: ...ent country and is still trying to establish the previous position record a GPS log of your trip tap GPS logging to turn it on or off Demo Demo will begin when the device is connected to power via gen...

Page 76: ...Then view the tutorial tap View Tutorial To display the tutorial on each start up select the Show tutorial on start up option on the initial screen of tutorial view copyright and trademark informatio...

Page 77: ...re you begin Ensure that your computer meets the minimum system requirements for NavDesk especially i Ensure that Internet Explorer 6 or higher is installed on you computer before you install NavDesk...

Page 78: ...at the back of your computer Slide the Power switch to the ON position to turn on your Navman A USB Connection screen will display on your Navman 7 If prompted to update your Navman software follow th...

Page 79: ...with multiple waypoints on your computer and then save the trip to your Navman MY NAVMAN A collection of applications that allow you to customise or update your NavDesk You can also transfer data to f...

Page 80: ...my subscription NavDesk Activation 1 Enter your product key 2 Follow the prompts to activate your subscription How do I update subscriptions on my Navman The My Subscriptions section will display a li...

Page 81: ...ap Source section From the map Source section click Install Maps to install the selected map to your Navman Otherwise click Upwards to return to the Loadable Maps section My Navman A list of maps inst...

Page 82: ...has been inserted into your computer DVD drive and then click Open to display the Map Source section The maps already installed on your Navman are green The maps that are unlocked and ready to be inst...

Page 83: ...remove maps from my Navman 1 Open NavDesk and then click My Maps 2 From the My Navman section select the checkbox next to the map you want to remove 3 Click Remove Maps to remove the selected maps 4 C...

Page 84: ...port your own POI files These are called custom POIs Unlike preinstalled POIs custom POIs can be removed from your Navman and can have audio as well as visual alerts associated with them Various POI f...

Page 85: ...hic with a minimum size of 6x6 pixels and a maximum size of 32x32 pixels If you do not select a custom icon a default icon will display select the distance from a POI of this category at which the vis...

Page 86: ...o Album Component Description Desktop albums Displays a list of all albums stored in the NavPix library on your computer Click an album to display its contents in the Album display area Click View all...

Page 87: ...ing NavPix name latitude longitude description Rotate left Rotates the selected NavPix 90 to the left Rotate right Rotates the selected NavPix 90 to the right Delete NavPix Click to delete the selecte...

Page 88: ...to modify Click OK to save the changes delete a picture select the picture from the Album display area Right click and select Delete or click Delete on the toolbar What else can I do with pictures and...

Page 89: ...Flickr account to upload NavPix To create a Flickr account visit www flickr com save a picture to your computer select the picture from the Album display area Right click and select Export to disk or...

Page 90: ...y Navman checkbox receive a warning message before deleting an image from your NavPix library select Warn me when permanently deleting a NavPix from my library checkbox create a new folder every time...

Page 91: ...selected picture and then select Add to My Places from the shortcut menu Application Gallery Application Gallery is not available on all models Application Gallery is a NavDesk application that allows...

Page 92: ...the Available Settings section 2 Drag and drop the application to the Device Main Menu screen section 3 Click Save to Device The application is added to the Main Menu screen on your Navman Activation...

Page 93: ...Place locations by type and name If you want to Then sort My Place locations by type click Type on the My Places panel sort My Place locations by name click Name on the My Places panel How do I import...

Page 94: ...will open ready to send to your friends Your friend will receive the email with links to either save the image or to save the location in My Places in NavDesk If the location is a NavPix your friend...

Page 95: ...rom point and To point A list of planned routes will display in the Pre planned Routes section Display area Display the route on the map You can also plan your route directly on the map How do I pre p...

Page 96: ...ave this route The route is saved to the Pre planned Routes section and your Navman simultaneously How do I pre plan a route using the map 1 From the map displayed in the Display area click 2 The curs...

Page 97: ...our Navman s internal memory If you do not use a voice file you can remove it to free up space You can later reinstall it to your Navman if required 1 Click My Voices 2 Complete the following If you w...

Page 98: ...your Navman Your PIN must be between four and eight numerical digits 6 Click OK The PIN for your Navman has been set The Enter your PIN screen will now display on your Navman when you turn your Navman...

Page 99: ...lick Backup and Restore 2 Complete the following If you want to Then backup your Navman click Create new backup Select the data you would like to backup Click OK The backup will be saved to your compu...

Page 100: ...nection to recover keys Simply click the desired function button in the menu and then follow the prompts to complete the process How do I configure NavDesk Depending on your Navman model certain setti...

Page 101: ...into your computer plug the large end of the USB cable directly into a USB port on your computer not a USB hub plug the small end into on the bottom of your Navman Make sure you have an active Intern...

Page 102: ...rch services may vary 4 Enter your search criteria then click Search A list of search results will display For some countries you are required to accept the terms of use 5 Click next to the POI you wa...

Page 103: ...he data is in compliance with local laws and or regulations Usage is at your own risk Safety Camera POIs Navman products are designed to be used as an aid to safer driving You can receive messages to...

Page 104: ...l Fire Brigade Golf course Government office Grocery store Guest house Higher education Hospital Polyclinic Hotel Ice skating Important tourist attraction Information Tourist information office Librar...

Page 105: ...POI categories and the order may differ depending on your region maps installed or model of Navman Branded Points of Interest Branded Points of Interest are available on some maps These include well k...

Page 106: ...ugh to be considered a dangerous situation for example a minor accident has taken place Forecast An event is expected to occur on a route Restrictions There is a restricted flow of traffic on a route...

Page 107: ...which SUNA Products and or Services are installed and active remain at all times responsible for observing all relevant laws and codes of safe driving In particular you agree to only actively operate...

Page 108: ...tocopying recording or otherwise without the prior written permission of Navman Microsoft Windows Windows Vista Windows 7 and Internet Explorer are either registered trademarks or trademarks of Micros...

Reviews: