PARFOCAL ZOOM INSTRUCTIONS
PARCENTER ZOOM INSTRUCTIONS
Navitar Zoom lenses have the ability to be adjusted and keep the image in focus throughout the entire
travel of the zoom range. This is called parfocal or parfocusing the system.
=RRPWRWKHKLJKPDJQL¿FDWLRQSRVLWLRQ;RQWKH=RRP;RQWKH;=RRP
6HWWKH¿QHIRFXVLISUHVHQWWRFHQWHURIWKHDOORZDEOHPRYHPHQW
3. Adjust the working distance of the entire lens system to produce the best focus.
a. Do NOT change this position of the lens system for steps 4 and 5.
=RRPWRWKHORZPDJQL¿FDWLRQSRVLWLRQ;RQWKH=RRP;RQWKH;=RRP
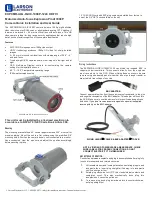
5. Adjust the rear conjugate (the distance from the rear of the lens to the camera’s sensor).
a. Some cameras have a focus screw to adjust this distance (see camera documentation).
b. Most Navitar adapter tubes have adjustable back ends to allow for this adjustment.
c. The adjustable lenses in Navitar’s adapter tubes are locked into place by a thumb screw
on the adapter tube. Do NOT attempt to open the adapter tube to gain access to this lens.
i. When adjusting the optics, loosen the thumb screw only to the point where
WKHRSWLFVPRYHIUHHO\,IWKHVFUHZFRPHVIUHHIURPWKHLQQHUFHOOLWLVGLI¿FXOW
to get back into place properly.
6. Check to see that the system now stays in focus throughout the entire zoom range travel.
Navitar Zoom lenses can be adjusted to line up the center of the sensor in the camera with the center of
the optical zoom. This allows the lens to provide an image on the screen that does not wander laterally
when the zoom is changed. This is called parcentricity, or parcentering the zoom.
1. Use an object with many details that will provide many points of interest on screen at the same time.
2. To determine the optical center of the zoom lens, watch the entire image on screen while rotating the
zoom ring back and forth quickly, so the image expands and contracts.
3. You should observe a spot or point on the overall image that does not move laterally as the
PDJQL¿FDWLRQLQFUHDVHVDQGGHFUHDVHV7KLVLVWKHRSWLFDOFHQWHU
4. Adjust the 3 set screws on the C-Mount Coupler so the camera moves over the optical center of
the zoom
5. This process may require a few adjustments to dial precisely in the center.
LIFETIME WARRANTY
All Navitar products are warranted to be free from defects in materials and workmanship for life. If the product is found
to be defective in materials or workmanship, Navitar will, at its option, repair or replace it without charge, subject to the
following limitations and exclusions:
ƒ7KLVZDUUDQW\H[WHQGVWRWKHRULJLQDOFRQVXPHUSXUFKDVHURQO\,WLVQRWWUDQVIHUDEOHRUDVVLJQDEOH
ƒ3URRIRISXUFKDVHPXVWDFFRPSDQ\UHWXUQHGSURGXFW
ƒ:DUUDQW\VKDOOQRWDSSO\WRDQ\SURGXFWZKLFKKDVLQ1DYLWDU¶VMXGJPHQWEHHQVXEMHFWWRPLVXVH
abuse, negligence,
accident or unauthorized repair.
ƒ 1R UHVSRQVLELOLW\ LV DVVXPHG IRU XQVDWLVIDFWRU\ RSHUDWLQJ SHUIRUPDQFH GXH WR HQYLURQPHQWDO FRQGLWLRQV
such as
humidity, dust, corrosive chemicals, deposition or oil or other foreign matter, spillage or other conditions beyond the
control of Navitar.
For service, repair or returns contact your distributor or Navitar directly
DWRULQWKH8QLWHG
States. Contact Navitar to obtain RMA #. Return product, prepaid with RMA# referenced, to:
Navitar, Inc.
200 Commerce Drive
For more information, visit:
Navitar.com
Rochester NY 14623