Navig8r NAV-GMBL3AXIS User Manual Download Page 5

GET TO KNOW THE STABILIZER 

The stabilizer is high-precision control device. When connected to the APP it has more face tracking, 

time-lapse function, etc. which can offer a more professional grade video. 

USB CONNECTION 


IN-USE CHARGING 

Connect the Micro USB Port on the side of 

stabilizer's handle to a power source such 

as a power pack (not included) to extend 

run-times

.


MOBILE CHARGING 


The USB port at the bottom of the stabilizer 

handle can be used for charging your 

Smartphone while in use on the Stabilizer. 
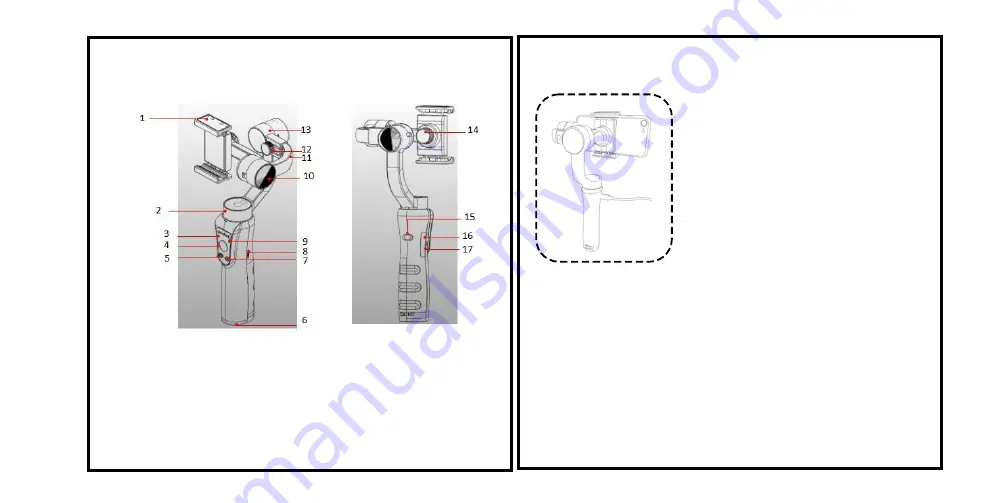


1.


Smartphone Clamp 

2.


Pan Motor 

3.


Battery Level Indicator 

4.


Joystick 

5.


Power ON/OFF 

6.


1/4 Thread screw 


8.


Shifter Lever 

(Zoom Control) 

9.


Status indicator 

10.


Tilt Motor 

11.


Arm Adjustment 

12.


Roll Balance Thumbscrew 


14. Smartphone Clamp 

Adjustment Knob 

15.Shooting 

16.


Micro USB Charging Port 

17.


Power Output Port 

(For charging of Smartphone) 


An L-shape charging connector is required 

when the Smartphone is mounted 

horizontally on the mobile clamp. 

(For extension poles or tripods) 13. Roll Motor 

7. MODE Select 

Summary of Contents for NAV-GMBL3AXIS

Page 1: ...User Manual 3 AXIS GIMBAL STABILIZER...

Page 2: ...8 Panel Introduction 10 Operating Mode 11 Changing Orientation 12 App Operation Bluetooth Connection 13 Product Specifications 14 PACKAGE LIST The product should be packed with following items includ...

Page 3: ...LOSSARY The following terms are used throughout the product literature to indicate various levels of potential harm when operating this product WARNING Procedures which if not properly followed may in...

Page 4: ...ed STORAGE 1 DO NOT leave the Stabilizer near heat sources such as a furnace or heater or expose inside of a vehicle on hot days 2 Store Stabilizer in dry environment and never store the Stabilizer in...

Page 5: ...ottom of the stabilizer handle can be used for charging your Smartphone while in use on the Stabilizer 1 Smartphone Clamp 2 Pan Motor 3 Battery Level Indicator 4 Joystick 5 Power ON OFF 6 1 4 Thread s...

Page 6: ...can greatly affect the torque output Place Smartphone to mounting clip as show Slide the Smartphone all the way to right until it touches Tilt Motor WARNING ALWAYS MOUNT YOUR CAMERA PRIOR TO POWERING...

Page 7: ...o switch the front and back lens Triple click to switch between photo and video Blue Light Enough Remaining Battery Power Flashing Low on Charge Micro USB Charging Port Power Output Port Micro USB Por...

Page 8: ...s menu Step 3 After connecting the stabilizer you can start taking photos or recording video 13 Connect to Bluetooth Connect to Stabilizer APP CHANGE ORIENTATION The Stabilizer comes with 2 different...

Page 9: ...where possible for this product if it Roll Angle Range 180 becomes defective within the warranty period This warranty will no longer Pan Angle Range 330 apply where the defect is a result of alterati...

Page 10: ...ve received your defective Laser product for inspection we will inform you of our assessment of your claim within 7 days When we contact you we will first let you know whether you have a valid claim u...

Reviews: