background image

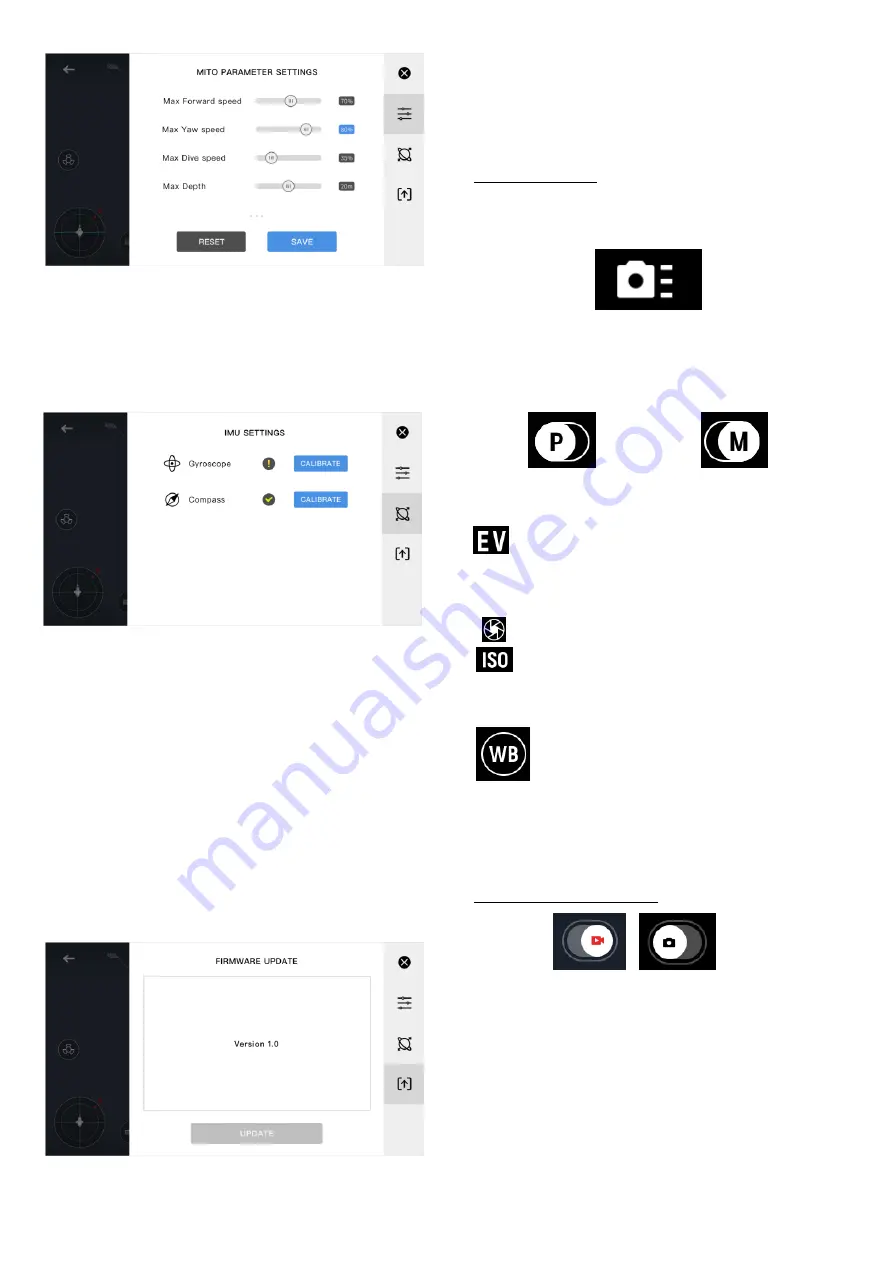
Figure 3.2 

– Vehicle Limiter Settings 


Once the values are set, click on 

“Save” 

to change 

the settings, or 

“Reset”

 to return it to the previous 

value. 

Figure 3.3 

– Vehicle Sensor Status and Calibration 

Page 


The second page is the calibration page. Each row 
contains  status  of  the  sensor,  and  a 

Calibrate 

button  that  would  pop  out  a  help  page  telling  the 
users  how  to  calibrate  Navatics  MITO.  It  is 
recommended  to  ensure  gyroscope  and  compass 
status  before  diving  to  ensure  best  performance 
from  MITO.  In  addition,  it  is  beneficial  to  regularly 
recalibrate  compass  to  prevent  drift  and  magnetic 
interference,  especially  when  diving  in  different 
spots. 

Figure 3.4 

– Firmware Update Page 


The  third  page  is  for  MITO  firmware  update. 
Pushing  the 

“Update”

  button  will  start  an  update 

sequence.  It  also  shows  the  curent  firmware 
version. 


Camera Settings 

Change  various  camera  settings,  such  as  the 
followings:


1. Exposure Mode


Users  are  able  to  configure  the  shooting  mode, 
between auto-mode (

P-mode

) or manual mode (

M-

mode

).  


In 

P-mode

, users can adjust: 

  Exposure Compenstation Value (-2.0 to 2.0) 


In 

M-mode

, users can adjust: 

Shutter speed (1/30 to 1/8000) 

ISO (100 to 6400) 


2. White Balance


In  White  Balance  settings,  users  can  select 
between 

Auto, 

Manual, 

Cloudy, 

Sunny, 

Incandescent light, 

and

 Fluorescent light. 


Camera/Recording Mode


Switch  between  photo  mode  and  recording  mode. 
In photo mode, users will be able to take 12M high 
resolution photos, and in the recording mode users 
can  record  high  resolution  videos.  Difference  in 
shooting  page  is  shown  in  Figure  3.5  and  Figure 
3.6  The  red  button  (Figure  3.5)  and  white  button 
(Figure  3.6)  are  record  and  capture  buttons 
respectively. 


Summary of Contents for Mito

Page 1: ...s provided to start MITO 1 To start MITO first open the battery chamber at the bottom part of Navatics MITO Connect the battery cable to the battery s waterproof connector then push the battery into t...

Page 2: ...4 2 for more details 4 Place MITO on a flat ground let is still and press calibrate gyroscope MITO will be restarted and the LED light will flash The calibration process runs for around 1 second each...

Page 3: ...d North Arrow shows where the North is relative to the users and the MITO icon shows where it is heading Pitch Indicator The MITO Icon shows MITO s current pitch attitude Depth Indicator The depth ind...

Page 4: ...hing the Update button will start an update sequence It also shows the curent firmware version Camera Settings Change various camera settings such as the followings 1 Exposure Mode Users are able to c...

Page 5: ...sor calibration in section 3 2 White indicates normal operating state of Navatics MITO 3 6 Viewing Pictures and Videos Once users took some videos and pictures they can view it in Navatics smartphone...

Page 6: ...oller will blink faster than in normal charging Navatics MITO tether roller is also equipped with solar charger adding 1 hour usage in bright sunny day Navatics MITO tether roller can be used while ch...

Page 7: ...diate radio frequency energy and if not installed and used in accordance with the instructions may cause harmful interference to radio communications However there is no guarantee that interference wi...

Reviews: