This document serves as a guideline to operate
Navatics underwater vehicle, MITO.
1.
Product Profile
2.1. Introduction
Navatics MITO is an underwater vehicle that can
be used to explore depths. It uses four highly
efficient thrusters to stabilize and maneuvre itself
underwater. It captures 4K videos and 12
megapixel photos, and is capable of carrying extra
payload without deterioriation in performance.
MITO boasts 4 knots (2 m/s) maximum speed. The
battery, designed to be replaceable, runs for 2
hours when fully charged. The tether floatation
comes with 4 hours runtime, equipped with solar
panel to extend usage duration.
2.1. Features Highlights
Navatics MITO is designed to be small and stable.
The size and battery capacity is designed to fit the
airlines specification for carry-on luggage.
Camera: MITO shoots 4K video up to 30 frames
per second, and 12 megapixel stills. The larger
sensor size improves MITO's low light performance.
Controller: Navatics MITO is equipped with four
thrusters that enables it to manuevre freely
underwater. It is capable of tilting up and down to
45
0
angles while holding its depth, heading, and
orientation. The controller is very simple, it is very
easy to pick up.
Video Transmission: Navatics MITO is equipped
with Sensethink's Senseplay video transmission
system, allowing it to transmit 1080p HD video at
30 fps from 500 m away.
2.
Underwater Vehicle: Navatics
MITO
This section introduces steps to setup and calibrate
MITO's array of sensors before using it.
3.1. Using Navatics MITO
3.1.1 Starting Up Navatics MITO
Navatics MITO comes with a tether floatation and a
Senseplay Race controller. It comes assembled
with propellers. The instructions below is provided
to start MITO.
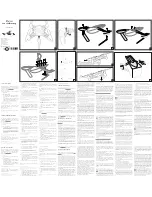
1) To start MITO, first open the battery
chamber at the bottom part of Navatics
MITO. Connect the battery cable to the
battery's waterproof connector, then push
the battery into the chamber to lock it in
place.
2) To turn it on, switch on the battery and
close the chamber.
3)
When started, MITO is going to check for
the states of its sensor. In the process, it will
turn on LED lights as an indicator, as well
as changing the color of LED ring to
indicate the process. Once all sensors are
calibrated, the LED lights will turn off and
the LED ring will turn white. If the process is
stuck,
find
the
Sensor
Calibration
instructions on section 3.2 on Sensor
Calibration
3.1.2 Starting Up Tether Roller
The tether roller is a floataion device that receives
the data from Navatics MITO and transmit it to
Senseplay Race remote controller. The steps to
start a roller is a following:
1) Next, connect the tether from the tether
floatation to the top connector of the robot
and turn on the tether by pulling up the
antennae
2) There are 2 LED indicators on the tether
roller, power indicator and signal indicator.
Blinking signal indicator shows that the
tether roller is ready to transmit video and
data to the remote controller.
3)
When using the tether roller, it is strongly
recommended to cover the Type-C charging
port with the provided rubber cover attached
to the charging port
3.1.3 Starting Up Remote Controller (Senseplay
Race)
The Senseplay Race remote controller is the
transciever device that allows Navatics smartphone
app to receive video from Navatics MITO, and
allows users to send control commands to Navatics
MITO. To use Senseplay Race controller, users
can follow the following step:
1)
If users have not bind the controller with
Navatics account, please check section
4 for account registration and device
binding
2) IF the device binding is completed, users