BHM
10/25/18
NTV-DOC257
Agreement
:
End user agrees to use this product in compliance with all State and Federal laws. NAV-TV Corp. would not be held liable for misuse of its product.
If you do not agree, please discontinue use immediately and return product to place of purchase. This product is intended for off-road use and passenger
entertainment only.
3 |
P a g e
Module Installation
1.
Remove the 4” media screen from the dashboard, above the CD player.
2.
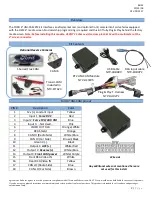
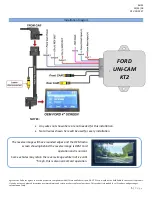
Connect the provided
Plug & Play T-Harness
to the OEM ford 12-pin plug previously
connected to the radio.
3.
After installing and running your reverse camera to the dash opening, connect your RVC signal to
the
Yellow
RCA found on the
Plug & Play T-Harness
.
Power your camera
with an ACC source
(OUTPUT 1 provides 12v ACC @ 1 amp MAX).
4.
Connect the UNI-CAM module to the 18-pin harness on the Plug & Play T-Harness.
5.
Connect the male end of the Plug & Play T-Harness to the screen and proceed to the next
section.
Ford 4” UNI
-CAM Programming & Testing
Programming for the 4” UNI
-CAM is automatic. After all connections are properly made and the module is
connected, turn the car on to
IGNITION
, wait for the radio to fully boot and settle before testing functionality.
NOTES:
•
The radio
may or may not
visually reboot
with a ‘Diagnosis’ message
. It may appear that the radio
just boots slowly (only the first time, in which case it took programming before the display
appeared).
•
Place the car into reverse, the screen should automatically display the connected reverse image.
NOTE: you must have a camera powered and connected (for Ford systems)!
•
This module VIN-LOCKS to the vehicle it is connected to and cannot be used on any other vehicle
once installed.
•
This module will
NOT
de-program rear camera, once this modification is made to the system, it will
remain forever!
LED Response
Description
1 flash
Waiting for Ignition…
(Turn ignition to ON)
2 flashes
Waiting for Vehicle VIN…
3 flashes
Query Vehicle
(Reading/decoding the VIN and vehicle components)
4 flashes
Programming…
5 flashes
Programming Complete
6 flashes
No Programming Needed
(Already programmed)
7 flashes
Radio Not Supported
8 flashes
Out of Licenses
(Contact NAV-TV to purchase more licenses)
While programming, refer to the chart below for LED flash representation.


