


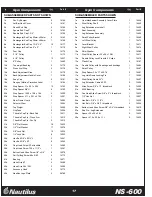


70
70
74
74
74
74
77
77
74
74
67
67
33
33
44
56
30
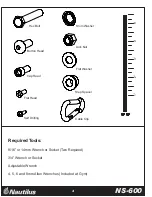
Low Pulley Cover
4 1/2" Pulley
Cable #4 - Pec Fly Cable
Hex Bolt 3/8" x 1 1/2"L Threadlock
Button Head Screw 1 3/4"L
3/8" Flat Washer
3/8" Lock Nut
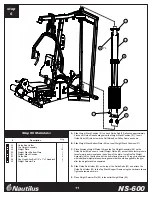
A.
Attach two 4 1/2" Pulleys (44) to either side of the Leg Extension Assembly using
the Low Pulley Cover (33) and the hardware shown. Note the orientation of the
Low Pulley Covers. Tighten hardware firmly.
B.
Attach the Cable #4 (56) termination to the left Pec Fly Cam using the hardware
shown. Be sure to place the groove in the termination bracket against the cam.
Tighten hardware securely.
C.
Remove the bracket and spacer from the other end of Cable #4 (56). Route the
Cable around the left Pulley in the Pec Fly Pulley Bracket (21) as shown. Proceed by
routing the Cable around the Pulley on the left side of the Leg Extension Assembly
as shown. Be sure that the Low Pulley Cover (33) does not interfere with the Cable.
D.
Route Cable #4 (56) around the 6" Pulley in the Pec Fly Double Floating Pulley
Bracket (30) and around the Pulley on the right side of the Leg Extension Assembly
as shown. Be sure the Low Pulley Cover (33) does not interfere with the Cable.
E.
Route Cable #4 (56) around the right Pulley in the Pec Fly Pulley Bracket (21) as
shown, and attach the cable termination to the right Pec Fly Cam using the hardware
shown. Be sure to place the groove in the termination bracket against the cam.
Tighten hardware securely. NOTE: If the cable termination does not reach the
connection hole on the cam, adjust the Pulleys in the Double Floating Pulley
Brackets to increase cable length.
TM
NS-600
15
Step #10 Materials:
step
10
#
Description
Qty.
2
2
1
2
2
6
2
33
44
56
67
70
74
77
1 1/2"L
1 1/2"L
1 3/4"L
1 3/4"L
21
126" (3200mm)


