background image

Page 4

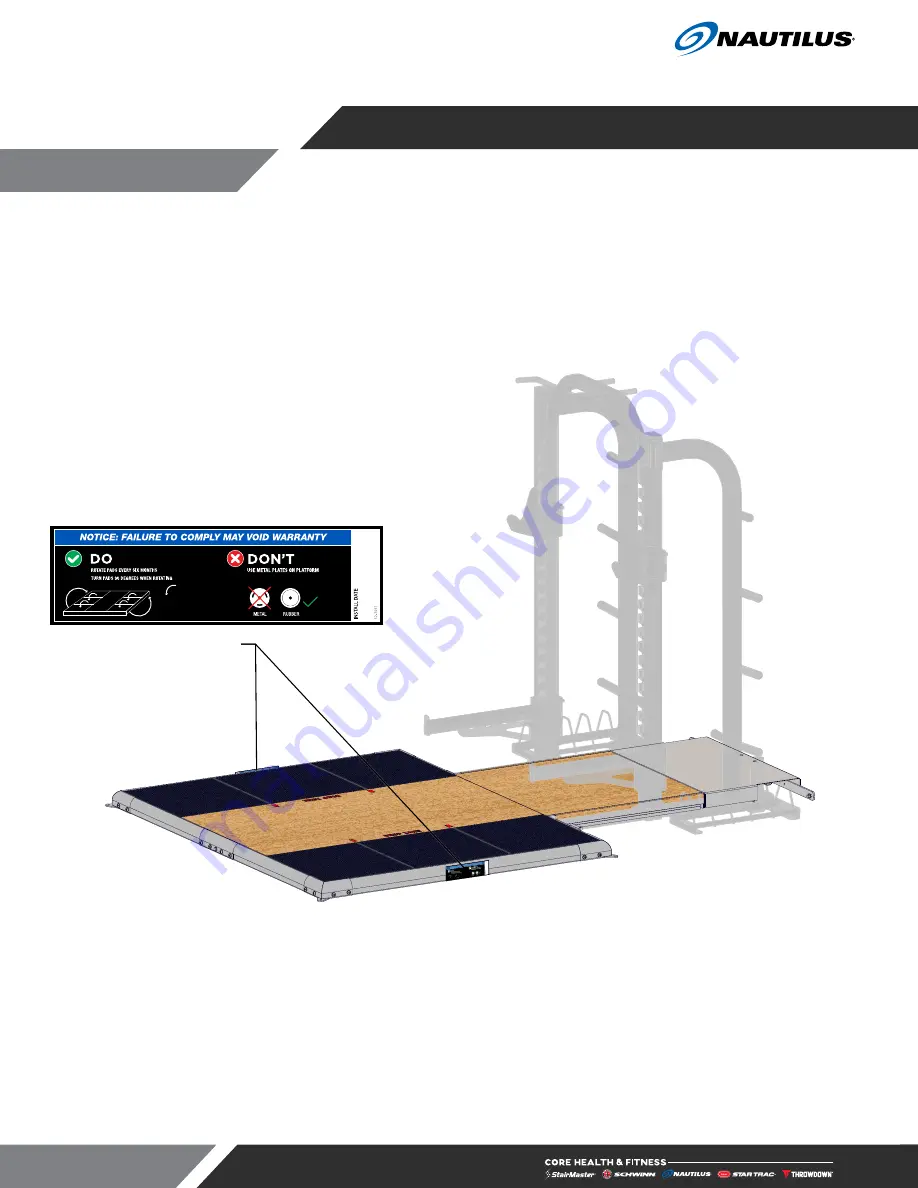
This page shows examples of the warning labels and communication stickers placed on the equipment as part of the manufacturing process. It is critical that own-
ers maintain the integrity and placement of these stickers. If you find any stickers missing or damaged the replacement numbers are shown on the support site. 
See Support and Service to order replacements.  NOTE: STICKERS AND LABELS ARE NOT SHOWN TO SCALE

N12-7051

IMPORTANT LABEL LOCATIONS

Fig. 2

Summary of Contents for CORE HEALTH & FITNESS HDP6D

Page 1: ...OWNER S MANUAL CORE HEALTH FITNESS HDP6D Dampened Platform ...

Page 2: ...age 1 TABLE OF CONTENTS IMPORTANT SAFETY INSTRUCTIONS 2 IMPORTANT LABEL LOCATIONS 4 PRODUCT SPECIFICATIONS 5 ASSEMBLY 6 TOOLS 6 PROCEDURE BB2 PLATFORM 6 PROCEDURE SA 13 MAINTENANCE 17 SUPPORT SERVICE 18 ...

Page 3: ...s or regulations www access board gov ada 2 This equipment is designed for use in a commercial gymnasium or health club To ensure the proper use of the equipment in a safe manner all users of the equipment should read this manual before using the machine This machine should be made a part of your club training program in order that the equipment is used by your members in a safe manner as intended...

Page 4: ...ent may be anchored or installed and differences in applicable local building codes Core Health Fitness is not responsible for any damage to the flooring that may result due to anchoring or installing equipment to the floor and for compliance with local building codes Only licensed contractors or certified installers should be used to insure proper anchoring installation and compliance with local ...

Page 5: ...uring process It is critical that own ers maintain the integrity and placement of these stickers If you find any stickers missing or damaged the replacement numbers are shown on the support site See Support and Service to order replacements NOTE STICKERS AND LABELS ARE NOT SHOWN TO SCALE N12 7051 IMPORTANT LABEL LOCATIONS Fig 2 ...

Page 6: ...241 cm 140 in 356 cm 4 in 10 cm 350 lbs 160 kg Fig 4 HDP6D BB2 SA HDP6D Dampened Platform Stand Alone Overall Weight2 Lifting Area Width Length Height Max User Weight 642 lbs 292 kg 76 1 x 95 x 4 in 193 3 x 241 3 x 10 2 cm 95 in 241 cm 77 in 196 cm 4 in 10 cm 350 lbs 160 kg 1 Shipping Weight Boxed 825 lbs 375 kg 2 Shipping Weight Boxed 716 lbs 325 kg PRODUCT SPECIFICATIONS ...

Page 7: ...URE BB2 PLATFORM 1 Install the trim tension rod into the rear of the top dampening platform Fig 5 2 Move the platform assembly built in Step 1 into position in the rack Fig 6 3 Use a 5 8 open ended wrench to secure the platform assembly to the rack using two 2 pieces each of the 7 16 flat washer and 7 16 x 7 bolt 5 8 Fig 7 ASSEMBLY ...

Page 8: ...de of the platform Fig 8 5 Use an 11 16 open ended wrench to turn the trim tension rod to secure the top and center platforms together 11 16 Fig 9 6 Use a 3 4 open ended wrench and 5 16 allen key to secure the rear platform brace to the rack using two 2 pieces each of the x 1 button head cap screw and nylock nut and four 4 pieces of the flat washer 3 4 5 16 Fig 10 ...

Page 9: ...form to the rack using two 2 5 16 black pine tree clips then finish securing the platform using a T10 TORX screwdriver and four 4 5 16 1 4 20 x 3 4 pan head screw T10 TORX Fig 12 9 Ensure that an end plug is inserted into the inside end of the back left and right weldment tubes Fig 13 ...

Page 10: ... M12 washer and M12 x 65mm bolt 18mm Fig 14 11 Use an 8mm allen key to secure two 2 nut plates to the inside of the front sleeve using four 4 pieces each of the M12 flat washer and M12 x 30mm button head cap screw DO NOT FULLY TIGHTEN 8mm Fig 15 12 Slide a front weldment tube into each side of the sleeve assembly built in Step 11 Fig 16 ...

Page 11: ... built in Step 13 to the center platform using one 1 piece each of the M12 flat washer 7 16 washer and 7 16 x 5 bolt 5 8 Fig 18 15 Use an 8mm allen key to secure a nut plate to the inside of the corner sleeve using two 2 pieces each of the M12 flat washer and M12 x 30mm button head cap screw DO NOT FULLY TIGHTEN 16 Repeat Step 15 three additional times to build a total of four corner sleeve assemb...

Page 12: ... Fig 20 19 Use an 8mm allen key to secure a nut plate to the inside of the corner sleeves located on the ends of the side tube assemblies built in Step 17 18 using two 2 pieces each of the M12 flat washer and M12 x 30mm button head cap screw DO NOT FULLY TIGHTEN 20 Repeat Step 19 for the other side tube assembly built during Step 18 x2 8mm Fig 21 21 Install the side tube assemblies onto the front ...

Page 13: ... platform frame 23 Install the six 6 middle pads onto the top of the rebond foam pads 24 Install the rubber mat wings textured side up onto the top of the middle pads Fig 25 25 Use an 8mm allen key to fully tighten the hardware from Steps 19 20 26 Assembly is Complete x4 8mm Fig 26 ...

Page 14: ...ps 1 2 onto one end of each of the front tube weldments then use an 8mm allen key to tighten the hardware to secure the corner sleeve to the front tube weldments 4 Repeat Step 3 to build a total of four 4 corner sleeve assemblies attached to front tube weldments x2 Fig 28 5 Use an 8mm allen key to secure two 2 nut plates to each front sleeve using four 4 pieces each of the M12 flat washer and M12 ...

Page 15: ...peat Steps 7 8 to build a total of two 2 of these assemblies x2 Fig 30 10 Use a 5 8 open ended wrench to secure one of the front tube assemblies to the bamboo platform using one 1 piece each of the 7 16 flat washer and 7 16 x 5 1 2 bolt Fig 31 11 Slide a side tube into each corner sleeve then use an 8mm allen key to tighten the hardware to secure the side tubes to the corner sleeves Fig 32 ...

Page 16: ...embly built in Steps 7 9 onto the ends of the side tubes DO NOT FULLY TIGHTEN Fig 33 13 Install the six 6 polyurethane rebond foam pads into the platform frame Fig 34 14 Install the six 6 middle pads onto the top of the rebond foam pads Fig 35 ...

Page 17: ...middle pads Fig 36 16 Use a 5 8 open ended wrench to secure the front tube assembly from Step 12 to the bamboo platform using one 1 piece each of the 7 16 flat washer and 7 16 x 5 1 2 bolt 17 Tighten the hardware from Step 12 using an 8mm allen key 18 Assembly is complete Fig 37 ...

Page 18: ...ly Weekly Monthly Bi Annually Inspect Fasteners X Labels X Frame X General Maintenance Rotate Dampening Pads X Cleaning Frame X Inspection Visual inspection of your units will insure a safe environment for your clients and alert you to any issues that may require maintenance prior to equipment failure Proper timely visual inspection is a critical component to the long term care of your product Fas...

Page 19: ... runs like new with a Core Advantage Preventative Maintenance or Extended Warranty Package Contact your service manager for more information servicecontracts corehandf com To request access visit SUPPORT COREHANDF COM General Inquiries Warranty Registration Preventative Maintenance Service Requests Parts Orders Automated partner payment Product technical library Transparency on service performance...

Page 20: ...ved Star Trac the Star Trac logo and StairMaster are registered trademarks of Core Health Fitness LLC Schwinn and Nautilus are registered trademarks of Nautilus Inc used under license to Core Health Fitness LLC Throwdown is a registered trademark of Throwdown Industries LLC ...

Reviews: