background image


CARE AND MAINTENANCE 


Care Instructions:


1.  Clean  any  dirt  and  debris  from  the  solar  panels.  The  panels  cannot  recharge  if 

obstructed. Use a soft cloth to clean the panels.    Do not use abrasives or chemicals 

that might scratch or damage the UV coating. 

2. In a region where snow and ice are likely, the batteries are required to be charged for at 

least 8 hours if the assembly is covered with snow for an extended period of time.


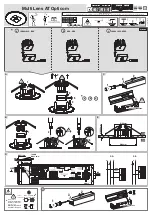
Battery Replacement:


Figure 8


Note:

 The batteries in your solar panel come 

preinstalled from the factory. 

1. (SEE FIGURE 8) Remove the screws from 

the underside of the solar panel housing. Solar 

panel housing is located on the top of the 

lantern assembly. 

2. Carefully lift the solar panel off the housing.   

Circuit wires are attached to the solar panel,     

Be careful not to disconnect the wires.   

Batteries compartment is located under the 

Solar panel. 


3. Remove old batteries. 

4. Replace old batteries with 3”AA” rechargeable Ni-Nh batteries. Reference polarity 

direction inside battery compartment. 

5. Replace the solar panel on the housing and Secure with screws retained from step 1. 

6. The rechargeable batteries need to be fully charged before operating light assembly. 

See ”Operation Solar Light” to restore solar light assembly to full operation.


Recycling


Please dispose of batteries properly. 

Consult your local telephone listings for a battery recycling center in your area. 


Summary of Contents for 23107

Page 1: ... choosing a Nature Power Product For future reference please complete the owner s record below Model _______________ Purchase Date _______________ Save the receipt and these instructions It is important that you read the entire manual to become familiar with this product before you begin using it ...

Page 2: ...ting Failure to follow the safety rules and other basic safety precautions may result in serious personal injury CAUTION Do not allow persons to operate or assemble this solar post lamp until they have read this manual and have developed a thorough understanding of how the solar post lamp works WARNING The warnings cautions and instructions discussed in this instruction manual cannot cover all pos...

Page 3: ...L M10 Nut Hex Nut 6 M Acorn Nut 3 N M10 Bolt 3 O J Bolts 3 P Mounting Plate 1 Part Detail Carefully remove the contents from the package If any parts are missing do not attempt to use the product until they have been obtained and correctly installed ...

Page 4: ...g M10 bolts N mounting plate P Flat washer K and hex Nut L Make sure the mounting plate flat washer and hex nut are secured to the hex bolt on the underside of the bottom of the planter base H Figure 3 2 SEE FIGURE 3 Attach the top planter base G To the bottom planter base H by lining up the 4 tabs and pulling the top planter base up until Tabs snap into place Turn the top planter base Clockwise t...

Page 5: ...mproper site selection weighting or stabilization of the Lamp Post is not covered by Warranty Alternate Ground Mounting Figure 5 1 SEE FIGURE 5 Thread hex nut L onto the J bolt O Make sure the hex nut is threaded down the j bolt far enough for the top of the J bolt to fit through the mounting plate P and the lamp post base F with enough threads to secure the base to the J bolts with acorn nuts M R...

Page 6: ...hrough the metal hanger B on the upper post C and twist clockwise to secure Note If using the planter base to mount the lamp post refer to Figure 4 before proceeding to the next step for lamp post assembly 3 Place the middle post D onto the lower post E and twist clockwise to secure 4 Place the upper post C onto the middle post D and twist clockwise to secure ...

Page 7: ...r day The number of hours of nighttime illumination is directly proportional to the number of hours of sunlight it receives If the light is placed in a shaded area it will not be able to fully charge and its duration of illumination will be limited Do not place the Lamp near other outdoor lighting like porch or street light it may deceive the auto sensor and keep the light from coming on or cause ...

Page 8: ...r panel housing Solar panel housing is located on the top of the lantern assembly 2 Carefully lift the solar panel off the housing Circuit wires are attached to the solar panel Be careful not to disconnect the wires Batteries compartment is located under the Solar panel 3 Remove old batteries 4 Replace old batteries with 3 AA rechargeable Ni Nh batteries Reference polarity direction inside battery...

Page 9: ... cleaning and be careful not to put too much pressure on the module while cleaning LIMITED WARRANTY Nature Power warrants our products to the original purchaser that this product is free from defects in materials and workmanship for the period of one year from date of purchase Dated Proof of Purchase is required Please contact Nature Power Products to acquire more information or technical support ...

Reviews: