


14
15
BASIC PRINCIPLES OF TELESCOPES
MAINTAINING YOUR TELESCOPE
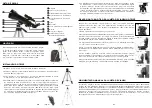
To collimate your portable telescope, simply turn the collimation handle behind the telescope (see
Figure 1). Turn this handle anticlockwise to focus on an object further away than the one you are
currently observing. Turn the handle clockwise to focus on an object closer than the one you are
currently observing.
Note:
remove the cover of the optical tube on the portable telescope before undertaking any observation.
Note:
if you are wearing corrective lenses (or especially glasses), you may find it useful to remove
them before undertaking any observations using an eyepiece fixed to the telescope. If you have an
astigmatism, you should wear your corrective lenses at all times.
Use of an optical instrument requires knowledge of certain elements so as to obtain the best pos-
sible image quality.
• Never look through a glass window. The glass in a domestic house window contains optical faults
and varies in thickness from one point to another. These irregularities risk affecting the ability to
collimate your telescope. In most cases, you will not be able to obtain a perfectly clear image and
you might even risk having a double image.
• Never look past or above objects producing a heat wave, particularly asphalt car parks during
particularly hot summer days, or even building roofs.
• Hazy skies, mist and fog risk making it difficult to collimate the telescope for land observation. The
details are much less visible in this type of conditions.
Note:
Your telescope has been designed for ordinary land and sky observations.
It is possible that traces of dust and/or moisture may accumulate on the lens of your telescope from
time to time. Ensure that you take the necessary precautions when cleaning the instrument to avoid
damaging the optical elements.
If you notice the presence of dust on the eyepiece, you can remove it with a spray of pressurised air.
Spray it for two to four seconds, tilting the spray towards the surface of the glass. Then use an op-
tical cleaning solution and a white paper handkerchief to remove any traces of residue. Pour a small
quantity of solution onto the handkerchief, then rub the optical elements. Use light movements,
moving from the centre of the eyepiece (or the mirror) moving towards the outside DO NOT rub in
a circular motion!
It is possible that sometimes some moisture may accumulate on the optical elements of your teles-
cope during an observation session. If you want to continue with the observation, you will need to
remove the moisture, either using a hairdrier (on the lowest setting) or by directing the telescope
towards the ground until the moisture evaporates.
COLLIMATION
GENERAL OBSERVATION TIPS
MAINTAINING AND CLEANING THE OPTICAL ELEMENTS
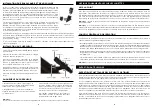
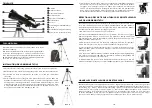
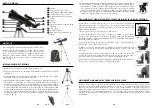
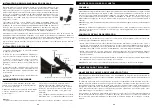
The star diagonal is a prism that diverts the light perpendicular to the tra-
jectory of the light entering the telescope. This permits a more comfortable
observation position than if you had to look directly in the tube. The back of
the portable telescope is an image rectifier that corrects the image by putting
it back in place with correct left-right orientation, which has the advantage of
facilitating the observation of land objects. Moreover, the star diagonal can
be turned into the position that suits you best. To install the star diagonal and
the eyepiece:
1. Ensure that the two screw handles behind the telescope tube do not exceed
the opening before installation, that the plug-in cap is removed from the opening
behind the telescope tube and that the caps are removed from the diagonal
cylinder. Insert the small cylinder of the diagonal into the back opening of the
telescope tube (Figure 11) then tighten the two screw handles.
2. Check that the two screws behind the telescope tube are not sticking out of the opening before
installation and that the cover has been removed from the cylinders of the star diagonal. Insert the
small cylinder of the star diagonal into the opening behind the telescope tube Then tighten the two
screws.
3. It is possible to modify the focal distance of the eyepieces by reverting the procedure described
above in stage 2.
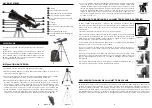
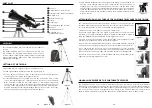
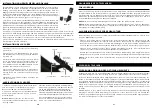
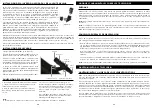
1. Pick up the finderscope (which is installed in the
support of the finderscope).
2. Remove the knurled nuts located on the
threaded mounts on the tube of the (Figure 12).
3. Place the finderscope supports on the mounts
protruding from the optical tube then, holding
it in place, screw it on to the kurled nuts. Then
tighten the nuts.
4. Please note that the finderscope must be
oriented so that the widest diameter of the lens is
directed towards the front of the telescope tube.
5. Remove the covers from both ends of the fin-
derscope.
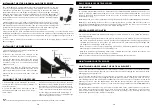
1. In full daylight, locate a far-away object and
centre it in the low power eyepiece (20 mm) of
the main telescope.
2. Look in the finderscope (the eyepiece end of
the finderscope) and note the position of the
same object.
3. Without moving the main telescope, turn the
adjustment screws situated (Figure 12) around
the support of the finderscope until the reticle
(the crossed lines) of the finderscope is centred
on the object selected with the main telescope.
4. If the image obtained in the finderscope is
out of focus, turn the eyepice of the finderscope
until the image becomes clear.
(Figure 11)
INSTALLING THE STAR DIAGONAL AND THE EYEPIECE
INSTALLING THE FINDERSCOPE
ALIGNMENT OF THE FINDERSCOPE
Eyepiece
Finderscope
Finderscope
support
Eyepiece
Knurled nuts
Adjustment screw
Note:
Items observed through a finderscope will appear reversed and inverted, this is normal


