background image

AUDIO 4 DJ – 20

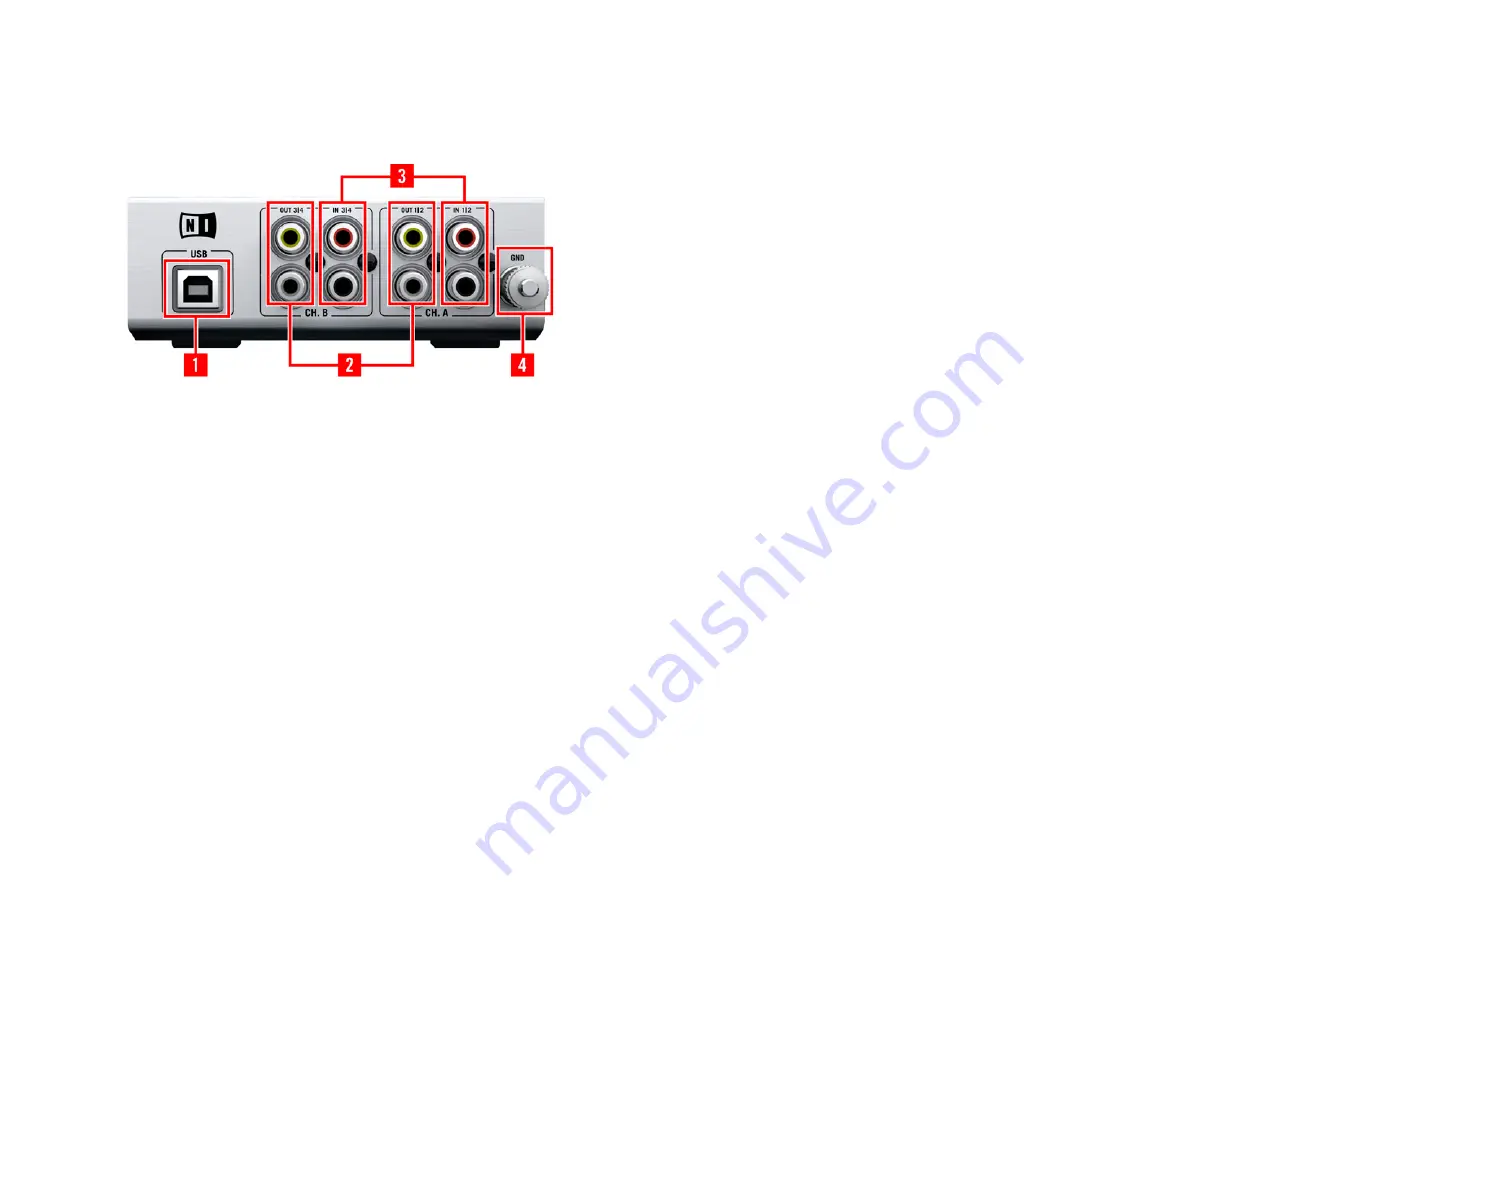
6.2  Rear Panel

1 - USB 2.0 Port

Connects the AUDIO 4 DJ to your computer. The USB 2.0 connection handles data trans-
mission and provides bus power to your AUDIO 4 DJ. This means you do not need an 
external power supply.

2 - Inputs A & B

You can configure these inputs as 2 stereo pairs or 4 mono input channels.

3 - Outputs A & B

You can configure these outputs as 2 stereo pairs or 4 mono output channels.

4 - Ground Screw

Attach your turntable’s grounding wire to this screw to eliminate hum induced by ground 
loops from the audio signal.

1 - USB 2.0 Port
2 - Inputs A & B
3 - Outputs A & B
4 - Ground Screw

1 - USB 2.0 Port
2 - Inputs A & B
3 - Outputs A & B
4 - Ground Screw

Summary of Contents for Audio 4 DJ

Page 1: ...USER S GUIDE...

Page 2: ...this publication may be copied reproduced or otherwise transmitted or recorded for any purpose without prior writ ten permission by NATIVE INSTRUMENTS GmbH hereinafter referred to as NATIVE INSTRUMENT...

Page 3: ...IVE INSTRUMENTS North America Inc 5631 Hollywood Boulevard Los Angeles CA 90028 USA sales native instruments com www native instruments com MASSIVE was designed and developed entirely by Native Instru...

Page 4: ...conditions 4 inputs and 4 outputs integrate the AUDIO 4 DJ into most DJ and recording setups 2 phono preamps let you connect turntables directly Low latency drivers provide natural analog feel for you...

Page 5: ...be very careful that no objects or liquids of any kind enter the unit The AUDIO 4 DJ in combination with an amplifier headphones or speakers can pro duce sound levels capable of damaging your ears Do...

Page 6: ...ct to change The information contained in this manual is believed to be correct at the time of printing However Native Instruments reserves the right to make changes to the specifications of software...

Page 7: ...AUDIO 4 DJ 3 System requirements For latest system requirements compatibility and support of the latest operating systems please see our website at www native instruments com audio4dj...

Page 8: ...in the background when your system starts up The driver takes care of all audio and MIDI signals coming from or going to the AUDIO 4 DJ hardware through the USB2 connection Although the driver itself...

Page 9: ...our computer s CD DVD ROM drive Use the Windows Explorer to browse the content of the CD Double click the installer file named AUDIO 4 DJ Driver Setup 4 Click Next 5 To continue you need to accept the...

Page 10: ...Next If you wish to select a custom path click Change browse to the folder where you want to install the Audio 4 DJ Driver and click Next 7 Now select the folder in the Windows Start dialog to place...

Page 11: ...nish 11 After the TRAKTOR installer has finished running please connect the AUDIO 4 DJ to any available USB port on your computer using the USB cable included in delivery Windows will identify the AUD...

Page 12: ...ments Audio 4 DJ Driver Double click the Unwise Tool to begin un installation Choose Automatic from the following dialog 4 1 2 Installing the AUDIO 4 DJ Drivers on Mac OS X Place the installation CD R...

Page 13: ...ault path or browse to select a custom installation path by clicking Change Install Location Then click Install 7 The next screen informs you that your computer needs to be restarted when the in stall...

Page 14: ...ry Extensions NIUSBAudio4DJ kext Library Audio MIDI Drivers NIUSBMIDIDriver plugin Library Audio MIDI Devices Native Instruments Images Audio 4 DJ tiff Library Preferences com caiaq Native Instruments...

Page 15: ...Installing the AUDIO 4 DJ Drivers on Windows There is no interaction required Uninstalling the Settings Tool The Settings Tool can be uninstalled along with the driver of the AUDIO 4 DJ Please follow...

Page 16: ...rol Panel on a Windows PC Installing the Control Panel The Control Panel will be installed along with the driver of the AUDIO 4 DJ Please follow the instructions on installing the AUDIO 4 DJ driver gi...

Page 17: ...ver of the AUDIO 4 DJ Please follow the instructions on installing the AUDIO 4 DJ driver given in chapter 4 1 2 Installing the AUDIO 4 DJ Drivers on Mac OS X There is no interaction required Uninstall...

Page 18: ...et browser Open the NATIVE INSTRUMENTS website www native instruments com In the headline navigation click on Support On the next page click on Product Activation Since you only need to register the s...

Page 19: ...io outputs 1 4 headphone connector Status LEDs displaying the AUDIO 4 DJ s settings and input output activity Read more about the AUDIO 4 DJ s controls and connectors on the following pages 6 1 Front...

Page 20: ...ply 2 Inputs A B You can configure these inputs as 2 stereo pairs or 4 mono input channels 3 Outputs A B You can configure these outputs as 2 stereo pairs or 4 mono output channels 4 Ground Screw Atta...

Page 21: ...signal is too loud and causes clipping the LEDs turn red 2 USB When the AUDIO 4 DJ is connected this LED is lit green If the USB status LED remains black although you have connected the AUDIO 4 DJ to...

Page 22: ...evel audio sources like CD or other audio interfaces Phono Mode applicable for recording via turntables Vinyl Control Mode applicable for use with Control Vinyl 6 4 AUDIO 4 DJ Technical Specifications...

Page 23: ...ull Scale Level max gain 11 9 dBu 29 dBu THD N 0 009 0 062 SNR 100 dBA weighted 91 dBA weighted Frequency Response 10 40 kHz 10 40 kHz 0 5 dB 0 5 dB OUTPUT SPECIFICATIONS Line Cross Talk 87 dBu Impeda...

Page 24: ...ac OS X double click on Applications Audio 4 DJ Driver Settings Tool to open the Settings Tool On Windows XP click on Start All Programs Native Instruments Audio 4 DJ Driver Settings Tool to open the...

Page 25: ...rol Panel button to open the Control Panel The Control Panel is explained in detail in chapter 7 2 Understanding the Control Panel 3 USB Connection Monitor This is a status LED showing you whether the...

Page 26: ...helpful information about the different settings and features Hover over one of the features and you will see a description of the respective setting or feature 6 Input Mode Selector The Input Mode S...

Page 27: ...e click its label 7 2 Understanding the Control Panel This chapter will introduce you to the Control Panel and its settings 7 2 1 The Control Panel on Windows On Windows operating systems the Control...

Page 28: ...ck on OK to confirm your changes and to close the Control Panel 7 2 3 Buffer Format In this area of the Control Panel you can select the sample rate that the AUDIO 4 DJ handles audio streams at The va...

Page 29: ...mware version the driver version and the number of USB streaming errors It does not provide any options or settings as these can be configured from within the audio software you want to use the AUDIO...

Page 30: ...tening to music or watching DVDs via your computer 8 1 1 Using the AUDIO 4 DJ in Windows Make sure the volume controls of the amplifier are down Open Start Control Panel Sounds Audio Devices Click on...

Page 31: ...fier are down In the Settings Tool choose Line as Input Mode Connect the RCA cable of your CD player to a free input pair of the AUDIO 4 DJ e g AUDIO 4 DJ CH A In 1 2 Put a CD in your CD Player and st...

Page 32: ...t Adjust the recording level in your recording software and start recording 8 4 2 Using the AUDIO 4 DJ as Recording Device on a Mac Click on Applications Utilities Audio MIDI Setup or open the Audio M...

Page 33: ...amplifier or powered speakers For the Monitor output choose channel pair Out 3 4 so that you can pre listen to tracks Turn down the headphones volume on the AUDIO 4 DJ to a low level Connect your head...

Page 34: ...eakers From the Browser List drag tracks in both decks and hit the Play button Drag the Crossfader of your DJ mixer all the way to the left Deck A or Channel 1 Set the headphones mix knob fader of you...

Page 35: ...cted to an USB 2 0 port of your computer Make sure you are connecting directly to an USB port of the computer and not through an USB hub Try another USB cable Disconnect any other USB devices from the...

Page 36: ...bed in chapter 4 1 Installation of the AUDIO 4 DJ If the driver is not recognized check your USB 2 0 connection as described in chap ter 10 3 USB Troubleshooting As any other USB device the driver ins...

Page 37: ...ection between the Audio 4 DJ and your computer check the following chapters first several possible sources for USB issues are covered here 10 3 1 USB 2 0 required The AUDIO 4 DJ is an USB 2 0 interfa...

Page 38: ...the AUDIO 4 DJ plugged into the right port you can encounter audio problems like clicks or dropouts whenever the trackpad is reactivated from standby mode MacBook Pro recommended USB port s For the f...

Page 39: ...GHz Intel Core 2 Duo MacBook 13 Black 2 0 GHz Intel Core Duo and Core 2 Duo MacBook 13 Black 2 16 GHz Intel Core 2 Duo There are 2 USB ports on the left side of the MacBook models listed above Due to...

Page 40: ...circuit In complex setups the cause s of the noise can be difficult to find Ground loops are perceived usually as a hum or buzz in your audio signal but this can also transmit and amplify other sound...

Page 41: ...r the active monitors need to be physically discon nected from the AUDIO 4 DJ In case the ground loop disappears you need to lift the ground on your amplifier or the active monitors Contact the manufa...

Page 42: ...to play in real time with the AUDIO 4 DJ will probably prove unsatisfying due to the delay Any computer based audio system has some delay between the audio input and output As a result if you are play...

Page 43: ...se that does not deliver water continuously but in bursts So you use a holding tank to store the water coming in from the hose and have a valve in the tank that releases a steady amount of water in a...

Page 44: ...sing is available at www thesycon de deu latency_check shtml There is no software installation required just launch the tool after downloading With your audio interface disconnected the tool will repo...

Page 45: ...operties dialog On the bottom of this pane you can disable the device via the drop down menu Deactivate it and hit OK You should see a red cross over the device which means that it has been deactivate...

Page 46: ...of your audio application Mac OS X Choose a preset with higher latency or if using user defined settings raise the USB and Audio latency Keep raising the latency until you do not encounter any more p...

Page 47: ...you detect an IRQ conflict Open Start Run and type the word msinfo32 and press OK Your system information window will appear Click the Plus sign next to Hardware Click on IRQs Your IRQs will be displa...

Page 48: ...his chapter collects tips for tweaking the performance of a Windows PC 11 1 1 Processor Scheduling Open Start Control Panel and double click System Choose Advanced Under Performance choose Settings Ch...

Page 49: ...wer Schemes to Always On Drop down the menu for Turn off Monitor and select Never Drop down the menu for Turn off hard discs and select Never 11 1 7 Turn off Hibernation Open Start Control Panel and d...

Page 50: ...er Click on Show Details to display the energy saver details Click on Sleep Set the slider for Put the computer to sleep when inactive to Never Set the slider for Put the display to sleep when inactiv...

Page 51: ...rom Some are simple applications that you double click to stop and start the Dashboard oth ers are lines of code to be pasted into the Terminal 11 2 7 Turn off Sharing Open System Preferences Sharing...

Page 52: ...tive instruments com knowledgebase To search the Knowledge Base you have to log into your user account first For more information about registering products please see chapter 5 Registration and Produ...

Page 53: ...nd software involved The exact model and technical specifications of your computer 12 2 Forum In the Native Instruments User Forum you can discuss directly with other users and with experts from Nativ...

Reviews: