


Quick Start Guide
9
SLAU662B – January 2016 – Revised May 2016
Copyright © 2016, Texas Instruments Incorporated
ADS54J69EVM
2.4
Quick Start Trouble Shooting
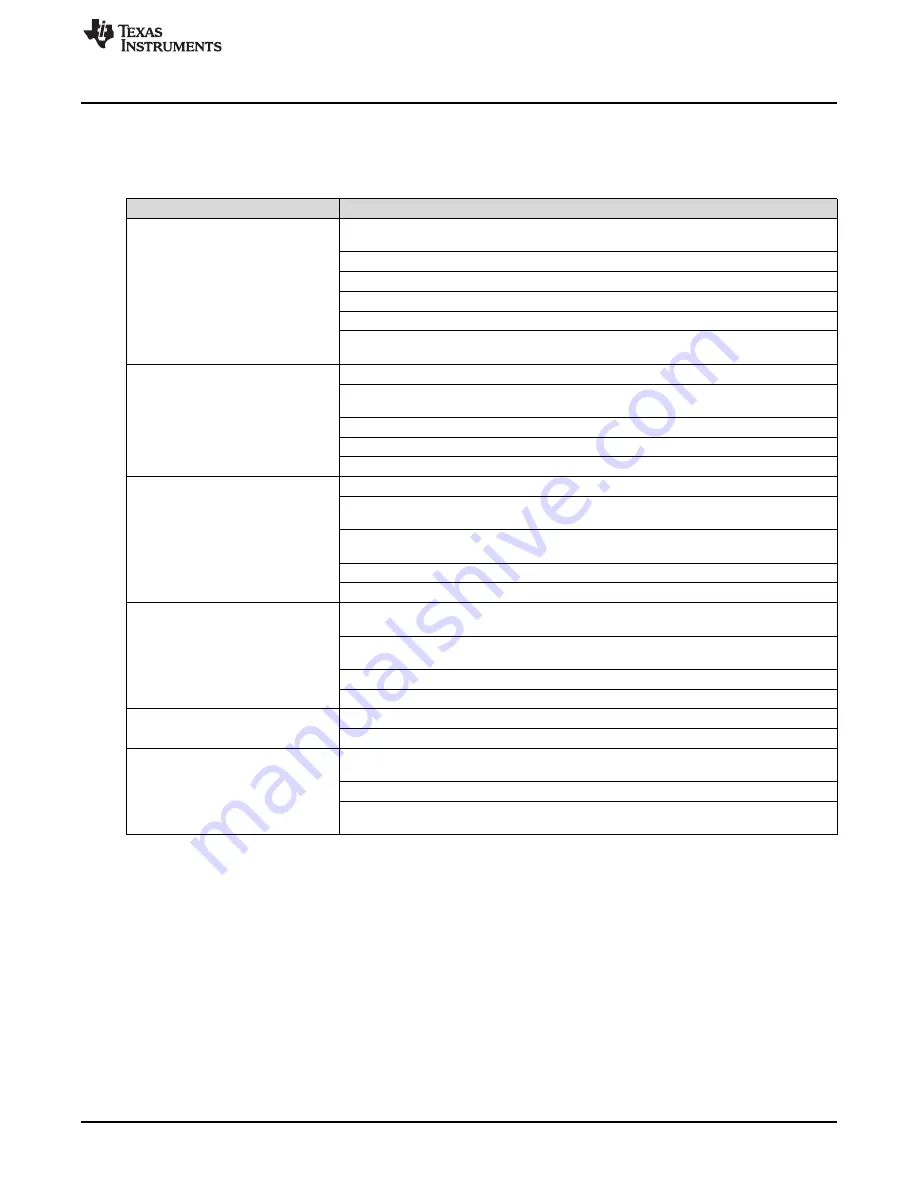
Use
to assist with problems that may have occurred during the quick start procedure.
Table 2. Troubleshooting Tips
Issue
Troubleshooting Tips
General Problems
Verify the test setup shown in
and repeat the setup procedure as described in this
document.
Check power supplies to the EVMs. Verify that the power switches are in the ON position.
Check signal and clock connections to the EVM.
Check that all boards are properly connected together.
Try pressing the
CPU_RESET
button on the TSW14J56EVM.
Try power-cycling the external power supply to the EVM and reprogram the LMK and ADC
devices.
TSW14J56 LEDs are not correct:
D1, D5 – N/A
D2, D4 – Blinking
D3, D6, D7 – OFF
D8, D28 – ON
Verify the settings of the configuration switches on the TSW14J56EVM.
Verify that the EVM configuration GUI is communicating with the USB and that the
configuration procedure has been followed.
(LEDs Not Blinking) Reprogram the LMK device.
Try pressing the
CPU_RESET
button on the TSW14J56EVM.
Try capturing data in HSDC Pro to force an LED status update.
Device GUI is not working properly
Verify that the USB cable is plugged into the EVM and the PC.
Check the computer’s Device Manager and verify that a
USB Serial Device
is recognized
when the EVM is connected to the PC.
Verify that the green
USB Status
LED light in the top right corner of the GUI is lit. If it is not
lit, press
Reconnect FTDI
button.
Try restarting the configuration GUI.
Check default jumper connections as shown in
HSDC Pro Software is not
capturing good data or analysis
results are incorrect.
Verify that the TSW14J56EVM is properly connected to the PC with an USB cable and that
the board serial number is properly identified by the HSDC Pro software.
Check that the proper ADC device is selected. In default conditions, ADS54J69_2x_4222
should be selected.
Check that the analysis parameters are properly configured.
Check that the fundamental power is no larger than –1 dBFs.
HSDC Pro Software gives a Time-
Out error when capturing data
Try to reprogram the LMK device and reset the JESD204 link.
Verify that the ADC sampling rate is correct in the HSDC Pro software.
Sub-Optimal Measured
Performance
Make sure an ADC hardware reset was issued after loading the LMK but before loading the
ADC configuration file.
Check that the spectral analysis parameters are properly configured.
Verify that bandpass filters are used in the clock (external ADC Clock Mode) and input
signal paths and that low-noise signal sources are used.


