background image

7

Dual-direction Lid

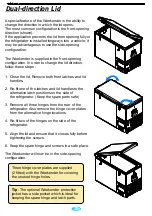
A special feature of the Weekender is the ability to 
change the direction in which the lid opens.
The most common configuration is the front-opening 
direction (shown).
If the application prevents the lid from opening fully or 
the refrigerator is installed longways into a vehicle, it 
may be advantageous to use the side-opening 
configuration.

The Weekender is supplied in the front-opening 
configuration. In order to change the lid direction, 
follow these steps :

1.  Close the lid. Remove both front latches and lid
     handles.

2.  Re-fit one of the latches and lid handles to the
     alternative latch positions on the side of 
     the refrigerator. (Keep the spare parts safe)

3.  Remove all three hinges from the rear of the 
     refrigerator. Also remove the hinge cover plates
     from the alternative hinge locations.

4.  Re-fit two of the hinges on the side of the 
     refrigerator.

5.  Align the lid and ensure that it closes fully before 
     tightening the screws.

6.  Keep the spare hinge and screws in a safe place.

The Weekender will now be in the side-opening 
configuration.

Tip

 - The optional Weekender protection 

jacket has a side pocket which is ideal for 
keeping the spare hinge and latch parts.

Three hinge cover plates are supplied 
(2 fitted) with the Weekender for covering 
the unused hinge holes.

Summary of Contents for Weekender-52

Page 1: ...52 litre Advanced Control Unique Hinge Design ...

Page 2: ...ble low battery protection speed control battery monitor with low voltage warning and fault indicators Before use Unpacking the Weekender 52 The Weekender is supplied with the following parts Please check that none of these parts are missing Precautions during use When the Weekender is used in an automotive application ensure that it is appropriately secured to prevent accidental movement The frid...

Page 3: ... 5 Lid locking latch 6 Insulated outer body 7 Control panel 8 Alternative lid handle position 9 Alternative lid latch position 10 Spring loaded carry handle 11 Compressor area 12 Electronics cooling fan 13 DC fuse 15A automotive type 14 AC input socket with internal fuse 15 DC input socket 1 2 3 4 5 6 7 8 9 10 11 12 13 14 15 ...

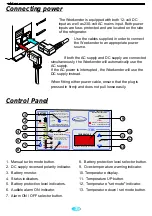
Page 4: ...utton 2 DC supply reversed polarity indicator 3 Battery monitor 4 Status indicators 5 Battery protection level indicators 6 Audible alarm ON indicator 7 Alarm ON OFF selector button The Weekender is equipped with both 12 volt DC input as well as 230 volt AC mains input Both power inputs are fuse protected and are located on the side of the refrigerator Use the cables supplied in order to connect t...

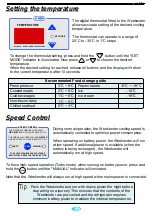
Page 5: ...NUAL indicator is illuminated Note that the Weekender will always run at high speed when mains power is connected The digital thermostat fitted to the Weekender allows accurate setting of the desired cooling temperature The thermostat can operate in a range of 20 C to 30 C in 1 C steps To change the thermostat setting press and hold the button until the SET MODE indicator is illuminated Now press ...

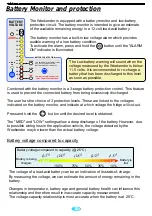
Page 6: ...battery protection control This feature is used to prevent the connected battery from being excessively discharged The user has the choice of 3 protection levels These are linked to the voltages indicated on the battery monitor and indicate at which voltage the fridge will cut out Press and hold the button until the desired level is obtained The MED and LOW settings allow a deep discharge of the b...

Page 7: ...ender is equipped with status indicators which show the operation of the refrigerator and help to identify faults that may occur A brief description of the status indicators is shown below of flashes Fault description 2 Fan over current cut out There is a problem with the ventilation fan 3 Motor start error The rotor is blocked or the system pressure is too high 4 Minimum speed error The motor can...

Page 8: ...Re fit one of the latches and lid handles to the alternative latch positions on the side of the refrigerator Keep the spare parts safe 3 Remove all three hinges from the rear of the refrigerator Also remove the hinge cover plates from the alternative hinge locations 4 Re fit two of the hinges on the side of the refrigerator 5 Align the lid and ensure that it closes fully before tightening the scre...

Page 9: ...nt for repair The ventilation fan is noisy or not running The Fault ID light is flashing twice every 5 seconds The compressor failed to start correctly or run at its minimum speed If the refrigerator continues to show the error for an extended period of time contact an authorised service agent The Fault ID light is flashing 3 or 4 times every 5 seconds There are significant cable or connection los...

Page 10: ...ible This will protect against short circuits that may occur along the length of the cable Ensure that all connections are properly crimped and insulated An automotive fuse with a rating of 15A is recommended To Ba ter t y To ri g F d e When installing electrical outlets in your vehicle do not rely on the vehicle s body for an electrical earth If you choose to change the attached plug on the DC ca...

Page 11: ... or hazardous operation or may be the cause of the malfunction of this product 6 National Luna shall not be responsible for any damages of any kind resulting from incorrect voltages or faults with regards to power supply which falls outside of the appliance operating parameters 7 National Luna shall not be responsible for damage to the appliance caused by negligent use storage of hazardous chemica...

Page 12: ...tallic grey Aluminium Smooth metallic grey R134a CFC Free 170V AC 270V AC 0 40A 9 6V DC 15V DC 2 5A 31W 2 5A average running current at low speed 710mm 385mm Lid in front opening configuration Weight with battery at 12 5V under normal conditions 506mm Specifications Weekender 52 Inside Dimentions showing useable volume 587 mm 0 27 mm 389 mm 189 mm 392 mm Tel 27 0 11 452 5438 Fax 27 0 11 452 5263 e...

Reviews: