background image

SCXI-1300/1301 Terminal Block

8

www.ni.com

SCXI-1102/B/C
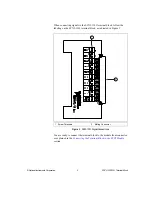
If you are using a ground-referenced thermocouple, connect the 
thermocouple positive and negative leads to CH+ and CH– respectively.

If you are using a non-referenced (floating) thermocouple, choose one of 
the two options to ground the thermocouple:

Ground the negative lead of the thermocouple near the thermocouple 
junction.

Ground the negative lead of the thermocouple inside the SCXI-1300 
terminal block, by connecting CH– to CHSGND as shown in Figure 4. 
In most applications, this is the most convenient grounding option.

Caution

Do not reference the thermocouple to ground at more than one point to avoid 

measurement errors caused by ground loops.

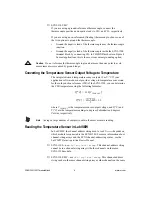
Converting the Temperature Sensor Output Voltage to Temperature

The integrated-circuit temperature sensor outputs 10 mV/°C. If your 
application software does not provide voltage-to-temperature conversion 
for the cold-junction reference (CJR) of the SCXI-1300, you can determine 
the CJR temperature using the following formulas:

where V

TEMPOUT


is the temperature sensor output voltage, and T(°F) and 

T(°C) are the temperature readings in degrees Fahrenheit and degrees 
Celsius, respectively.

Note

Average a large number of samples to obtain the most accurate reading.

Reading the Temperature Sensor in LabVIEW

In LabVIEW, the channel address string used to read V

TEMPOUT

 depends on 

which module is connected to the SCXI-1300. For more information about 
channel-string arrays and the SCXI channel-addressing syntax, see the 
LabVIEW Data Acquisition Basics Manual.

SCXI-1100—use 

ob

x


!


sc

y


!


md

z


!


mtemp

. This channel-address string 

cannot be in a channel-string array with other channels on the same 
SCXI-1100 module.

SCXI-1102/B/C—use 

ob

x


!


sc

y


!


md

z


!


mtemp

. This channel-address 

string can be in the same channel-string array as other channels on the same 

T

°

C

( )

100 V

TEMPOUT

(

)

=

T

°

F

( )

[T(

°

C

) ]

9

5

-----------------------

32

+

=

Summary of Contents for SCXI-1300

Page 1: ... terminals Your terminal block has the following features Seventy two screw terminals A cold junction temperature sensor Thirty two pairs of screw terminals that connect to the 32 differential inputs of the SCXI module Two screw terminals that connect to the module functional chassis ground pins A solder lug available as a safety chassis ground Additional screw terminals connect to the SCXI module...

Page 2: ...1 terminal block you need the following items SCXI 1300 or SCXI 1301 terminal block SCXI 1300 1301 Terminal Block Installation Guide SCXI chassis SCXI module Your SCXI module user manual Number 1 and 2 Phillips head screwdrivers 1 8 in flathead screwdriver Long nose pliers Wire cutter Wire insulation stripper ...

Page 3: ...ning You can add insulation or padding if necessary 4 Prepare your signal wire by stripping the insulation to no more than 7 mm 5 Connect the signal wires to the screw terminals by inserting the stripped end of the wire fully into the terminals and tighten the screws with a flathead screwdriver Tighten the screws to a torque of 5 to 7 in lb Caution Uninsulated wire extending past the screw termina...

Page 4: ...e strain relief screws 7 Reinstall the top cover and tighten the top cover screws When connecting signals to the SCXI 1300 terminal block follow the labeling on the SCXI 1300 terminal block as indicated in Figure 2 Figure 2 SCXI 1300 Signal Connections 1 Screw Terminals 2 Mating Connector 2 1 ...

Page 5: ...al block follow the labeling on the SCXI 1301 terminal block as indicated in Figure 3 Figure 3 SCXI 1301 Signal Connections You are ready to connect the terminal block to the module front connector as explained in the Connecting the Terminal Block to the SCXI Module section 1 Screw Terminals 2 Mating Connector 1 2 ...

Page 6: ...lt parking position If you are using a non referenced floating thermocouple the SCXI 1100 instrumentation amplifier can be driven into saturation if the thermocouple is not grounded properly Choose one of the following two options to ground the thermocouple Ground the negative lead of the thermocouple near the thermocouple junction Leave jumper W1 on the SCXI 1100 in the factory default parking po...

Page 7: ... National Instruments Corporation 7 SCXI 1300 1301 Terminal Block Figure 4 Connecting a Thermocouple to SCXI 1300 Channel 0 1 Channel 0 2 Chassis Ground 3 Thermocouple 3 1 2 ...

Page 8: ...r application software does not provide voltage to temperature conversion for the cold junction reference CJR of the SCXI 1300 you can determine the CJR temperature using the following formulas where VTEMPOUT is the temperature sensor output voltage and T F and T C are the temperature readings in degrees Fahrenheit and degrees Celsius respectively Note Average a large number of samples to obtain t...

Page 9: ...nit must be completely dry and free from contanimants before returning to service Specifications All specifications are typical at 25 C unless otherwise specified Electrical Cold Junction Sensor on the SCXI 1300 Sensor type Integrated circuit LM35CAZ Accuracy1 1 3 C from 0 to 50 C Repeatability 0 5 C Output 0 to 0 5 V from 0 to 50 C 10 mV C Environment Operating temperature 0 to 50 C Storage tempe...

Page 10: ......

Reviews: