background image

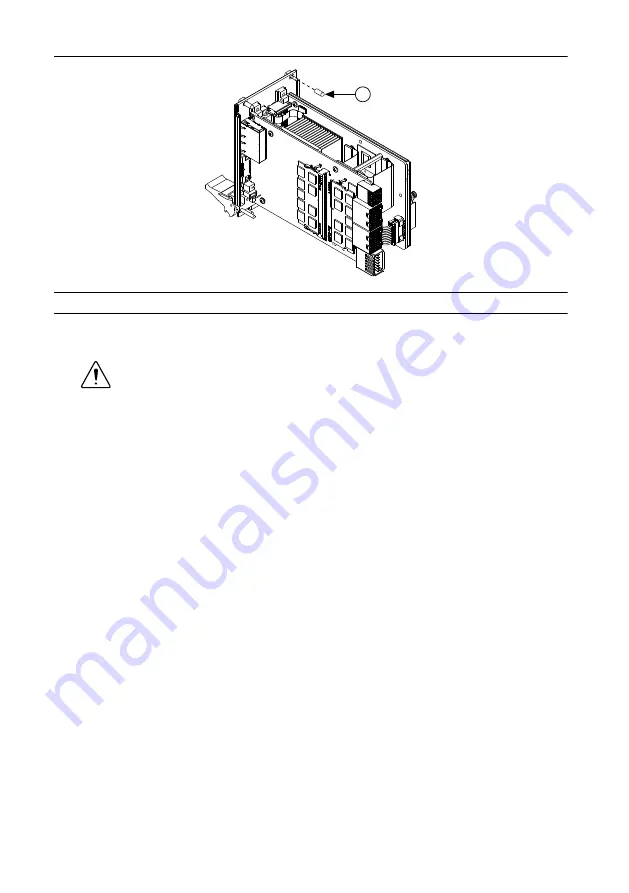
Figure 1. Removing Protective Plastic Covers

1

1. Protective Screw Cap (4x)

5.

Make sure the injector/ejector handle is in its downward position. Align the PXIe-8861
with the card guides on the top and bottom of the system controller slot.

Caution


Do 

not

 raise the injector/ejector handle as you insert the PXIe-8861.

The module will not insert properly unless the handle is in its downward
position so that it does not interfere with the injector rail on the chassis.

6.

Hold the handle as you slowly slide the module into the chassis until the handle catches
on the injector/ejector rail.

7.

Raise the injector/ejector handle until the module firmly seats into the backplane
receptacle connectors. The front panel of the PXIe-8861 should be even with the front
panel of the chassis.

8.

Tighten the four bracket-retaining screws on the top and bottom of the front panel to
secure the PXIe-8861 to the chassis.

9.

Check the installation.

10. Connect the keyboard and mouse to the appropriate connectors.
11. Connect the DisplayPort monitor video cable or adapter to the DisplayPort connector.
12. Connect devices to ports as required by your system configuration.
13. Power on the display.
14. Power on the chassis.
15. Verify that the controller boots. If it does not boot, refer to the 

Troubleshooting

 section.

The following figure shows a PXIe-8861 controller installed in the system controller slot
of an NI PXIe-1082 chassis.

PXIe-8861 Getting Started Guide

  | 

© National Instruments

  | 

3

Summary of Contents for PXIe-8861

Page 1: ...my chassis How do I boot the chassis with the module installed 11 What if some modules installed in a remote Thunderbolt chassis show up in Windows Device Manager with yellow exclamation points 11 Wha...

Page 2: ...ess Chassis To install the PXIe 8861 into a PXI Express chassis complete the following steps 1 Plug in your chassis before installing the PXIe 8861 The power cord grounds the chassis and protects it f...

Page 3: ...module firmly seats into the backplane receptacle connectors The front panel of the PXIe 8861 should be even with the front panel of the chassis 8 Tighten the four bracket retaining screws on the top...

Page 4: ...ded Co ntr 3 1 PXI Express Chassis 2 PXI Express Controller 3 Injector Ejector Rail Data Storage The PXIe 8861 has the following data storage features m 2 NVME internal solid state drive 500 GB or la...

Page 5: ...ous peripherals and their corresponding PXIe 8861 external connectors bus interfaces and functions Peripheral External Connector Description Video DisplayPort 1 1 and 1 2 DisplayPort ATI Radeon E6465...

Page 6: ...outside the normal limits or the system power supply is out of regulation OFF The controller is powered off Red BLINKING The controller detected a power rail fault when trying to boot Red SOLID The c...

Page 7: ...hard drive USB CD DVD ROM or USB flash drive Most PCI or PCI Express based devices that provide an Option ROM Note There are limitations when booting from a USB device You can install Windows 7 and l...

Page 8: ...82271 01 available from National Instruments to connect a VGA monitor to a DisplayPort connector Software Driver Installation How do I install or reinstall the video driver Refer to What Peripheral Dr...

Page 9: ...controller as shown in the following figure 3 Install the new SO DIMM module into the slot PXIe 8861 System Memory Information National Instruments offers the following types of SO DIMMs for use with...

Page 10: ...oint BIOS Operating System and so on If nothing appears on the screen try a different monitor Does your monitor work with a different PC If it hangs note the last screen output that you saw for refere...

Page 11: ...lamation points Thunderbolt does not allow peripherals to take advantage of legacy IO Space Some devices such as serial or Ethernet modules may rely on IO Space creating resource allocation issues in...

Page 12: ...e two methods that you can use to reset the CMOS 1 First Method a Enter the BIOS setup program b Press F9 to load BIOS defaults c Answer Y Yes to the verification prompt d Select Save and Exit Setup 2...

Page 13: ...ces NI offers Visit ni com register to register your NI product Product registration facilitates technical support and ensures that you receive important information updates from NI NI corporate headq...

Page 14: ...y legal notices in the readme file for your NI product Refer to the Export Compliance Information at ni com legal export compliance for the NI global trade compliance policy and how to obtain relevant...

Reviews: