


Getting Started with R Series Multifunction RIO
4
ni.com
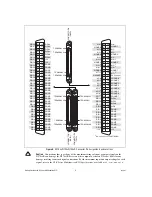
Figure 3.
Installing an NI PXI-78
xx
R Device in a PXI Chassis
5.
For the NI PCI/PCIe-78
xx
R, secure the device mounting bracket to the computer back panel rail.
For the NI PXI-78
xx
R, secure the device front panel to the chassis front panel mounting rail using
the front-panel mounting screws.
6.
For the NI PCI/PCIe-78
xx
R, replace the computer cover, if applicable.
7.
Plug in and power on the computer or PXI chassis.
To confirm that your device is recognized, complete the following additional steps:
1.
Select
Start»All Programs»National Instruments»Measurement & Automation
to open
Measurement & Automation Explorer (MAX).
2.
Expand
Devices and Interfaces
.
3.
Verify that the device appears under
Devices and Interfaces»RIO Devices
.
1
PXI Chassis
2
PXI System Controller
3
NI PXI-78
xx
R Device
4
Injector/Ejector Handle
5
Front-Panel Mounting Screws
6
Module Guides
7
Power Switch
3
4
PXI-1000B
6
1
7
2
5