background image

©

 National Instruments Corporation

7

MID-7604/7602 Stepper Power Motor Drive User Guide

Back Panel Connector Wiring

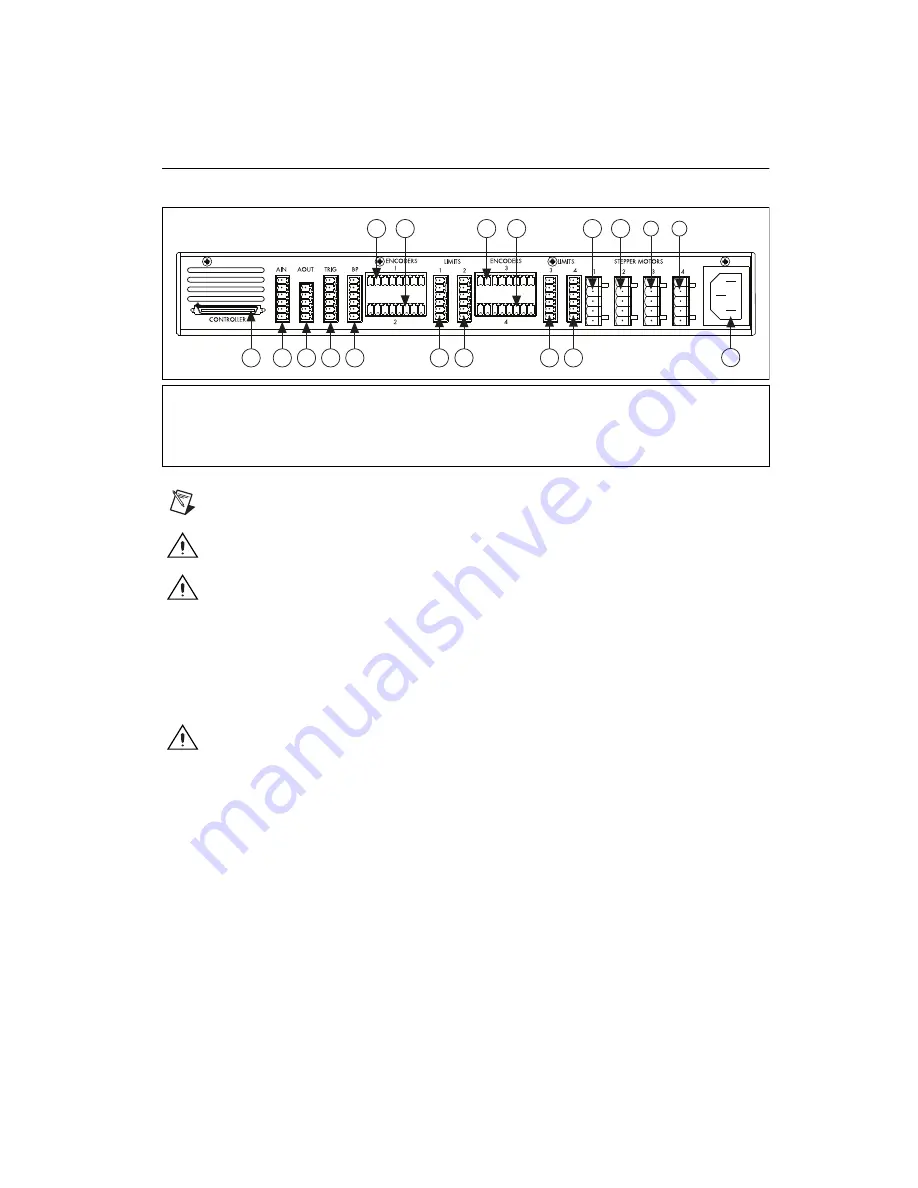
Figure 2 shows the connectors located on the back panel of your MID-7604/7602.

Figure 2.  

MID-7604/7602 Back Panel Connectors

Note

Items followed by an asterisk (*) are available on the MID-7604 only.

Caution

Be sure to turn off the ENABLE switch and the main AC power to your MID-7604/7602 

and host computer 

before

 connecting the accessory to your motion controller.

Caution

The stepper motor connectors on this drive are energized when the unit is powered 

on. Disconnect the MID-7604/7602 unit from the power outlet 

before

 connecting wires to or 

disconnecting wires from the stepper connectors. Strip back the insulation of the stepper wires to the 
stepper connectors no more than 7 mm. 

Failure to do so could result in electric shock leading to 

serious bodily injury or death.

1.

Use the interface cable to connect the motion controller to the MID-7604/7602. Wire the motor 
power, limit switch, encoder, and I/O terminal blocks as described in this guide and to your specific 
system requirements.

Caution

You 

must

 change the MID-7604/7602 main input fuse on the front panel if you change the 

line voltage from the factory setting. Refer to the 

Specifications

 section of this guide for fuse 

specifications.

2.

Use the 

LINE VOLTAGE SELECT

 switch to configure the MID-7604/7602 for 115 VAC, 60 Hz 

or 230 VAC, 50 Hz operation. For proper operation, you must set this switch to match your power 
source.

3.

Finally, install the power cord into the back panel AC connector and plug it in to a correctly rated 
power source.

1

Motion Controller Connector

2

Analog Input Connector

3

Analog Output Connector

4

Trigger Connector

5

Breakpoint Connector

6

AC Power

Encoder Connectors

7

Axis 1

8

Axis 2

9

Axis 3*

10 Axis 4*

Limit Connectors

11 Axis 1
12 Axis 2
13 Axis 3*
14 Axis 4*

Motor Connectors

15 Axis 1
16 Axis 2
17 Axis 3*
18 Axis 4*

1

4

11

12

8

9

7

10

1

3

14

6

15

16

17

1

8

5

3

2

Summary of Contents for NI MID-7602

Page 1: ...l Instruments MID 7602 Manual Get Pricing Availability at ApexWaves com Call Today 1 800 915 6216 Email sales apexwaves com https www apexwaves com modular systems national instruments motor drives MI...

Page 2: ...s 11 Inhibit Input Polarity Setting 12 Limit Status LED Polarity Setting 13 Back Panel Connector Wiring 13 Motor Power Terminal Blocks 13 Encoder Terminal Blocks 14 Limit Switch Terminal Blocks 16 Bre...

Page 3: ...ing you need to connect motors encoders limit switches I O and other motion hardware to National Instruments motion controllers The MID 7604 7602 can drive a broad range of stepper motors with its rug...

Page 4: ...us locations The hardware must be in a suitably rated IP 54 minimum enclosure for hazardous locations You must insulate signal connections for the maximum voltage for which the hardware is rated Do no...

Page 5: ...s of hardware circuits powered by regulated low voltage sources and electronics Measurement Category II is for measurements performed on circuits directly connected to the electrical distribution syst...

Page 6: ...turning the hardware off and on you are encouraged to try to correct the interference by one or more of the following measures Reorient the antenna of the receiver the device suffering interference Re...

Page 7: ...ED status array illuminate for all axes Refer to the Front Panel LEDs section of this guide for more information Note In older versions of the MID 7604 7602 the red status LEDs do not illuminate when...

Page 8: ...eath 1 Use the interface cable to connect the motion controller to the MID 7604 7602 Wire the motor power limit switch encoder and I O terminal blocks as described in this guide and to your specific s...

Page 9: ...D fails to illuminate check the power cord and the main input fuse on the front panel The LED status array is arranged by motor axes Each of the four columns represents an axis and each of the three r...

Page 10: ...r more information Front Panel DIP Switch Settings The MID 7604 7602 front panel has a detachable metal plate that when removed provides access to four 10 position DIP switch banks Refer to Figure 1 f...

Page 11: ...settings for all possible microstep settings DIP switches 6 through 9 control the microstep rate on a per axis basis Table 2 Microstep Rate DIP Switch Setting Binary Selections Decimal Selections Swi...

Page 12: ...d exists when the total power dissipated by the motors exceeds 80 W continuous for a sustained period of time To determine the maximum total power dissipation of all of the motors combined add up the...

Page 13: ...the polarity for the inhibit input for all axes DIP switch 10 on the axis 1 DIP switch bank controls this setting Refer to Figures 1 and 3 for the location of this switch The factory default setting...

Page 14: ...ower Terminal Blocks Each axis on the MID 7604 7602 has a separate 5 position removable screw terminal block for motor power wiring Figure 4 shows a typical stepper motor configuration pin assignment...

Page 15: ...ovable screw terminal block Where applicable the MID 7604 7602 accepts two types of encoder signal inputs single ended TTL or differential line driver You can accommodate open collector output encoder...

Page 16: ...g the Index and Index signals on differential encoders or using the Index input on single ended encoders Figure 7 shows the proper encoder phasing for CW forward motor rotation Figure 7 Encoder Signal...

Page 17: ...Connection Example The inhibit output signal is asserted low from the MID 7604 7602 when an axis is inhibited This signal can be useful for actuating mechanical brakes or for monitoring an axis status...

Page 18: ...rigger Terminal Block Pin Assignment Figure 12 Breakpoint Terminal Block Pin Assignment Analog I O Terminal Blocks The MID 7604 7602 has two analog I O connectors The analog input connector uses a 6 p...

Page 19: ...the MID 7604 7602 The arms of the strain relief bar attach to the sides of the MID 7604 7602 with the thumb nuts facing upward as shown in Figure 15 Using the provided screws attach the strain relief...

Page 20: ...relief bar and panel mount kit cannot be installed at the same time Amplifier Driver Command Signals For stepper drivers the two industry standards for command signals are as follows Step and Directi...

Page 21: ...a 6 wire motor except that the center taps CT are not brought out Figure 17 6 Wire and 8 Wire Stepper Motors For maximum flexibility you can connect 8 wire stepper motors in either a series or parall...

Page 22: ...ot possible with a 6 wire motor you can usually obtain high speed performance with the half coil connection shown in Figure 20 This configuration sacrifices low speed torque for better high speed perf...

Page 23: ...controller specifications to determine the allowable voltage range and logic level compatibility of the signal Stepper Amplifiers Type IM481H modular hybrid bipolar chopper Chopping frequency 20 kHz...

Page 24: ...nput compatibility Signal pass through 5 V output 1 A Included Connectors Encoders 8 position mini combicon 3 81 mm plug 1 per axis Limits 6 position mini combicon 3 81 mm plug 1 per axis Motors 5 pos...

Page 25: ...For UL and other safety certifications refer to the product label or the Online Product Certification section Electromagnetic Compatibility This product meets the requirements of the following EMC sta...

Page 26: ...not only to the environment but also to NI customers For additional environmental information refer to the NI and the Environment Web page at ni com environment This page contains the environmental r...

Page 27: ...e DoC for your product by visiting ni com certification If your product supports calibration you can obtain the calibration certificate for your product at ni com calibration National Instruments corp...

Page 28: ...r respective companies For patents covering National Instruments products technology refer to the appropriate location Help Patents in your software the patents txt file on your media or the National...

Reviews: