LabVIEW, National Instruments, NI, ni.com, the National Instruments corporate logo, and the Eagle
logo are trademarks of National Instruments Corporation. Refer to the
Trademark Information
at
ni.com/trademarks
for other National Instruments trademarks. Other product and company
names mentioned herein are trademarks or trade names of their respective companies. For patents
covering National Instruments products/technology, refer to the appropriate location:
Help»Patents
in your software, the
patents.txt
file on your media, or the
National Instruments Patent Notice
at
ni.com/patents
.
© 2010 National Instruments Corporation. All rights reserved.
373216A-01
Jul10
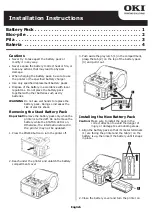
6.
Secure the battery pack bracket by hand-tightening the retention
fastener onto the top of the bracket, as shown in Figure 7.
Figure 7.
Hand-Tightening the Retention Fastener
7.
Finish the battery pack installation by tightening the retention fastener
with a 6 mm wrench or small adjustable crescent wrench (not included
with the kit), as shown in Figure 8. When appropriately tightened, the
retention fastener should not be easily removable by hand. Do not
over-tighten the fastener.
Figure 8.
Finishing Battery Pack Installation
8.
Replace the chassis cover and reinstall the rear thumbscrew and two
side screws removed in step 1.
Battery Recycling
Battery Directive
After replacement, recycle the old battery. For information about the
available collection and recycling scheme (and your nearest National Instruments branch
office) or battery directive compliance (Directive 2006/66/EC of the European Parliament
and Council) in a particular EU country, visit
ni.com/environment/
batterydirective
.
Cd/Hg/Pb