


■
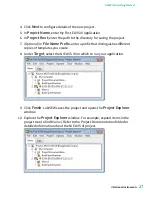
My Computer
—Represents the local or host computer as a target in the
project.
■
Build Specifications
—Includes build configurations for source
distributions and other types of builds available in LabVIEW toolkits and
modules.
■
RT Target
—Represents the NI ELVIS III you add to the project. VIs and
libraries that you add to the NI ELVIS III appear under the target in the Project
Explorer window.
■
FPGA Target
—Represents the FPGA target on the NI ELVIS III.
■
Build Specifications
—Includes specifications for building source
distributions, stand-alone real-time applications, and zip files.
Tip
Go to
next.
Programming the Control I/O
In this part of the tutorial, you start from a project that monitors the user
programmable button on the NI ELVIS III, and extend its functionality to control the
user programmable LEDs.
Before starting this part, make sure you have completed the steps to
.
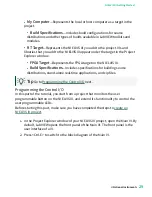
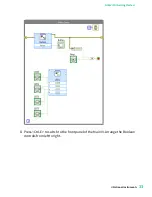
1. In the Project Explorer window of your NI ELVIS III project, open the Main VI. By
default, LabVIEW opens the front panel of the Main VI. The front panel is the
user interface of a VI.
2. Press <Ctrl-E> to switch to the block diagram of the Main VI.
© National Instruments
29
NI ELVIS III Getting Started


