National Instruments NI-DAQ 7 Getting Started Manual Download Page 21

©

 National Instruments Corporation

21

NI Switches Getting Started Guide
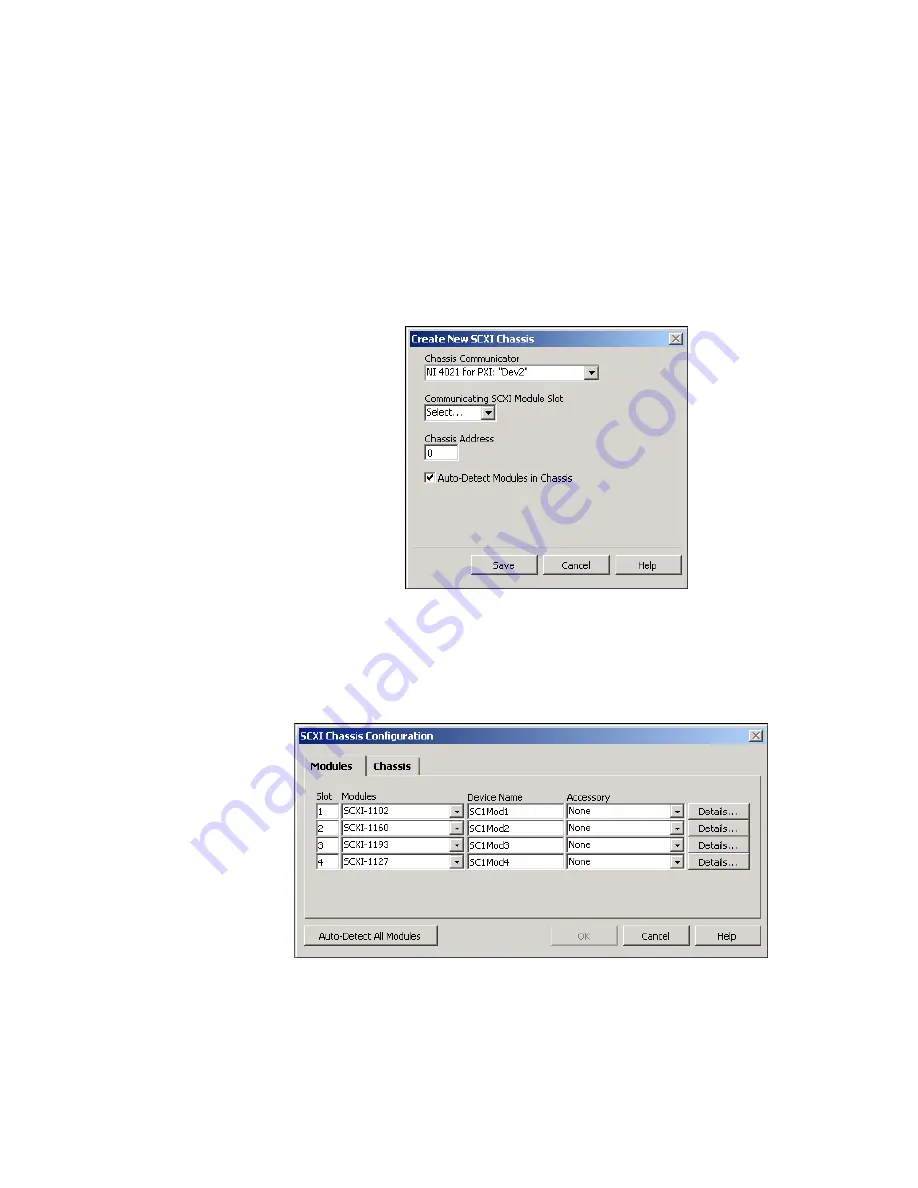
4.

Select the module slot connected to the chassis communicator from 

Communicating SCXI Module Slot

.

5.

Enter the chassis address setting in 

Chassis Address

. Make sure the 

setting matches the address setting on the SCXI chassis.

6.

Select whether or not to auto-detect SCXI modules. If you do not 
auto-detect modules, MAX disables the Communicating SCXI 
Module Slot.

7.

Click 

Save

.

Figure 13.  

Configuring SCXI Switch Modules Under NI-DAQmx Devices

8.

The SCXI Chassis Configuration window opens. The 

Modules

 tab is 

selected by default. If you did not auto-detect modules, select an SCXI 
module from the 

Modules

 list box. Be sure to locate the module in the 

correct slot.

Figure 14.  

Configuring SCXI Switch Modules Under NI-DAQmx Devices

Summary of Contents for NI-DAQ 7

Page 1: ...ify the Components 4 3 Install the Software 5 4 Install the PXI Switch Modules 7 5 Install the SCXI Switch Modules 8 Procedure 1 Installing the SCXI Switch in an Existing System 11 Procedure 2 Cable t...

Page 2: ...ems and dialog box options Bold text also denotes parameter names and information on hardware labels italic Italic text denotes variables emphasis a cross reference or an introduction to a key concept...

Page 3: ...n Traditional NI DAQ and NI DAQmx and a complete list of supported modules Available on the NI DAQ 7 x Device Documentation CD NI DAQmx Help contains information about programming your switch with the...

Page 4: ...r For development at least one of the following software packages and documentation LabVIEW LabWindows CVI Microsoft Visual C Microsoft Visual Basic PXI switch modules require the following PXI switch...

Page 5: ...stalling NI DAQ 7 x Some NI DAQ devices supported in 6 9 3 may no longer be supported Before uninstalling NI DAQ 6 9 3 or earlier refer to the DAQ Quick Start Guide available on the NI DAQ 7 x Device...

Page 6: ...etermine which APIs work with your switch module Install Support Files The NI DAQ 7 x installer detects the NI software installed on the system and automatically selects the latest versions of the dri...

Page 7: ...the hardware 2 Remove the filler panel of an unused PXI slot 3 Touch any metal part of the chassis to discharge static electricity 4 Insert the device into the PXI slot Use the injector ejector handl...

Page 8: ...e refer to Table 2 to ensure that your controller supports your switch Table 2 also lists the cable adapter kit s necessary to cable the controller directly to the switch module 1 High Voltage Analog...

Page 9: ...SCXI 1362 kit SH6868 EP and SCXI 1349 SCXI 1161 SCXI 1163R SCXI 1190 SCXI 1191 SCXI 1192 1 The NI 4060 cannot control the SCXI 1130 1166 1167 or SCXI 1193 switch modules For software support informati...

Page 10: ...010 1011 Refer to Procedure 2 No Yes Refer to Procedure 1 Yes Yes Yes Refer to Procedure 3 Start Are you installing the SCXI switch in an existing system Are you installing the SCXI switch into an SCX...

Page 11: ...odule 1 Power off and unplug the SCXI chassis Follow proper ESD precautions to ensure you are grounded before installing the hardware 2 Remove the filler panel in an unused SCXI slot 3 Touch any metal...

Page 12: ...Figure 5 all switches are shown in the OFF position Note Older chassis use jumpers inside the front panel instead of chassis address switches Older chassis also differ in fuses and AC power selection...

Page 13: ...ns to ensure you are grounded before installing the hardware 2 Remove the filler panel in an unused SCXI slot 3 Touch any metal part of your chassis to discharge static electricity 4 Insert the device...

Page 14: ...to the SCXI slot 5 Screw the device front panel to the chassis front panel mounting rail 6 Attach the SCXI 1359 cable adapter included with SCXI 1357 1358 and SCXI 1359 kits to the rear of the SCXI sw...

Page 15: ...Insert the device into the SCXI slot 5 Screw the device front panel to the chassis front panel mounting rail 6 Attach the SCXI 1362 cable adapter to the rear of the SCXI switch module 7 Screw the cabl...

Page 16: ...address switches to OFF All switches in the OFF position are shown in Figure 5 3 Confirm the correct power settings of the chassis 100 120 220 or 240 VAC 4 Connect the chassis power cord 5 Remove the...

Page 17: ...e hardware 2 Confirm the correct power settings of the chassis 100 120 220 or 240 VAC 3 Connect the chassis power cord 4 Remove the filler panel in an unused SCXI slot 5 Touch any metal part of your c...

Page 18: ...NI DAQmx Devices 1 Power on the chassis 2 Double click the Measurement Automation icon on the desktop to open MAX 3 Expand Devices and Interfaces 4 Check that your PXI switch module appears under Devi...

Page 19: ...test on switches listed under NI DAQmx Devices Right click the switch you want to test 5 Select Self Test to test the selected device 6 When the self test finishes a message indicates if an error occu...

Page 20: ...I DAQ Devices The NI 4060 can only control SCXI switch modules configured under Traditional NI DAQ Devices NI DAQmx If you are using NI DAQmx complete the following steps as shown in the figures to co...

Page 21: ...6 Select whether or not to auto detect SCXI modules If you do not auto detect modules MAX disables the Communicating SCXI Module Slot 7 Click Save Figure 13 Configuring SCXI Switch Modules Under NI D...

Page 22: ...y 11 Click Details to configure the switch module options 12 The switch module configuration window opens The Terminal Block Accessory tab is selected by default Select the terminal block connected to...

Page 23: ...this chassis Note You cannot save the chassis configuration until you finish entering module information A message at the top of the SCXI Chassis Configuration window alerts you of the status of the...

Page 24: ...ick Next Figure 16 Adding an SCXI Chassis in MAX 3 Select the type of chassis Click Next Figure 17 Selecting a Chassis Type in MAX 4 Select an ID for the SCXI chassis The ID can be any integer between...

Page 25: ...re the setting matches the chassis address setting on the SCXI chassis Refer to the Procedure 2 section for help locating the chassis address switches Click Next Figure 18 Configuring the Chassis ID a...

Page 26: ...h between the chassis and the computer Click Next Figure 20 Select the Controller 8 Select the switch module that is cabled to the communication device If the chassis has only one module NI DAQ select...

Page 27: ...odule slot and select Properties Figure 22 Configuring Switch Modules Under Traditional NI DAQ Devices in MAX 12 The General tab is selected by default Choose which controller connects to the module f...

Page 28: ...nstallation guide or the NI Switches Help for more information Caution Always refer to the specifications document included with your switch before connecting signals Exceeding specified switch signal...

Page 29: ...gnals to the backplane Refer to Figure 2 to determine if your switch has an HVAB connector The following examples demonstrate how to derate your modules Example 1 SCXI 1000 chassis SCXI 1359 2 slot ba...

Page 30: ...Modules You can operate the switch module in one of the following three ways Interactively using the NI SWITCH Soft Front Panel Programming using the NI SWITCH API Programming using the NI DAQmx API...

Page 31: ...AQmx Help Information specific to your switch module is available in the NI Switches Help For example locations refer to the DAQ Quick Start Guide Technical Support Resources NI Web Support National I...

Page 32: ...al Instruments corporate For telephone support in the United States dial 512 795 8248 For telephone support outside the United States contact your local branch office Australia 1800 300 800 Austria 43...

Reviews: