background image

©

 National Instruments Corporation

7-1

NI 177x Smart Camera User Manual

7

LED Indicators

This chapter provides information about the location and functionality of 
the LED indicators on the NI 177x Smart Camera. 

Understanding the LED Indicators

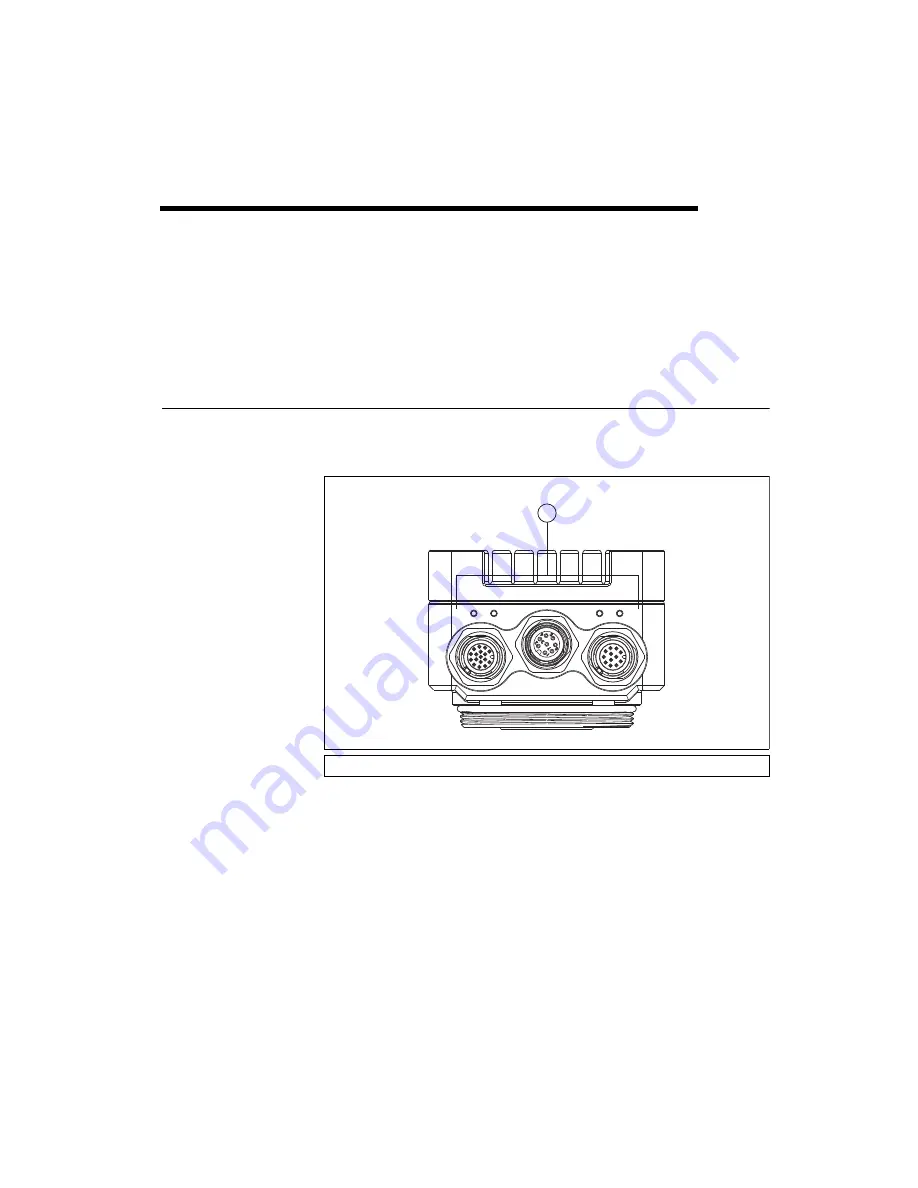
The NI 177x Smart Camera includes four multicolor indicators. The 
following figure illustrates the location of the LED indicators:

Figure 7-1.  

NI 177x Smart Camera LED Indicators

1

LED Indicators

I/O

100/1G

Power

Status

User

VGA/
USB

10

0/

1G

1

Summary of Contents for ISC-1772

Page 1: ...al Instruments ISC 1772 Manual Get Pricing Availability at ApexWaves com Call Today 1 800 915 6216 Email sales apexwaves com https www apexwaves com modular systems national instruments smart cameras ISC 1772 ...

Page 2: ...NI Vision NI 177x Smart Camera User Manual NI 177x Smart Camera User Manual September 2011 373491A 01 ...

Page 3: ...nd current events National Instruments Corporate Headquarters 11500 North Mopac Expressway Austin Texas 78759 3504 USA Tel 512 683 0100 For further support information refer to the Technical Support and Professional Services appendix To comment on National Instruments documentation refer to the National Instruments Web site at ni com info and enter the Info Code feedback 2011 National Instruments ...

Page 4: ...orporation National Instruments respects the intellectual property of others and we ask our users to do the same NI software is protected by copyright and other intellectual property laws Where NI software may be used to reproduce software or other materials belonging to others you may use NI software only to reproduce materials that you may reproduce in accordance with the terms of any applicable...

Page 5: ...n industrial locations There is no guarantee that harmful interference will not occur in a particular installation when the product is connected to a test object or if the product is used in residential areas To minimize the potential for the product to cause interference to radio and television reception or to experience unacceptable performance degradation install and use this product in strict ...

Page 6: ...ew and Installation Hardware Overview 1 2 Connect the Power Supply and I O 1 3 Connect to the Development Computer 1 5 Direct Connection 1 5 Network Connection 1 5 Subnet Considerations 1 6 IP Address Assignment 1 6 Firewall Configuration 1 7 Chapter 2 Software Overview Configuring the NI Smart Camera with Vision Builder AI 2 2 Configure the IP Address 2 2 Install Software on the NI Smart Camera 2...

Page 7: ...nnecting to a NPN Device 4 3 Connecting to a PNP Device 4 4 Protecting Against Inductive Loads 4 4 Connecting to a Triggering Device 4 6 Connecting to Serial Devices 4 7 Chapter 5 Image Sensor Field of View 5 1 Image Sensor Spectral Response 5 3 Gain 5 3 Auto White Level NI 177xC Smart Cameras 5 4 Black Level NI 177xC Smart Cameras 5 5 Look Up Table 5 5 Maintenance 5 6 Chapter 6 Image Acquisition ...

Page 8: ...6 6 Chapter 7 LED Indicators Understanding the LED Indicators 7 1 Device Initialization 7 2 Power Indicator 7 2 Status Indicator 7 2 User Indicator 7 3 100 1G Indicator 7 4 Chapter 8 Mounting Information Appendix A Specifications Appendix B Camera Attributes Appendix C Accessories Appendix D Technical Support and Professional Services Glossary Index ...

Page 9: ...n this symbol is marked on a product it denotes a warning advising you to take precautions to avoid electrical shock bold Bold text denotes items that you must select or click in the software such as menu items and dialog box options Bold text also denotes parameter names italic Italic text denotes variables emphasis a cross reference or an introduction to a key concept Italic text also denotes te...

Page 10: ...ations the Instrument Driver Network a measurement glossary an online magazine a product advisor and a community area where you can share ideas questions and source code with developers around the world The NI Developer Zone is located on the National Instruments Web site at ni com zone NI Vision Builder for Automated Inspection Documents NI Vision Builder for Automated Inspection Tutorial Describ...

Page 11: ...Concepts Help Describes the basic concepts of image analysis image processing and machine vision This document also contains in depth discussions about imaging functions for advanced users NI Vision for LabVIEW Help Describes how to create machine vision and image processing applications in LabVIEW using the Vision Development Module The help file guides you through tasks beginning with setting up...

Page 12: ...es the following information Basic information about the NI 177x Smart Camera hardware Instructions for configuring the NI 177x Smart Camera hardware Basic information about software options for application development Instructions for acquiring your first image with the NI 177x Smart Camera using the selected application development software ...

Page 13: ...tures and components of the NI 177x Smart Camera Figure 1 1 shows the NI 177x Smart Camera Figure 1 1 NI 177x Smart Camera 1 Image Sensor 2 C Mount 3 Lens Cover Mount 4 LED Indicators 5 I O Connector 6 100 1G Connector 7 VGA USB Connector I O 100 1G P o w e r S t a t u s U s e r VGA USB 1 0 0 1 G NATIONAL INSTRUMENTS NI 177X SMART CAMERA 1 3 2 7 6 5 4 ...

Page 14: ...ons refer to Appendix A Specifications NI 177x Smart Cameras use a standard C mount lens and include 4 opto coupled inputs 4 open collector outputs an optically isolated trigger input and a constant current output for connecting to external devices For complete device specifications refer to Appendix A Specifications NI 177x Smart Cameras includes 4 LED indicators for communicating system status R...

Page 15: ... connector and a 17 pin M12 to 25 pin D SUB cable 17 pin M12 Pigtail Cable 153131 03 An open ended cable that you can use to create your own custom cable Refer to the I O Connector section of Chapter 3 Connectors for wiring information Caution Use the NI 177x Smart Camera only with a 12 W 24 VDC 10 UL listed limited power source LPS supply The power supply will bear the UL listed mark LPS The powe...

Page 16: ...e to the CAMERA connector on the terminal block 3 Connect the power supply output to the 24 V in connector on the terminal block 4 Connect any additional I O signals necessary for your application to the appropriate terminal block connector Refer to the I O Connector section of Chapter 3 Connectors for pin information 5 Plug the power supply into an outlet When power is first applied to the device...

Page 17: ...nect the NI 177x Smart Camera directly to the development computer complete the following steps 1 Connect the 8 pin female M12 connector to the 100 1G connector on the NI 177x Smart Camera 2 Connect the Ethernet connector to an Ethernet port on the development computer The NI 177x Smart Camera is now connected directly to the development computer Network Connection To connect the NI 177x Smart Cam...

Page 18: ...or Note If the NI 177x Smart Camera IP address is 169 254 x x the device is only accessible from the local subnet To access the smart camera from a remote subnet configure the smart camera to obtain an IP address from a DHCP server or manually assign a static IP address DHCP IP Addresses Using a DHCP server to assign an IP address has the following advantages The DHCP server manages the IP address...

Page 19: ...iguration If you are having difficulty detecting the NI 177x Smart Camera on your network you must configure the firewall to open the TCP UDP ports used by the NI 177x Smart Camera and the host machine The required ports are listed in Table 1 2 If your firewall is controlled remotely or you are unsure about configuring the firewall contact your network administrator Table 1 2 TCP UDP Ports Used by...

Page 20: ...er AI for information about using the NI 177x Smart Camera with Vision Builder AI Refer to Configuring the NI Smart Camera with LabVIEW for information about using the NI 177x Smart Camera with LabVIEW The installation and configuration process for each development environment is different Complete only the instructions for your chosen development environment Caution National Instruments software ...

Page 21: ...n select the NI 177x Smart Camera in the list of targets If the NI 177x Smart Camera does not appear in the list of targets verify that the device has power and is connected to an Ethernet port on the same subnet as the development computer then click Refresh Target List Refer to Chapter 7 LED Indicators for information about LED status messages 4 Click Install Software The Remote Target Configura...

Page 22: ...tory where Vision Builder AI is the location where Vision Builder AI is installed 4 Click OK to apply the IP configuration settings and download software to the device 5 Click OK to close the Remote Target Configuration Successful dialog box Acquire an Image with Vision Builder AI Complete the following steps to acquire an image using Vision Builder AI 1 On the Vision Builder AI welcome screen sel...

Page 23: ...nts configuration utility and NI IMAQdx driver software for acquiring images and controlling I O using the NI 177x Smart Camera The latest version of NI Vision Acquisition software is included with the NI 177x Smart Camera Install the software in the following order 1 LabVIEW Refer to the LabVIEW Release Notes for installation instructions for LabVIEW and system requirements for the LabVIEW softwa...

Page 24: ... to configure To uniquely identify multiple unconfigured devices connect and configure one device at a time If the NI 177x Smart Camera does not appear in the list of targets verify that the device has power and is connected to an Ethernet port on the same subnet as the development computer Refer to Chapter 7 LED Indicators for information about LED status messages 3 In the Name field enter a name...

Page 25: ...t NI Vision RT and NI IMAQdx RT The software wizard will automatically select any other required software 4 Click Next 5 Verify your software installation choices and click Next 6 When the installation is complete click Finish Acquire an Image Complete the following steps to acquire an image using MAX 1 In the Remote Systems branch of the MAX configuration tree expand the folder for your device 2 ...

Page 26: ...owing information Descriptions and pinout information for the M12 connectors Wiring diagrams and instructions for connecting the NI 177x Smart Camera to external devices Information about acquiring an image with the NI 177x Smart Camera Descriptions and blink code explanations for the LED indicators Information about mounting the NI 177x Smart Camera ...

Page 27: ...nnectors The following table lists the connectors found on the NI 177x Smart Camera 1 I O Connector 2 100 1G Connector 3 VGA USB Connector Table 3 1 NI 177x Smart Camera Connector Overview Connector Name Connector Type Description I O connector 17 pin male M12 Power and I O connection 100 1G connector 8 pin female M12 10 100 1000 Mb s Ethernet connection VGA USB connector 12 pin male M12 Analog vi...

Page 28: ... Instead power is provided by the connected device and is either grounded or not grounded by the open collector connection Each connection is protected by a 100 mA fuse The I O connector also includes a controlled current output capable of providing current to a LED light The I O connector includes 4 independent opto coupled input connections which share a common ground connection with the NI 177x...

Page 29: ...input signal 1 positive Yellow 7 TRIG_IN Opto isolated trigger input signal positive Black 8 PWR Supplies power to the camera Use the NI 177x Smart Camera only with a 12 W 24 VDC 10 UL listed limited power source LPS supply Gray 9 PWR Red 10 TxD_RS232 RS 232 transmit Violet 11 OUT2 Open collector ouput signal 2 Gray Pink 12 OUT0 Open collector ouput signal 0 Provides an exposure signal generated u...

Page 30: ... Smart Camera uses a nominal 24 VDC power source The device accepts power within the range of 24 V 10 with an additional allowance for an AC peak of 5 Refer to Appendix A Specifications for complete power requirement specifications 100 1G Connector The 100 1G connector is an 8 pin female connector that provides Ethernet communication capabilities at 10 Mbit sec 100 Mbit sec or 1 Gbit sec 1000 Mbit...

Page 31: ...riptions for the 100 1G connector VGA USB Connector The VGA USB connector is a 12 pin male connector that transmits RGB analog video output and USB signals Figure 3 4 VGA USB Connector Table 3 3 100 1G Connector and Ethernet Connector Signals 100 1G Connector Pin Number Ethernet Connector Pin Number 1 5 2 7 3 8 4 2 5 3 6 1 7 4 8 6 11 10 12 2 3 4 5 6 7 8 9 1 ...

Page 32: ...TA USB data positive 3 3 USB_DATA USB data negative 2 4 GND Ground 4 GND Table 3 5 VGA USB Connector Signals and 15 Pin DSUB Connector Signals 12 Pn M12 Connector Pin Number Signal Name Function 15 Pin DSUB Connector Pin Number 5 RED _VID_OUT Red component of the RGB video signal 1 6 BLUE _VID_OUT Blue component of the RGB video signal 3 7 VSYNC Vertical sync of the RGB video signal 14 8 HSYNC Hor...

Page 33: ...n Builder AI MAX Select the Lighting tab of the NI Smart Camera configuration page and click Configure Light The light must be configured in MAX before you can use it in LabVIEW Vision Builder AI Select the Lighting tab of the Acquire Image Smart Camera step and click Configure Light Connecting a Light Controller You can connect a light controller to the NI 177x Smart Camera in order to control an...

Page 34: ...ed signal that can turn the lighting controller on or off Connect the ground of the NI 177x Smart Camera and the lighting controller to a common ground Refer to Figure 4 1 and for wiring examples Note Each open collector output can sink up to 100 mA Figure 4 1 Connecting to an External Light Controller OUT0 GND GND Digital Input Lighting controller NI 177x Smart Camera I O connector External pull ...

Page 35: ... to Figures 4 2 and 4 3 for wiring examples by output type Refer to Appendix A Specifications for current requirements Connecting to a NPN Device Connect the ground of the NI 177x Smart Camera and the NPN input device to a common ground Note Each open collector output can sink up to 100 mA Figure 4 2 Connecting to an External NPN Input Device OUT0 GND GND Input NPN compatible PLC device NI 177x Sm...

Page 36: ...t Device Protecting Against Inductive Loads When an inductive load such as a relay or solenoid is connected to an output energy stored in the inductor may cause a voltage spike when power is removed This flyback voltage can damage the outputs and the power supply The Power I O Accessory for NI 177x Smart Cameras 781993 01 includes integrated flyback diodes so that no additional wiring is required ...

Page 37: ...gative side of the load to the diode anode and connect the positive side of the load to a 24 V power supply and the diode cathode as illustrated in Figure 4 4 Connect the ground of the NI 177x Smart Camera and the inductive load device to a common ground Note Each open collector output can sink up to 100 mA Figure 4 4 Connecting to an External Inductive Load Device OUT0 GND GND Sinking input PNP c...

Page 38: ...G_IN input Figure 4 5 Connecting to an External Triggering Device To wire a NI 177x Smart Camera output directly to the TRIG_IN input you must add a pull up resistor to 24 V as illustrated in Figure 4 6 National Instruments recommends a 3 K ohm 1 4 W resistor Wire the TRIG_IN input to GND Figure 4 6 Connecting to an External Triggering Device TRIG_IN TRIG_IN GND Trigger out Trigger generator NI 17...

Page 39: ...177x Smart Camera to the Tx signal on your serial device Connect the TxD_RS232 signal on the NI 177x Smart Camera to the Rx signal on your serial device Connect COM on the NI 177x Smart Camera to the ground of your serial device You must install the NI Serial software on the NI 177x Smart Camera it is not installed by default Refer to the Serial Hardware and Software Help for information about ins...

Page 40: ...tion about each image sensor Field of View The field of view is the area under inspection that will be imaged by the NI 177x Smart Camera It is critical to ensure that the field of view of your system includes the object you want to inspect Table 5 1 NI 177x Smart Camera Models Model Resolution Color Support NI 1772 640 480 pixels VGA No NI 1774 1 280 960 pixels SXGA No NI 1776 1 600 1 200 pixels ...

Page 41: ... Active Pixels is the number of pixels in either the horizontal or vertical direction Working Distance is the distance from the front element external glass of the lens to the object under inspection and Focal Length measures how strongly a lens converges focuses or diverges diffuses light Figure 5 1 illustrates horizontal field of view and working distance Figure 5 1 Parameters of an Imaging Syst...

Page 42: ...ative sensitivity of the sensor to different wavelengths of light If you are imaging a dim scene this information can be useful when selecting a light source to use in your application as the camera is most sensitive at its peak responsiveness It also helps determine if your application might require filters to remove undesired wavelengths of light from the scene Refer to Appendix A Specifications...

Page 43: ... no longer distinguish subtle shading in the brightest areas of the image Gain can be useful when there is not enough available light and you need to increase the brightness of your images However increasing gain multiplies both the signal and noise When possible it is preferable to add additional lighting Auto White Level NI 177xC Smart Cameras NI 177xC Smart Cameras allow you to adjust the gain ...

Page 44: ... to adjust gain values or enable automatic white balance adjustment MAX Use the settings on the Camera Attributes tab of the device configuration page Vision Builder AI Use the settings on the Advanced tab of the Acquire Image Smart Camera step Look Up Table A look up table LUT transformation maps pixel values in the source image into other values in the transformed image For example you can use a...

Page 45: ...rom dust and dirt Avoid drastic temperature changes to prevent dew condensation When necessary use the following procedure to clean the sensor at a workstation equipped with anti ESD facilities If dust sticks to the CCD first attempt to blow it off from the side of the sensor using ionized air If oils are present on the sensor clean the sensor with a cotton bud and ethyl alcohol Be careful not to ...

Page 46: ...he amount of light in the environment results in a dark low contrast image Exposing the image sensor for too long of a time relative to the amount of light in the environment results in a bright low contrast image When the image sensor is exposed for an appropriate amount of time relative to the light in the environment acquired images will exhibit appropriate contrast to easily distinguish both d...

Page 47: ...he ambient light can vary significantly with weather Also standard fluorescent lighting flickers at a rate that is perceivable by the NI 177x Smart Camera In these situations the ambient light must be overridden with a dedicated light source to ensure reproducible results Acquiring Images You can configure the NI 177x Smart Camera to acquire images based on internal timing or an external trigger s...

Page 48: ...Connecting to a Triggering Device section of Chapter 4 Connecting Lighting and External Devices for information about connecting external signals You can enable triggering in the following software programs Vision Builder AI Select the Enable Trigger checkbox on the Trigger tab of the Acquire Image Smart Camera step LabVIEW Set the value of the TriggerSource attribute to External Trigger and set t...

Page 49: ...is case specifying the trigger delay in terms of edge counts allows the NI 177x Smart Camera to expose the image when the part is in position regardless of changes in conveyor belt speed For other applications a delay specified in milliseconds is sufficient If you are strobing a light there is a delay of 500 μs while the lighting controller turns on the light After the lighting turn on time the ex...

Page 50: ...f this chapter Determining the Maximum Frame Rate You can determine the maximum frame rate for your configuration in software by reading the Max Frame Rate indicator in Vision Builder AI reading the AcquisitionFrameRateLimit attribute in LabVIEW or reading the Max Frame Rate indicator in MAX When external triggering is enabled do not trigger faster than the maximum frame rate If a trigger occurs f...

Page 51: ... limits the min frame period When the trigger delay is specified in milliseconds the software includes this in the calculation of the maximum frame rate indicator Calculating the Minimum Frame Period Refer to Equations 6 3 and 6 4 to calculate the minimum frame period for untriggered acquisitions with and without strobing 6 3 6 4 Refer to Equations 6 5 and 6 6 to calculate the minimum frame period...

Page 52: ...nctionality of the LED indicators on the NI 177x Smart Camera Understanding the LED Indicators The NI 177x Smart Camera includes four multicolor indicators The following figure illustrates the location of the LED indicators Figure 7 1 NI 177x Smart Camera LED Indicators 1 LED Indicators I O 100 1G P o w e r S t a t u s U s e r VGA USB 1 0 0 1 G 1 ...

Page 53: ... When power is first applied to the device the Power indicator flashes red for one second while internal systems power up If the Power indicator stays red for longer than one second it indicates that the voltage is out of range Status Indicator The Status indicator provides information about the status of the camera The following table describes the behavior of the Status indicator Table 7 1 LED I...

Page 54: ... DHCP and no DHCP server is available Use MAX or Vision Builder AI to configure the NI 177x Smart Camera 2 Flashes Orange The NI 177x Smart Camera detects an error in the software configuration This usually occurs when an attempt to upgrade the software is interrupted or if system files are deleted from the NI 177x Smart Camera Reinstall software on the NI 177x Smart Camera 3 Flashes Orange The NI...

Page 55: ...ndicates the status of any network connection The following table describes the behavior of the 100 1G indicator A blinking LED indicates network activity Table 7 4 100 1G LED Indicator Behavior LED Color Description Off No link or a 10 Mbps link is negotiated Yellow A 100 Mbps link is negotiated Green A 1 000 Mbps link is negotiated ...

Page 56: ...t to mount the NI 177x Smart Camera to a thermally conductive structure do not position the device with the heat sinks resting on any surface Doing so may violate the thermal requirements of the device and cause the device to overheat Refer to Appendix A Specifications for temperature specifications Figures 8 1 through 8 4 provide the dimensional drawings necessary to create a custom mount for the...

Page 57: ...era User Manual 8 2 ni com Figure 8 1 Front View of the NI 177x Smart Camera with Dimensions NATIONAL INSTRUMENTS NI 177X SMART CAMERA 1 181 in 30 mm 1 417 in 36 mm 1 299 in 33 mm 4 331 in 110 mm 1 240 in 31 5 mm 2 953 in 75 mm 4X M4 0 7 0 138 3 5 mm ...

Page 58: ...orporation 8 3 NI 177x Smart Camera User Manual Figure 8 2 Back View of the NI 177x Smart Camera with Dimensions 0 492 in 12 5 mm 3 862 in 98 1 mm 0 234 in 5 95 mm 0 492 in 12 5 mm 1 969 in 50 mm 4X M4 0 7 0 315 8 0 mm 2 856 in 72 55 mm 1 006 in 25 25 mm ...

Page 59: ...x Smart Camera User Manual 8 4 ni com Figure 8 3 Bottom View of the NI 177x Smart Camera with Dimensions 2 953 in 75 mm I O 100 1G P o w e r S t a t u s U s e r VGA USB 1 0 0 1 G 0 157 in 4 mm 1 179 in 29 95 mm 0 83 in 21 mm 0 83 in 21 mm ...

Page 60: ...nformation National Instruments Corporation 8 5 NI 177x Smart Camera User Manual Figure 8 4 Side View of the NI 177x Smart Camera with Dimensions 1 96 in 49 78 mm 4 331 in 110 mm NATIONAL INSTRUMENTS 3 99 in 101 35 mm REF ...

Page 61: ...tion Use the NI 177x Smart Camera only with a 12 W 24 VDC 10 UL listed limited power source LPS supply The power supply should bear the UL listed mark LPS The power supply must meet any safety and compliance requirements for the country of use Typical power consumption 12 W 24 VDC 10 Processing and Memory CPU Intel Atom Z530 1 60 GHz processor DDR2 RAM 512 MB Storage 2 GB solid state Opto Coupled ...

Page 62: ...Sinking current range 0 to 100 mA Maximum current leakage 10 μA On voltage drop 25 mV Maximum inrush current 4 A for 300 μs max Off to on responsiveness 250 ns On to off responsiveness 250 ns Controlled Current Output Operating voltage 24 V Output voltage 2 4 to 21 V Output current range 0 to 500 mA Network Connector 8 pin female M12 Network interface Ethernet Speed 10 100 1 000 Mbps Duplex Full h...

Page 63: ...aracteristics for each camera Sensor readout Progressive scan Table A 1 NI 177x Smart Camera Sensor Characteristics Camera Model Sensor Optical Format in Active Pixels Pixel Size µm Maximum Usable FrameRate fps Minimum Exposure Time µs NI 1772 Kodak KAI 0340S 1 3 640 480 VGA 7 4 7 4 110 34 NI 1772C Kodak KAI 0340SCM 65 NI 1774 Sony ICX445AL 1 280 960 SXGA 3 75 3 75 22 5 58 NI 1774C Sony ICX445AQ 1...

Page 64: ...Figure A 1 1772 VGA Sensor Spectral Response Curves NI 1772C color Refer to Figure A 2 Figure A 2 1772C VGA Sensor Spectral Response Curves 0 9 0 8 0 7 0 6 0 5 0 4 0 3 0 2 0 1 0 1 0 400 500 600 700 900 800 1000 Wavelength nm Relative Response 0 9 0 8 0 7 0 6 0 5 0 4 0 3 0 2 0 1 0 400 500 600 Wavelength nm Relative Response 700 Blue Red Green 1 0 ...

Page 65: ... Figure A 3 Figure A 3 1774 SXGA Sensor Spectral Response Curves NI 1774C color Refer to Figure A 4 Figure A 4 1774C SXGA Sensor Spectral Response Curves 0 9 0 8 0 7 0 6 0 5 0 4 0 3 0 2 0 1 0 1 0 400 500 600 700 900 800 1000 Wavelength nm Relative Response 0 0 9 0 8 0 7 0 6 0 5 0 4 0 3 0 2 0 1 1 0 400 500 600 700 Wavelength nm Relative Response Blue Red Green ...

Page 66: ...igure A 5 1776 UXGA Sensor Spectral Response Curves NI 1776C color Refer to Figure A 6 Figure A 6 1776C UXGA Sensor Spectral Response Curves 0 9 0 8 0 7 0 6 0 5 0 4 0 3 0 2 0 1 0 1 0 400 500 600 700 900 800 1000 Wavelength nm Relative Response 0 0 9 0 8 0 7 0 6 0 5 0 4 0 3 0 2 0 1 1 0 400 500 600 700 Wavelength nm Relative Response Blue Red Green ...

Page 67: ...es Physical Characteristics Lens mount C mount Camera housing Painted aluminium Dimensions without lens cover 11 cm 7 5 cm 4 98 cm 4 33 in 2 95 in 1 96 in Environmental The NI Smart Camera is intended for indoor use only Operating ambient temperature 0 to 50 C Humidity 10 to 90 RH noncondensing IP rating 67 Pollution degree 2 0 9 0 8 0 7 0 6 0 5 0 4 0 3 0 2 0 1 0 1 0 400 500 600 700 900 800 1000 W...

Page 68: ...tification column Electromagnetic Compatibility NI 177x Smart Cameras meet the following EMC standards for information technology equipment EN 55022 Emissions Group 1 Class A EN 55024 Immunity Basic Levels CE C Tick ICES and FCC Part 15 Emissions Class A CE Compliance NI 177x Smart Cameras meet the essential requirements of applicable European Directives as amended for CE marking as follows 2004 1...

Page 69: ...regulations and directives with which NI complies as well as other environmental information not included in this document Waste Electrical and Electronic Equipment WEEE EU Customers At the end of the product life cycle all products must be sent to a WEEE recycling center For more information about WEEE recycling centers National Instruments WEEE initiatives and compliance with WEEE Directive 2002...

Page 70: ...as only BalanceRatio DBL 0 000 to 3 999 Specifies the balance ratio of the selected component NI 177xC Smart Cameras only BalanceRatioSelector Enum Red Green Blue Specifies the balance ration to control NI 177xC Smart Cameras only BlackLevelRaw U32 0 to 255 Specifies the camera black level Coding Enum Raw Mono BGRAPacked Controls the pixel coding in the image Raw outputs the data in the native for...

Page 71: ... the exposure ExposureTime DBL μs Specifies the camera exposure time Range depends on the sensor Height U32 Pixels Gets or sets the height of the image Range depends on the sensor Gain U32 0 to 255 Specifies the input gain level Gamma DBL 0 to 1 0 Specifies the gamma correction level NI 177xC Smart Cameras only LightingCurrent DBL mA Indicates the lighting current output level LightingMaxCurrent D...

Page 72: ...ts the debounce time for the selected line The specified value is rounded to the nearest valid hardware value LUTEnable Bool Specifies or indicates whether the LUT is enabled LUTIndex U32 0 to 255 Specifies a LUT element The element corresponds to the source pixel value LUTSelector Enum Luminance Red Green Blue Specifies the LUT to control The Luminance value is only available for monochrome senso...

Page 73: ...seGeneratorEnable Bool Enables the specified pulse generator PulseGeneratorMode Enum Single Pulse Rearmed Pulse Pulse Train Gets or sets the mode of the selected pulse generator PulseGeneratorPolarity Enum Active High Active Low Gets or sets the polarity of the sepected pulse generator PulseGeneratorSelector Enum Pulse Generator 0 Pulse Generator 1 Pulse Generator 2 Pulse Generator 3 Specifies the...

Page 74: ... Specifies the counter source for the trigger delay TriggerDelayEdgeActivation Enum Rising Edge Falling Edge Specifies the activation for the trigger delay when configured for a delay TriggerMode Enum Off On Enables or disables the specified trigger TriggerOverlap Enum Readout Off Specifies the type of overlap permitted with the previous frame TriggerSelector Enum Frame Start Specifies the trigger...

Page 75: ...om UserOutputValueAll U32 0 to 4294967295 Gets or sets the value of all bits in the User Output register Width U32 Pixels Gets or sets the width of the image Range depends on the sensor Table B 1 Camera Attributes Continued Attribute Name Data Type Range Unit Description ...

Page 76: ...om I O cable Table C 1 Power and I O Cables and Accessories Description Part Number Notes Starter Kit for NI 177x Smart Cameras 782043 01 Includes all parts listed in table C 1 Power and I O accessory for NI 177x Smart Cameras 781993 01 Includes M12 to 25 pin D SUB cable 782032 01 Power supply for NI 177x Smart Cameras 782032 01 100 240 VAC IN 24 V 1 25 A M12 to 25 pin D SUB 152919 03 3 m cable in...

Page 77: ... MP 780033 01 f 1 4 1 MP Ultra low distortion 16 mm lens Computar M1620 MPV 782023 01 f 2 0 2 3 in 3 MP Ultra low distortion 25 mm lens Computar M2518 MPV 782024 01 f 1 8 2 3 in 3 MP Ultra low distortion 35 mm lens Computar M3520 MPV 782025 01 f 2 0 2 3 in 3 MP Red ring light Advanced Illuminations RL 127 782026 01 White ring light Advanced Illuminations RL 127 782027 01 Red ring light Advanced Il...

Page 78: ...tted online receives an answer Standard Service Program Membership This program entitles members to direct access to NI Applications Engineers via phone and email for one to one technical support as well as exclusive access to eLearning training modules at ni com eLearning NI offers complementary membership for a full year after purchase after which you may renew to continue your benefits For info...

Page 79: ...manufacturer s declaration of conformity This system affords the user protection for electromagnetic compatibility EMC and product safety You can obtain the DoC for your product by visiting ni com certification You also can visit the Worldwide Offices section of ni com niglobal to access the branch office Web sites which provide up to date contact information support phone numbers email addresses ...

Page 80: ...e pixels The number of light sensitive pixels on a CCD sensor B black level The value that corresponds to true black in the image C CCD Charge Coupled Device A chip that converts light into electronic signals E edge count A specified number of assertions rising falling or both in a signal exposure time The amount of time that light is allowed to strike the imaging sensor to produce an image ...

Page 81: ...titute of Electrical and Electronics Engineers A standard setting body I O Input output The transfer of data to from a computer system involving communications channels operator interface devices or data acquisition and control interfaces L LED Light emitting diode lookup table Maps pixel values in a source image to other values in a transformed image M MAX Measurement Automation Explorer A contro...

Page 82: ...ection by using a light emitter to transmit signals to a light receiver which then enables a signal current P pixel pitch The distance between the centers of adjacent pixels in either the horizontal or vertical direction PLC Programmable Logic Controller An industrial computer used for factory automation process control and manufacturing systems pulse train A signal consisting of a series of conti...

Page 83: ...l not flow through an intermediate router SXGA sensor Super eXtended Graphics Array SXGA may refer to multiple resolutions SXGA sensors used with NI 177x Smart Cameras feature a resolution of 1 280 960 pixels syntax Set of rules to which statements must conform in a particular programming language T TCP Transmission Control Protocol A set of standard protocols for communicating across a single net...

Page 84: ...ion of 640 480 pixels VI Virtual Instrument A combination of hardware and or software elements typically used with a PC that has the functionality of a classic stand alone instrument W white level The point at which values in the red green and blue color planes converge to produce white working distance The distance from the front of the camera lens to the object under inspection ...

Page 85: ...g devices 4 1 NPN devices 4 3 outputs 4 3 power 1 3 sinking devices 4 4 sourcing devices 4 3 connectors 3 1 100 1G 3 4 I O 3 2 overview 3 1 power 3 2 3 4 VBA USB 3 5 conventions used in the manual ix D Declaration of Conformity NI resources D 2 DHCP server 1 6 diagnostic tools NI resources D 1 documentation conventions used in manual ix NI resources D 1 related documentation x drivers NI resources...

Page 86: ... 100 1G 7 4 blink codes 7 3 initialization behavior 7 2 overview 7 1 Power 7 2 Status 7 2 User 7 3 look up table 5 5 M mounting information 8 1 N National Instruments support and services D 1 network connection 1 5 NI 177x acquiring images 6 2 assigning an IP address 1 6 black level 5 5 connecting I O 1 3 light controller 4 1 lighting devices 4 1 NPN devices 4 3 outputs 4 3 power 1 3 sinking devic...

Page 87: ...ng 1 3 programming examples NI resources D 1 protecting against inductive loads 4 4 R related documentation x S software LabVIEW smart camera configuration 2 4 NI resources D 1 NI Vision Builder for Automated Inspection smart camera configuration 2 2 Status indicator 7 2 blink codes 7 3 support technical D 1 T technical support D 1 training and certification NI resources D 1 troubleshooting NI res...

Reviews: