background image

Chapter 2

Mounting

FPT-1015 User Manual

2-6

ni.com

Desktop Stand Mounting

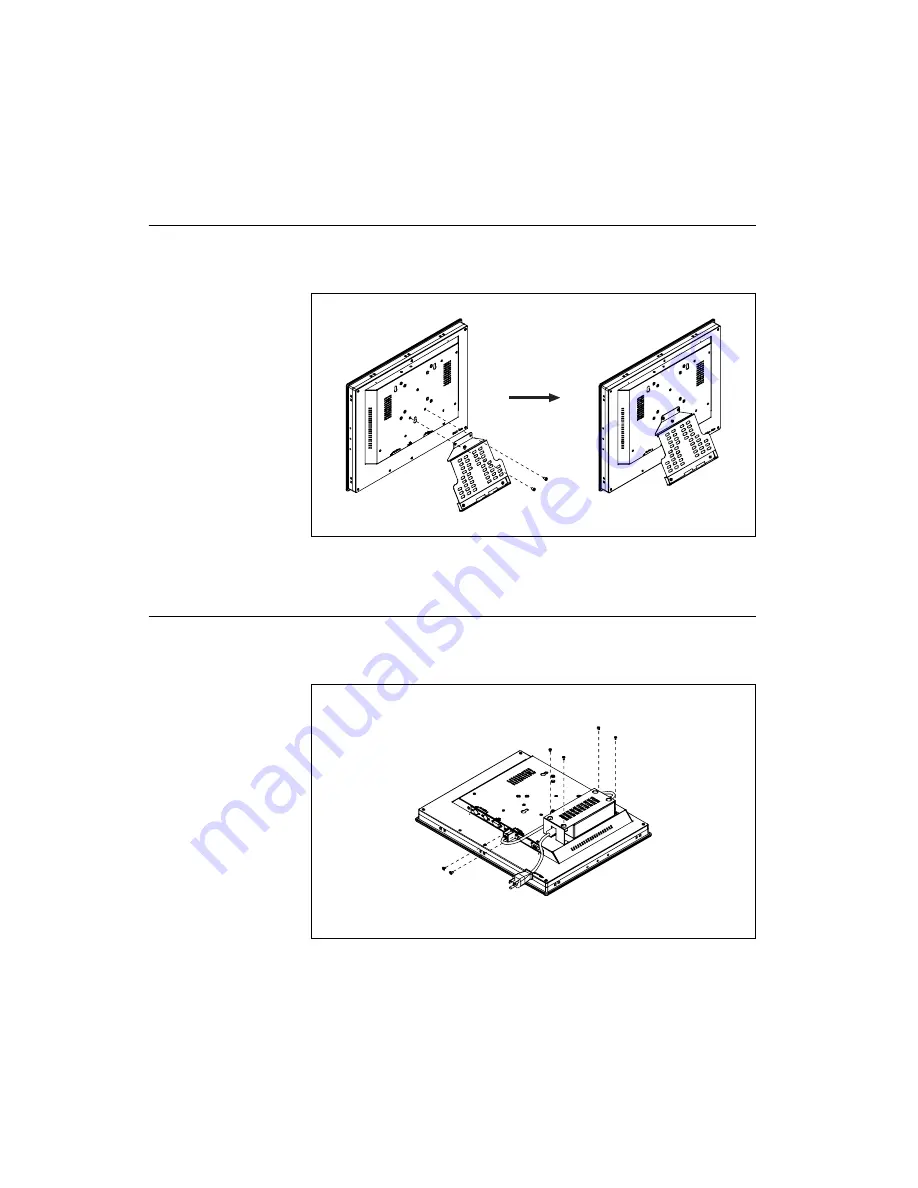
The desktop stand kit is optional. As shown in Figure 2-4, attach the 
desktop stand bracket to the rear of the monitor with two screws.

Figure 2-4.  

Desktop Stand Mounting

Power Adapter Mounting

Attach the power adapter bracket to the rear of the FPT-1015 monitor using 
four screws.

Figure 2-5.  

Power Adapter Mounting

Summary of Contents for FPT-1015

Page 1: ...FPT 1015 User Manual FPT 1015 User Manual December 2006 372051A 01...

Page 2: ...451 3400 Lebanon 961 0 1 33 28 28 Malaysia 1800 887710 Mexico 01 800 010 0793 Netherlands 31 0 348 433 466 New Zealand 0800 553 322 Norway 47 0 66 90 76 60 Poland 48 22 3390150 Portugal 351 210 311 21...

Page 3: ...ing photocopying recording storing in an information retrieval system or translating in whole or in part without the prior written consent of National Instruments Corporation National Instruments resp...

Page 4: ...t of Communications DOC Changes or modifications not expressly approved by NI could void the user s authority to operate the equipment under the FCC Rules Class A Federal Communications Commission Thi...

Page 5: ...tes a component that may be hot Touching this component may result in bodily injury bold Bold text denotes items that you must select or click in the software such as menu items and dialog box options...

Page 6: ...Touchscreen Connector 1 2 DC 12 V Power In 1 2 Chapter 2 Mounting Important Safety Information 2 1 Wall Mounting 2 3 Panel Mounting 2 4 Rack Mounting 2 5 Desktop Stand Mounting 2 6 Power Adapter Moun...

Page 7: ...ol signal input making it compatible with industrial PCs and workstations The onscreen display OSD function allows you to adjust the display and turn the backlight on and off The chassis is made of du...

Page 8: ...2 ni com USB Type B Touchscreen Connector The FPT 1015 includes this connector and a touchscreen cable if a touchscreen is installed You must connect it to the PC USB port DC 12 V Power In This conne...

Page 9: ...during installation Dropping it or letting it fall may cause damage The openings on the enclosure are for air convection Protect the equipment from overheating Do not cover the openings Make sure the...

Page 10: ...he equipment has obvious signs of breakage Do not leave this equipment in an environment where the storage temperature may go below 20 C 4 F or above 60 C 140 F Doing so could damage the equipment The...

Page 11: ...3 FPT 1015 User Manual Wall Mounting The FPT 1015 wall mounting kit is optional As shown in Figure 2 1 screw the hook and wall mounted brackets to the wall and attach the FPT 1015 to the bracket Figur...

Page 12: ...2 and follow these steps to install the FPT 1015 in a panel 1 Place the panel mounting brackets on the FPT 1015 2 Fasten the panel mounting brackets with the screws 3 Insert the FPT 1015 in the panel...

Page 13: ...ruments Corporation 2 5 FPT 1015 User Manual Rack Mounting The rack mounting kit is optional As shown in Figure 2 3 you can directly mount the FPT 1015 in a standard 19 in rack and secure it with four...

Page 14: ...kit is optional As shown in Figure 2 4 attach the desktop stand bracket to the rear of the monitor with two screws Figure 2 4 Desktop Stand Mounting Power Adapter Mounting Attach the power adapter bra...

Page 15: ...MA4 IP65 compliant Control Onscreen display OSD control pad on front side Mounting Panel wallmount rackmount with rackmount kit desktop or VESA arm Cutout dimension 373 5 297 5 mm 14 7 in 11 71 in Wei...

Page 16: ...Specifications FPT 1015 User Manual A 2 ni com Dimensions 383 15 07 307 12 08 372 6 14 66 308 26 12 13 270 59 10 65 296 6 11 67 214 1 8 42 15 0 59 4 5 0 17 18 5 0 72 48 13 1 89 100 3 93 75 2 95 100 3...

Page 17: ...a 5 8 in diameter silicone finger with a 350 g load at 2 touches per second Contact bounce 10 ms Operating voltage 5 V typical Sheet resistance 350 22 per square Linearity 1 5 full scale linearity er...

Page 18: ...ging 100 h at 60 C 95 relative humidity Thermal shock 25 cycles one cycle is 30 min dwell alternating from 40 to 85 C with less than 10 min transfer time LCD Display type XGA TFT LCD Display size 15 i...

Page 19: ...erature low 40 C continuous at ambient humidity LCD Operating temperature 0 to 50 C 32 to 122 F Storage temperature 20 to 60 C 4 to 140 F Safety This product is designed to meet the requirements of th...

Page 20: ...23 EEC Low Voltage Directive safety 89 336 EEC Electromagnetic Compatibility Directive EMC Note Refer to the Declaration of Conformity DoC for this product for any additional regulatory compliance in...

Page 21: ...es listed in Table B 1 Note Even if you use the preset timing you may need to adjust functions such as horizontal period CLK delay and display position The adjusted values are memorized in every prese...

Page 22: ...nge No signal detected or out of range Green and blinking The backlight is off No color Power is off Table B 2 Key Functions Key Function Auto Executes the autoadjustment process Sel Shows the OSD scr...

Page 23: ...function menus Table B 3 OSD Function Menus Main Menu Submenu Functionality Brightness Adjust the display brightness Contrast Contrast Adjust RGB channel contrast simultaneously Color 9300k 6500k Use...

Page 24: ...d follow the installation instructions Configuring the Touchscreen After you install the touchscreen driver the FPT 1015 automatically finds the new touchscreen controller board on rebooting The touch...

Page 25: ...g advanced calibration for greater accuracy Plot Calibration Data When you select this function a touch panel linearity comparison graph appears after you finish advanced calibration The blue lines sh...

Page 26: ...s Touch the screen 8 Touch the red square messages appear Touch the red squares in sequence 9 Continue calibration for each monitor by clicking Standard Calibration and touching the red squares Note I...

Page 27: ...h In this mode the beep occurs when the pen goes down and up Beep Frequency This option modifies the sound frequency Beep Duration This option modifies the sound duration Cursor Stabilizer Select this...

Page 28: ...play shows touch location Click Draw to start When you touch the screen with your finger or a stylus the drawing screen registers touch activity such as left right up down pen up and pen down Click Cl...

Page 29: ...u turn on PenMount Monitor in PenMount USB Utilities PenMount Monitor has the following functions Control Panel Brings up the PenMount Control Panel Beep Turns the beep on or off Right Button When you...

Page 30: ...very question receives an answer For information about other technical support options in your area visit ni com services or contact your local office at ni com contact Training and Certification Visi...

Page 31: ...sources D 1 dimensions A 2 display timing mode B 1 documentation conventions used in the manual v NI resources D 1 drivers NI resources D 1 E electromagnetic compatibility specifications A 6 environme...

Page 32: ...river for Windows C 1 introduction C 1 PenMount Control Panel C 1 specifications A 3 Waste Electrical and Electronic Equipment specifications A 6 H help technical support D 1 I instrument drivers NI r...

Page 33: ...safety A 5 touchscreen A 3 Waste Electrical and Electronic Equipment compliance A 6 standard calibration C 2 support technical D 1 supported input formats table B 1 supported input timing modes B 1 T...

Reviews: