13
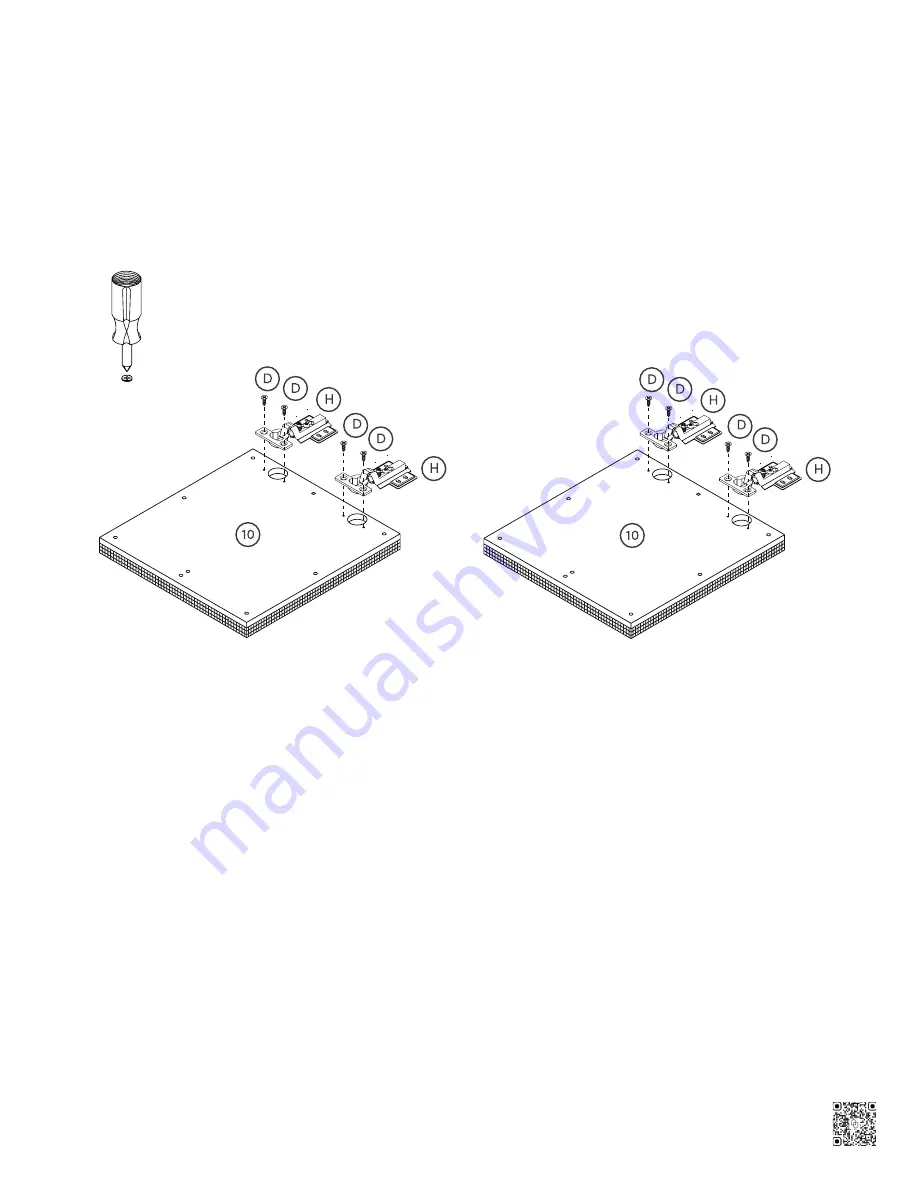
Hinge time! Attach the Hinges (H) to the Doors (10) using the M4*12mm Screws (D).
Step 8
Page 1: ...Bonnie Media Unit Let s build the 22 0923 Scan me Inspiration Digital Instructions Free Lifetime Warranty 115 1 1 5 MINU T E A S S E M B L Y SKU 74201...
Page 2: ...m Unit 1 3 Left Side Panel 1 4 Right Side Panel 1 5 Left Division Panel 1 6 Right Division Panel 1 7 Shelf 1 8 Side Back Panel 2 9 Middle Back Panel 1 10 Doors 2 11 Legs 4 12 Drawer Front Panel 1 13 D...
Page 3: ...not tighten bolts screws completely until all bolts screws are lined up and inserted into holes 2 Do not over tighten screws and bolts to avoid stripping 3 Please use hand tools to assemble this prod...
Page 4: ...M4 12mm Screw 24 E M3 5 10mm Screw 14 F M4 35mm Screw 8 G Door Stop 2 H Hinge 4 I M6 50mm Bolt 8 J Flat Washer 8 K Knob 3 L M4 25mm Bolt 2 M Drawer Runner 1 N M4 16mm Bolt 1 O M4 30mm Screw 4 R Allen...
Page 5: ...s screws completely until all bolts screws are lined up and inserted into holes 2 Do not over tighten screws and bolts to avoid stripping 3 Please use hand tools to assemble this product Do not use po...
Page 6: ...d thing Place the Top Panel 1 on the floor and screw the Cam Bolts A into their corresponding holes Next attach the Door Stops G to the left and right side using the M3 5 10mm Screws E Step 1 E E G A...
Page 7: ...e Runner labeled CL should be attached to the Left Division Panel 5 and the Runner labeled CR should be attached to the Right Division Panel 6 After you ve attached the Drawer Runners M secure the Cam...
Page 8: ...C into their corresponding holes in the sides of the Shelf 7 Then attach the Left Division Panel 5 and Right Division Panel 6 to the Shelf 7 by aligning the Wood Dowels C with the corresponding holes...
Page 9: ...holes in the Top Panel 1 Attach the Right Side Panel 4 the middle section you assembled in Step 3 and the Left Side Panel 3 to the Top Panel 1 by aligning the holes with the Wood Dowels C you just in...
Page 10: ...10 This one should be a piece of cake Slide the Side Back Panels 8 and Middle Back Panel 9 into the slots in the cabinet you assembled in Step 4 Step 5 8 8 9...
Page 11: ...attach the Bottom Unit 2 to the rest of the cabinet you ve assembled by first inserting 6 30mm Wood Dowels C into the corresponding holes in the side of the cabinet Once aligned secure in place using...
Page 12: ...Legs 11 to the Bottom Unit 2 using the 6 50mm Bolts I First place the a Flat Washer J then a Spring Washer S then the 6 50mm Bolt I Tighten using the provided Allen Key R Repeat this process for all 4...
Page 13: ...13 Hinge time Attach the Hinges H to the Doors 10 using the M4 12mm Screws D Step 8...
Page 14: ...time to attach those doors Attach the Doors 10 to the Left Side Panel 3 and Right Side Panel 4 by securing the Hinges H using the M4 12mm Screws D Repeat this for all hinges on both doors you ll use...
Page 15: ...our door is too low or too high Loosen the height screws then move the door up or down to make it level If the space between your doors is off Loosen the side to side screws then screw counter clockwi...
Page 16: ...e secure slide the Drawer Bottom Panel 16 into place Next screw the Cam Bolts A into the corresponding holes in the Drawer Front Panel 12 Align those Cam Bolts A with the corresponding holes in the Dr...
Page 17: ...d be attached to the left side while the Runner labeled DR should be attached to the right side You ve made it to the final step We made this step super easy because you deserve it Attach the Knob K t...
Page 18: ...t with zero hassle We really don t want you to go through the hassle of re packaging your item and sending it back because let s be honest nobody has time for that No heartburn when we handle the retu...
Page 19: ...tdoors Proper use Safety first fun later Safe use of this product starts with you Use this Bonnie Media Unit responsibly with the primary concern for your safety Follow assembly instructions carefully...
Page 20: ...happy For starters thanks for being you Toll free at 1 866 619 1004 Help nathanjames com NathanJames com help We do our best to ensure your furniture arrives without any problems but occasionally mis...