background image

Page 2 

   National Communications

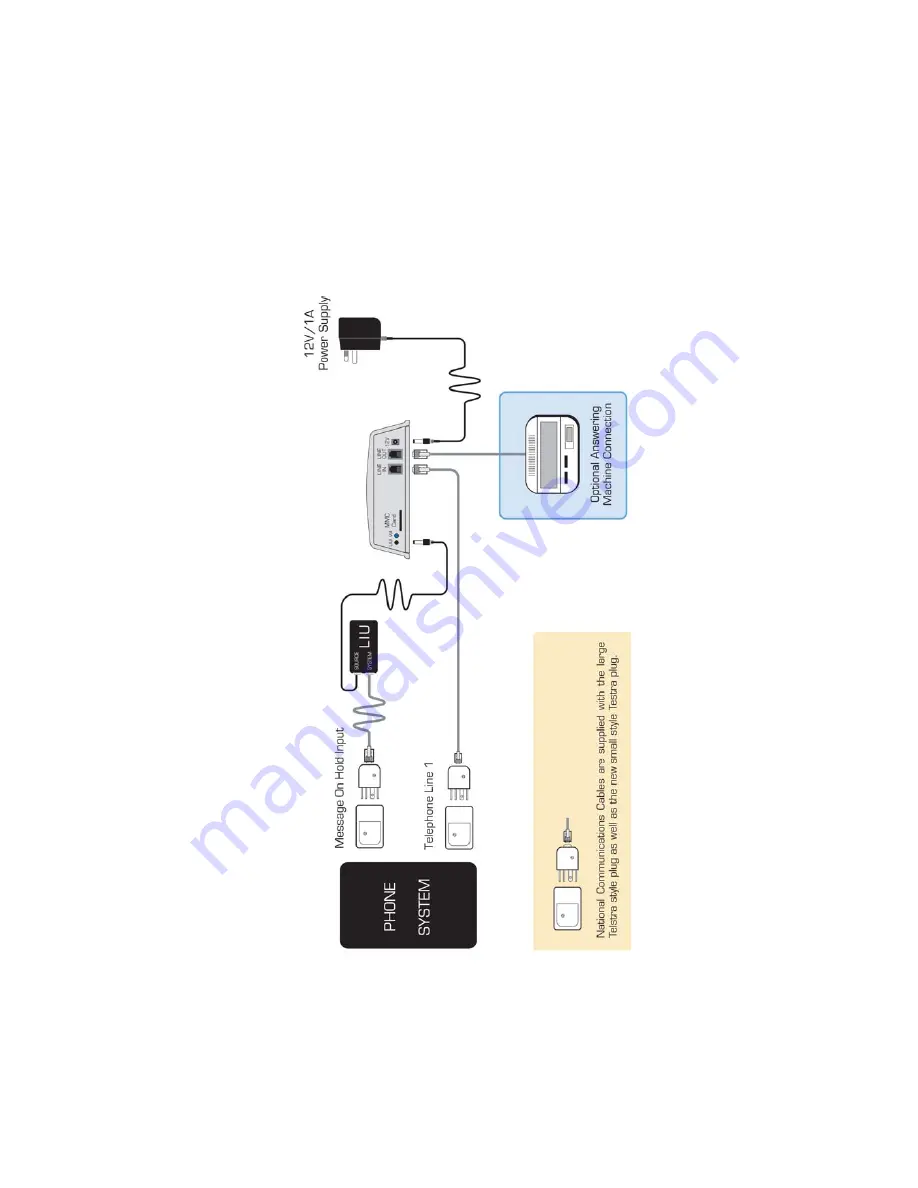
INSTALLATION DIAGRAM

Summary of Contents for DMS

Page 1: ...DMS USER GUIDE For Technical Assistance Please Phone 07 5596 5128 September 2015 ...

Page 2: ...Page 2 National Communications INSTALLATION DIAGRAM ...

Page 3: ...s can leave a Message There is anANSWER ON OFF Touch Switch located on the front face Touching this switch once will turn the Answering Facility ON Red Light will turn ON You should do this when leaving the office Touching it again will turn the After Hours Answering Announcement facility OFF Red Light will turn OFF You should do this when arriving at the office ATTENDED OFFICE OPERATION Red Light...

Page 4: ...11 DMS will then RING your Answering Machine at the completion of your Announcement Message TO SET DMS TO OPERATE WITH AN ANSWERING MACHINE enter 410 when in the programming mode See page 15 Section D 2 for more details Important Notes 1 You should turn your Answering Machine ON and leave it ON at all times 2 You should set your Answering Machine to answer as quickly as possible to minimize the de...

Page 5: ...e MP3 Files used with DMS must be named as follows One MP3 file is for the ANNOUNCEMENT MESSAGE NOTE The filename of this message MUST START WITH 001 so that DMS knows that this Message is to be used for announcements example 001XYZcompanyannouncement MP3 The other MP3 file is for the ON HOLD MESSAGE The filename of this message MUST START WITH 002 or any number up to 019 so that DMS knows that th...

Page 6: ...P3 005XYZcompanyannouncement MP3 2 The On Hold Messages must be numbered with filenames beginning with 006 007 008 009 and 010 You can up to FIVE 006XYZcompanyonhold MP3 007XYZcompanyonhold MP3 008XYZcompanyonhold MP3 009XYZcompanyonhold MP3 010XYZcompanyonhold MP3 3 Load All Mesaages onto the SD Card in strict numeric order 4 Install the DMC Control Program as per the separate Time Programmable M...

Page 7: ...ne System On Hold Port using a Line Isolation Unit Please refer to pages 8 9 2 AFTER HOURS ANNOUNCEMENT INSTALL This involves connecting DMS in place of an Answering Machine OR If an Answering Machine has not been used previously DMS will need to be connected in parallel to LINE 1 of the Telephone System Please refer to pages 10 11 Important Note DMS should be connected in parallel with Line 1 ...

Page 8: ...dio Output Cord of the existing LIU to the 3 5mm Audio Output connector of your DMS unit Note If the existing LIU does not use a 3 5mm Audio Plug then you will need to replace the existing LIU with a new LIU which has a 3 5mm Audio Plug These are available from National Communications ph 07 55965128 4 Power Connection A 12VAC 1A power adaptor is supplied with your unit This must be connected to an...

Page 9: ... connection and a 3 5mm audio connector must be used to connect the audio output from your DMS unit to the ON HOLD input port of your telephone system This is an ACMA safety requirement Note Some Telephone Systems may use an RCA or a 3 5mm audio socket for their ON HOLD connection port If this is the case you will need to use an LIU fitted with the appropriate plug LIU s with all connection types ...

Page 10: ... which is switched ON 5 Announcement Message Volume Check Turn On the Announcement facility by pressing the Button located on the top face of DMS Place a call to the telephone system by dialing your normal telephone number DMS will then ANSWER your call and play your Announcement Message before hanging up note DMS will take approx 15 seconds before hanging up as it is programmed by default to ring...

Page 11: ...chine is required to record incoming messages then you should connect it to the LINE OUT port located at the rear of DMS 3 Power Connection A 12VDC 1A power adaptor is supplied with your unit This must be connected to an electrical power outlet which is switched ON 4 Announcement Message Volume Check Turn On the Announcement facility by pressing the Button located on the top face of DMS Place a ca...

Page 12: ...t Up process During this time DMS will carry out a series of self diagnosis procedures where it will check the SD Card Power Supply and other important areas It will then play the Announcement Message first once only before proceeding to loop the On Hold Message ANNOUNCEMENT OPERATION TO TURN THE ANNOUNCEMENT ON To set DMS to Automatically ANSWER all INCOMING CALLS on your Main Telephone Line Line...

Page 13: ... MESSAGE Remove the Audio Connection from the AUDIO OUT port on the back of your unit If you can hear your message through the speaker located within DMS everything is fine and you can now re insert the Audio Connection to the AUDIO OUT port on the back of your unit If you CANNOT hear your message through the speaker located within DMS 1 Check or change your power connections until the AUDIO start...

Page 14: ...ut port as Program Changes are made by using touch tone keys THE DEFAULT SETTINGS OF THIS DEVICE ARE 1 DMS will ANSWERS CALLS IN 2 RINGS You can change this to 1 20 Rings 2 DMS will NOT RING the LINE OUT port after playing its message If you plan to use an Answering Machine you MUST program DMS to RING the LINE OUT after playing its message This RING will cause an Answering Machine to Answer after...

Page 15: ... beeps return to the start A D ENTER PROGRAMMING CHANGES AS FOLLOWS You can change one or more parameters in any order 1 RING COUNT BEFORE ANSWER To enter the NUMBER OF RINGS press 1xx on the telephone where xx number of rings and can be 00 19 To Answer in 2 rings press 102 Default To Answer in 8 rings press 108 Please wait for confirmation beep before proceeding 2 PROGRAM ANSWERING MACHINE OPERAT...

Page 16: ... the nature of the problem This Warranty shall not apply to any unit which has been subject to alteration modification abuse negligence accident external voltage lightning surge or used in any manner contrary to these instructions The obligation is solely to repair or replace the product The warrantor is not liable for any incidental or consequential damages due to such defects The user is respons...

Reviews: