background image

Unscrew and remove the two wing nuts from the rear of the
instrument and remove the stainless steel clamping bracket.
Fit the “O” ring seal into the groove in the panel mounting face of
the instrument. Ensure that it is correctly lying in its groove
before fitting the instrument to the panel, which provides the
watertight seal for the display.

Fit the instrument into the panel, fit the stainless clamp over the
studs, fit and tighten the two wing nuts finger tight only.

It is important that the O-ring rubber seal makes good contact
with the panel to prevent water getting behind the unit and
entering the cavity behind the panel.

It is good practice to run the cables vertically downwards from the
unit, even if they later have to rise to connect to the vessel’s
supplies. Doing so prevents any water that might get onto the
cables from running back along the cables and into the unit.

INSTALLING THE LOG PADDLE WHEEL UNIT

The paddle wheel should be installed at a point in the hull where:-


It is immersed at all attitudes under power or sail.

The blades of the paddle wheel are presented with a
smooth flow of water corresponding  to the vessel’s speed
through the water. On displacement hulls this is usually
about amidships, but on planing hulls it should be as far aft
as possible.

It should be easily accessible in the bilges for cleaning and 
laying up. A blanking cap is provided to seal the skin fitting
when the paddle wheel is removed.

It is not vulnerable to damage from unforgiving surfaces
such as trailers and lifting slings.

(a)

(b)

(c)

(d)

3

Summary of Contents for Clipper duet

Page 1: ...SPEED TOTAL TRIP ILLUM CLIPPER DUET DEPTH F E E T M P H Duet CLIPPER DUET COMBINED LOG AND ECHO SOUNDER ...

Page 2: ......

Page 3: ... NOTES ON ELECTRICAL INTERFERENCE USING THE INSTRUMENT SETTING THE MINIMUM DEPTH ALARM SETTING THE SPEED ALARM CHANGING THE OPERATING CONFIGURATION TO SELECT THE OPERATING UNITS SETTING THE KEEL OFFSET CHANGING THE GAIN THRESHOLD CHANGING THE LOG CALIBRATION OPERATION FLOW DIAGRAM 2 2 3 5 6 7 7 8 8 8 9 9 10 12 1 ...

Page 4: ...imes The cable entry is deliberately not sealed to ensure adequate ventilation This prevents misting of the display Cut a hole in the panel 87mm wide and 67mm high Bring the wiring through the hole in the panel and connect the black wire to negative and red to positive See Figure 1 It is wise to use a fused supply to provide protection should a fault occur The current consumption is very small so ...

Page 5: ...ertically downwards from the unit even if they later have to rise to connect to the vessel s supplies Doing so prevents any water that might get onto the cables from running back along the cables and into the unit INSTALLING THE LOG PADDLE WHEEL UNIT The paddle wheel should be installed at a point in the hull where It is immersed at all attitudes under power or sail The blades of the paddle wheel ...

Page 6: ...mbly in G R P As shown on Figure 2 Take care to ensure that a minimum of 20mm of thread is clear at the top of the paddle housing The paddle wheel unit can now be slid into the housing so that it is exposed to the water flow with the arrow pointing forward along the centre line of the vessel It is recommended that a little silicon grease is smeared over the rubber O ring to keep the unit free Tigh...

Page 7: ...ow the water level where the transducer will point substantially vertically downwards towards the seabed and where the transducer and its cable do NOT shorten the transducer cable will be well clear of equipment which might be a source of interference Such sources might include the engine ignition and starting systems alternators and dynamos electric pumps etc The position should also be well clea...

Page 8: ...bubble will cause a considerable loss in performance The transducer and the place of mounting must be kept entirely free of any antifouling compound as this can also effect the performance of the unit Plug the transducer into the transducer socket on the display NOTES ON ELECTRICAL INTERFERENCE External electrical interference is characterised by persistent random numbers on the display which obsc...

Page 9: ... of the display the top corners being omitted Pressing ILLUM again will turn the backlight off Pressing SPEED will return to boat speed The instrument will show depth at all times If the echo is temporarily lost then the depth units will momentarily flash If the echo is completely lost then the display will show OUT SETTING THE MINIMUM DEPTH ALARM This is done during normal operation Press SPEED a...

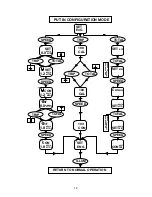
Page 10: ...lso gives access to the gain threshold the keel offset the speed alarm and the log calibration settings To enter the configuration mode turn the power off press and keep depressed the ILLUM key then turn the power to the instrument on When the key is released the display will show SET ENG The instrument is now in the configuration mode TO SELECT THE OPERATING UNITS Put the instrument into the conf...

Page 11: ... and the lower half the current keel offset value Use TRIP to decrement and TOTAL to increment this value Pressing SPEED will enter this new value The display will briefly show CON to confirm the operation and then return to the SET ENG display If no further settings are to be made then pressing the ILLUM key will exit the configuration mode and return to normal operation CHANGING THE GAIN THRESHO...

Page 12: ... return to the SET ENG display If no further settings are to be made then pressing the ILLUM key will exit the configuration mode and return to normal operation CHANGING THE LOG CALIBRATION The calibration factor determines the number of revolutions of the paddle required to represent a fixed distance The instrument is pre calibrated in the factory However the type of hull and the position of the ...

Page 13: ...the same percentage change that must be made For example if the instrument is found to under read by 6 then the calibration factor should be increased by 6 Pressing SPEED will enter a new calibration factor and return to the SET ENG display If no further settings are to be made then pressing the ILLUM key will exit the configuration mode and return to normal operation 11 ...

Page 14: ...DEPTH 0 0 MTRS t TRIP TOTAL thr DEPTH 1 8 MTRS t SPEED CON DEPTH 1 8 MTRS t TOTAL SET KTS TOTAL SET MPH SPEED Con MPH SET DEPTH MTRS TOTAL SET DEPTH FEET SPEED CON DEPTH FEET SET ENG ILLUM RETURN TO NORMAL OPERATION TRIP 100 CAL TRIP TOTAL 103 CAL SPEED 103 CON PRESS TO SELECT DESIRE D UNITS PRESS TO SELECT DESIRE D UNITS ...

Page 15: ......

Page 16: ... prudently and check its operation from time to time against other data Inspect the installation from time to time and seek advice if any part thereof is not fully seaworthy Nasa Marine Ltd warrants this instrument to be substantially free of defects in both materials and workmanship for a period of one year from the date of purchase Nasa Marine Ltd will at its discretion repair or replace any com...

Reviews: