background image

18

W415-0607 / A / 01.18.08

RESTRICTING VERTICAL VENTS

Vertical termination installations exiting either from the rear or the top flue collar of the stove may display a 
very active flame. If this appearance is not desirable, the vent exit must be restricted to reduce the velocity of 
the exhaust gases, thus slowing down the flame pattern and creating a more traditional gentle appearance.
Remove the baf

fl

 e plate from the rear wall of the 

fi

 rebox, exposing the 

fl

 ue gas outlet opening. Superimpose this outlet hole 

with the smaller hole on the kit restrictor plate. Secure with the two screws provided and replace the baf

fl

 e plate. 

VERTICAL VENTING INSTALLATION

    1. 

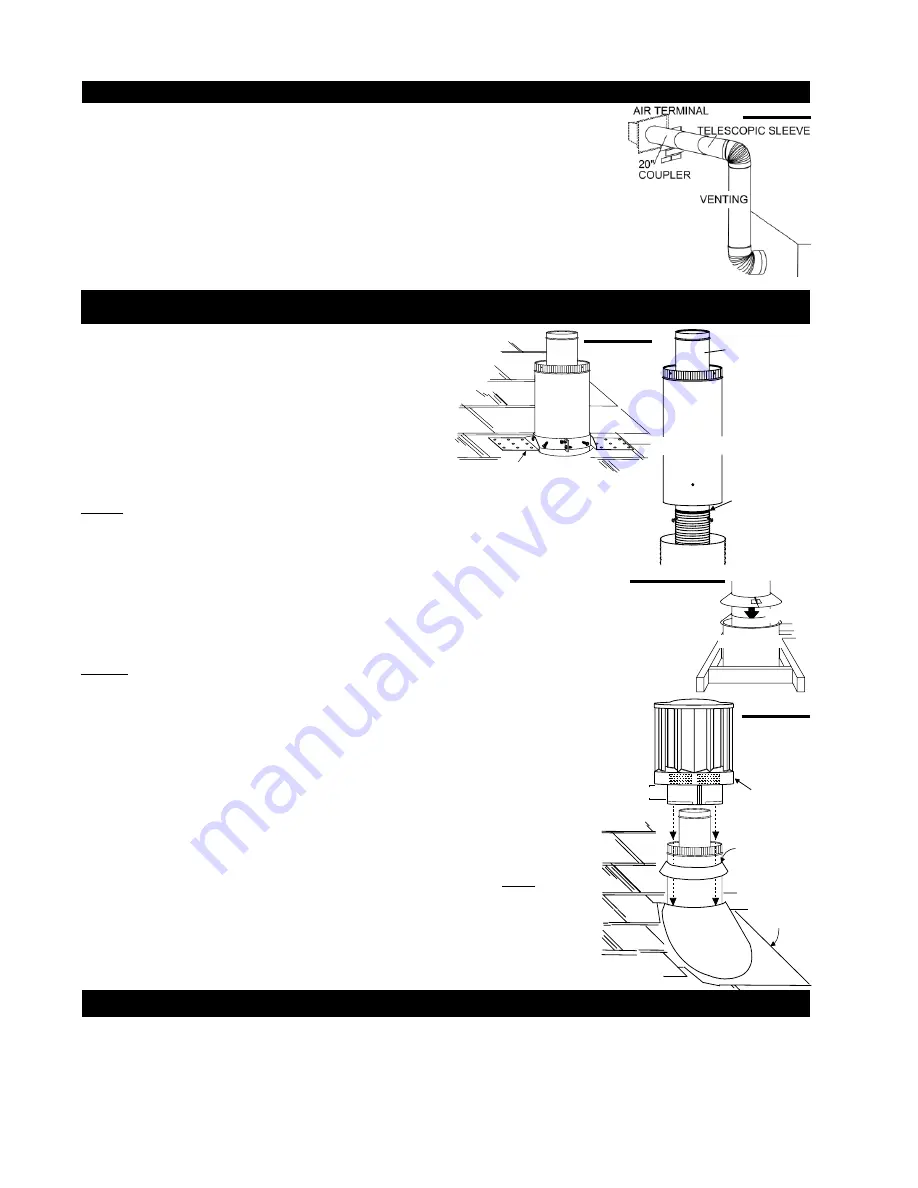
Follow the instructions for "Horizontal Air Terminal Installations", items 1 to 3. 

    2. 

Continue adding components alternating 

fl

 exible and rigid vent pipes. Ensure that all 4" 

fl

 exible vent pipes and elbows have suf

fi

 cient vent spacers attached and each component is 

securely fastened to the one prior. Attach the 4" telescopic sleeve to the vent run. 
Repeat using a 7" telescopic sleeve. Secure and seal as before. To facilitate completion, attach 
4" and 7" couplers to the air terminal. 

    3.

 Install the air terminal. 

See item 3 of the Horizontal Air Terminal Installation.

 Extend the 

4" telescopic sleeve; connect to the air terminal assembly. Fasten with self tapping screws 
and seal. Repeat using the 7" telescopic sleeve.

FIGURE 26

EXTENDED HORIZONTAL AND CORNER AIR TERMINAL INSTALLATION

      1.

 Fasten the roof support to the roof using the screws 

provided. The roof support is optional. In this case the venting 
is to be adequately supported using either an alternate method 
suitable to the authority having jurisdiction or the optional roof 
support. 

   2. 

Stretch the 4" 

fl

 exible vent pipe to the required length. Slip 

the vent pipe a minimum of 2” over the inner pipe of the air 
terminal connector and secure with 3 #8 screws. Seal using a 
heavy bead of the high temperature sealant W573-0002 (not 
supplied).

NOTE:  If using pipe clamps to connect vent components, 3 screws must also be used to 
ensure the connection cannot slip off.  


3.

  Slip the 7" rigid vent pipe a minimum of 2" over the air terminal connector and secure 

with 3 #8 screws.  Seal using a heavy bead of the high temperature sealant W573-0002 (not 
supplied). 
  

 4

. Thread the air terminal connector / vent pipe assembly down through the roof. The air terminal 

must be located vertically and plumb.  Attach the air terminal connector to the


roof support, ensuring 

that the top of the air terminal is 16” above the highest point that penetrates the roof.  

If the attic space is tight, we recommend threading the Wolf Steel vent pipe collar or equivalent 

loosely onto the air terminal connector / vent pipe assembly as it is passed through the attic. 
The air terminal connector must be located vertically and plumb.


 5.

 Remove nails from the shingles, above and to the sides of the chimney. Place the 

fl

 ashing over the air terminal connector leaving a min. 3/4” of the air terminal connector 

showing above the top of the 

fl

 ashing.  Slide the 

fl

 ashing underneath the sides and 

upper edge of the shingles. Ensure that the air terminal connector is properly centred 
within the 

fl

 ashing, giving a 3/4” margin all around. Fasten to the roof. Do not nail 

through the lower portion of the 

fl

 ashing. Make weather-tight by sealing with caulking. 

Where possible, cover the sides and top edges of the 

fl

 ashing with roo

fi

 ng material.  


 6.

 Aligning the seams of the terminal and air terminal connector, place the terminal 

over the air terminal connector making sure the inner pipe goes into the hole in the 
terminal.  Secure with the three screws provided.  

  7.

 Apply a heavy bead of weatherproof caulking 2" above the 

fl

 ashing.  Note:  Maintain 

a minimum 2” space between the air inlet base and the storm collar.  Install the storm 
collar around the air terminal and slide down to the caulking. Tighten to ensure that a 
weather-tight seal between the air terminal and the collar is achieved.  

ROOF SUPPORT

AIR

TERMINAL

CONNECTOR

4” FLEX 
VENT PIPE

7” RIGID
VENT PIPE

INNER
PIPE

HIGH
TEMPERATURE
SEALANT

STORM COLLAR

FLASHING

CAULKING

WEATHER
    SEALANT

2”

AIR INLET
BASE

FIGURE 27

FIGURE 28a&b

FIGURE 29

SHIELD

VENT

PIPE

COLLAR

VENT PIPE

Summary of Contents for Castlemore GDS26N

Page 1: ...life Do not store or use gasoline or other flammable vapors and liquids in the vicinity of this or any other appliance WHAT TO DO IF YOU SMELL GAS Do not try to light any appliance Do not touch any e...

Page 2: ...ve with the glass door removed cracked or broken Replacement of the glass should be done by a licensed or qualified service person Do not strike or slam shut the stove glass door This stove uses and r...

Page 3: ...hanical breakage of PHAZER logs and embers nor any venting components used in the installation of the stove NAPOLEON warrants its stainless steel burners against defects in workmanship and material fo...

Page 4: ...installation of a stove insert or gas log A carbon monoxide detector is required in all rooms containing gas fired appliances The appliance off valve must be a T handle gas cock The flexible connecto...

Page 5: ...ac When using Wolf Steel venting components use only approved Wolf Steel rigid flexible components with the following termination kits Wall Terminal Kit GD222 or 1 12 to 7 12 Pitch Roof Terminal Kit G...

Page 6: ...ed so that when final grading is completed the bottom air slot is located a minimum of 12 inches above grade The maximum allowable vent length is 10 ft PERISCOPE TERMINATION FIGURE 4b FIGURE 4a 24 MIN...

Page 7: ...7 W415 0607 A 01 18 08 FIGURE 6 MINIMUM AIR TERMINAL LOCATION CLEARANCES...

Page 8: ...m of 40 feet Vertical rise is equal to or greater t h a n t h e horizontal run Horizontal run verti cal rise to m a x i m u m of 40 feet Vertical rise is equal to or greater t h a n t h e horizontal r...

Page 9: ...lines represents acceptable values for HT and VT for the following symbols used in the venting calculations and examples are greater than equal to or greater than less than equal to or less than HT to...

Page 10: ...4 ft V2 1 5 ft VT V1 V2 4 1 5 5 5 ft H1 2 ft H2 1 ft H3 1 ft H4 1 5 ft HR H1 H2 H3 H4 2 1 1 1 5 5 5 ft HO 03 four 90 elbows 90 03 360 90 8 1 ft HT HR HO 5 5 8 1 13 6 ft HT VT 13 6 5 5 19 1 ft Formula...

Page 11: ...ts acceptable values for HT and VT REAR EXIT HORIZONTAL TERMINATION Simple venting configuration only two 90 elbows FIGURE 13 H3 90 90 90 V2 H1 V1 H2 V1 9 ft V2 6 ft VT V1 V2 9 6 15 ft H1 3 ft H2 2 ft...

Page 12: ...VT 24 75 feet 20 45 24 75 Since both formulas are met this vent configuration is acceptable FIGURE 15 For vent configurations requiring more than two 90 elbows the following formulas apply Formula 1 H...

Page 13: ...6 ft HT VT 18 6 21 39 6 ft Formula 1 HT VT 18 6 21 Formula 2 HT VT 40 feet 39 6 40 Since both formulas are met this vent configuration is acceptable FIGURE 16 For vent configurations requiring more t...

Page 14: ...llar of the termination cap must be connected to the air intake pipe Use Simpson Duravent Chimney Liner Termination Kit 923GK Base plate and Co Linear to Co Axial Adaptor Follow manufacturers Simpson...

Page 15: ...t 4 Gasket 4 Collar 7 Gasket 7 Collar Outer Top 4 Cover Plate In order to convert the venting configuration from a top exit to a rear exit remove components as illustrated When reinstalling in the alt...

Page 16: ...T 9 9 VENT PIPE SHIELD CAULKING This application occurs when venting through an exterior wall Having determined the air terminal location cut and frame a hole in an exterior wall with a minimum rectan...

Page 17: ...f the 4 flexible vent pipe over the inner sleeve of the air terminal Secure to the inner sleeve using 3 screws Seal the joint and screw heads using the high temperature sealant W573 0002 not supplied...

Page 18: ...t components 3 screws must also be used to ensure the connection cannot slip off 3 Slip the 7 rigid vent pipe a minimum of 2 over the air terminal connector and secure with 3 8 screws Seal using a hea...

Page 19: ...USE OPEN FLAME Purge all gas lines with the glass door of the stove re moved Assure that a continuous gas flow is at the burner before re installing the door This appliance is certified to be installe...

Page 20: ...pplied The stove requires a minimum ceiling height of 47 1 2 for a rear vent For temperature requirements the space around and above the stove must be left unobstructed 5 BRICK COMBUSTIBLE NON COMBUST...

Page 21: ...E 36 NIGHT LIGHT REPLACEMENT 1 Remove the door from the firebox 2 Run the wires up through the lens hole 3 Align key hole with lens assembly 4 Snap into place 5 Replace light shields attach the wires...

Page 22: ...FIGURE41b 1 Place the door frame face down careful not to scratch the paint 2 Center the gasketed glass inside the door frame with the thick side of the gasket facing up 3 Bend the glass retainers lo...

Page 23: ...urner Care should be taken to shred the embers into thin small irregular pieces as only the exposed edges of the fibre hairs will glow The ember material will only glow when exposed to direct flame ho...

Page 24: ...detail for optional wall switch GD 660 wiring Main Burner Switch WIRING DIAGRAM The main burner on off switch and Night LightTM switch is located behind lower access panel For ease of accessibility o...

Page 25: ...IF SERVICE IS TO BE PERFORMED 3 TURN MANUAL SHUTOFF VALVE CLOCKWISE TO OFF DO NOT FORCE FOLLOW B IN THE ABOVE SAFETY INFORMATION ON THIS LABEL IF YOU DON T SMELL GAS GO TO THE NEXT STEP 8 CLOSE THE GL...

Page 26: ...e by a qualified gas installer FIGURE 51 ADJUSTMENTS PILOT INJECTOR AND ORIFICE REPLACEMENT VENTURI ADJUSTMENT Remove the 2 screws securing the burner Natural gas models have air shutters set to 0 188...

Page 27: ...N OFF SWITCH 14 W387 0009 HALOGEN BULB 5W 15 W387 0004 LAMP 5 WATT 12 VOLT 77 914 GE38 M 16 W135 0292 CAST FRONT 17 W135 0291 CAST SIDE LEFT OR RIGHT CAST 18 W135 0293 CAST TOP 19 W225 0294 CAST CONTR...

Page 28: ...28 W415 0607 A 01 18 08 AT TE NT IO N CH AU D CA UT IO N HO T 27 44 35 18 6 7 46 17 5 11 1 3 2 23 8 26 29 31 32 34 34 28 34 25 24 33 41 38 37 40 39 21 16 4...

Page 29: ...wire about 3 16 away from the I terminal on the module If no spark the I terminal module must be replaced If there is a spark the I terminal is fine Inspect pilot assembly for a shorted wire or cracke...

Page 30: ...ed in the right order Module or Valve Conduct the following test to verify if the problem is the module or valve To measure voltages turn multimeter to DC place the red lead from multimeter on the scr...

Page 31: ...31 W415 0607 A 01 18 08 Wolf Steel Fireplace Service History This fireplace must be serviced annually depending on usage Date Service Technician Name Service Performed Special Concerns Dealer Name...

Page 32: ...32 W415 0607 A 01 18 08 NOTES...

Reviews: