EN
W415-1467 / 04.22.15
19
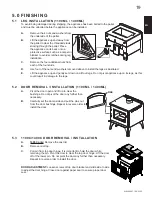
To avoid being damaged during shipping, the appliance has been bolted to the pallet
and must be unbolted before the appliance can be installed.
A.
Remove the 4 nuts and washers from
the underside of the pallet.
B.
Lift the appliance up and away from
the pallet to clear the threaded studs
sticking through the pallet. Place
the appliance on its back onto a
protective surface such as a carpet or
blanket to avoid scratches during leg
installation.
C.
Remove the four additional nuts from
each of the four studs.
D.
Use four of the nuts and washers removed above to install the legs as illustrated.
E.
Lift the appliance up and gently set down on all four legs. Do not pivot appliance up on its legs, as this
could result in damage to the legs.
5.0 FINISHING
PINS
A.
Pivot the door open and lift up to clear the
bushings. Do not pivot the door any further than
necessary.
B.
Carefully set the door aside and pull the pins out
from the door bushings. Repeat in reverse order to
install the door.
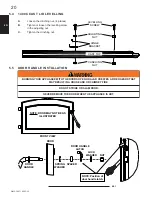
A. 1400C
only:
Remove the cast lid.
B.
Remove cast top.
C.
Pull pin from top door hinge. It is important to hold the door while
removing the pin. Pivot the door to clear the top door hinge. Lift the door
off of the lower pin. Do not pivot the door any further than necessary.
Repeat in reverse order to install the door.
DOOR ADJUSTMENT:
Loosen screws of top door bracket and slide side to side
to adjust the door hinge. Close door against paper seal to ensure proper door
seal.
5.1 LEG INSTALLATION (1100ML / 1400ML)
5.2 DOOR REMOVAL / INSTALLATION (1100ML / 1400ML)
5.3 1100C/1400C DOOR REMOVAL / INSTALLATION


