background image

10

  4. USING thE GAS BURNER

4.1. Igniting the Gas burner (EC.U.1.G.) 

The grill (EC.U.1.G.) is fitted with an infrared gas burner. 

The burner has a thermocouple protection, which closes off the gas supply when the 
burner has gone out.
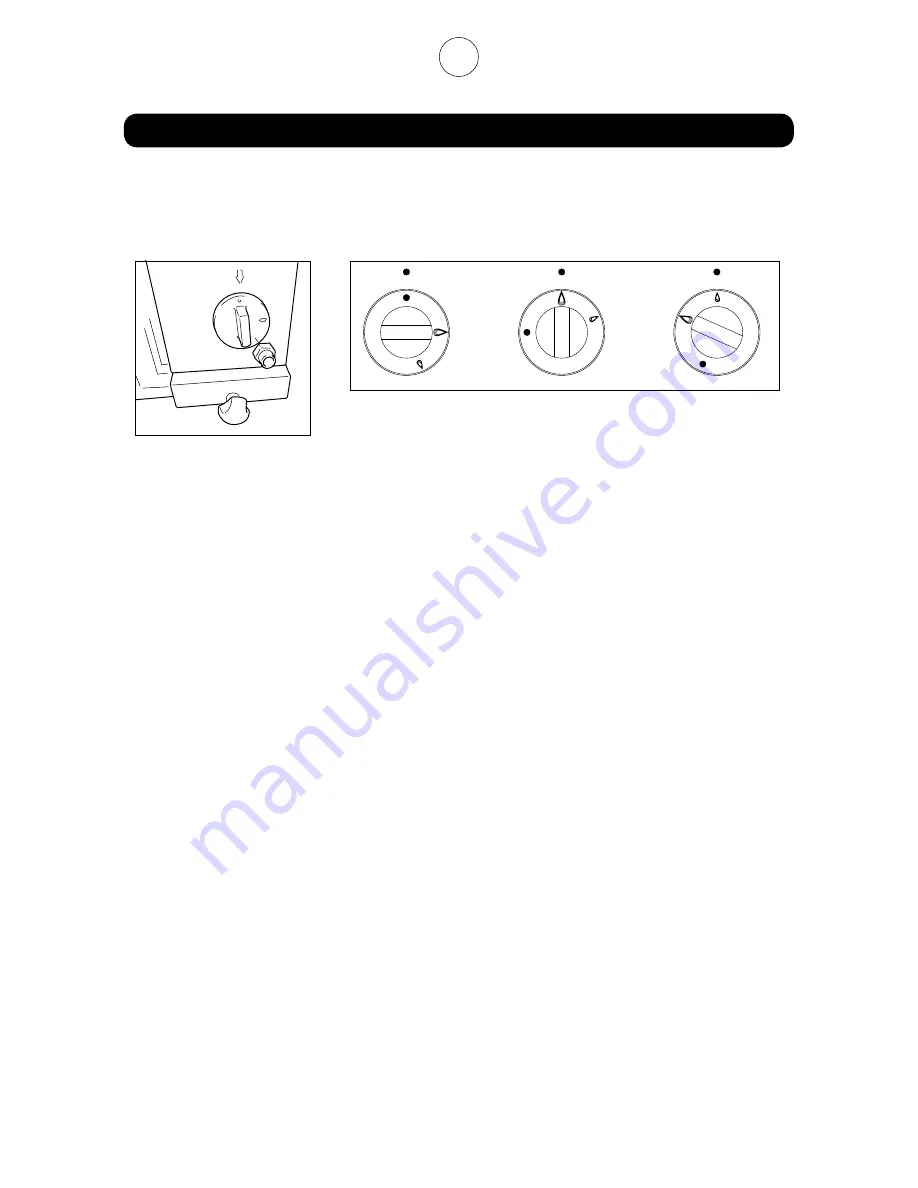
-  Depress the gas knob for the burner and turn it to the fully open position: the gas 

supply is opened.

-  Keep the gas knob pressed (in full position) and put an open flame, for example a 

match, to the burner wire gauze.

-  The burner has to ignite within approx. 5 seconds. In case the burner does not ignite, 

release the gas knob and put it in off-position.

-  Keep the gas knob pressed after ignition until the burner wire gauze becomes red hot 

(keep pressed for at least 20 seconds though).

-  The gas knob then can be adjusted continuously in between full-position and 

intermediate position.

-  After the burner has gone out, put the gas tap in the off-position.
  Before you re-ignite the burner wait for approx. 60 seconds.

By selecting the appropriate position the meat may be grilled quickly or slowly or kept
warm, taking into account:
 

- the kind of meat


- the thickness and height of the meat on the spit


- the distance of the meat to the gas burner

After use, turn off the main gas supply and set the motor switch to off. (EC.U.1.G.)


off 

full 

intermediate

The burner can be adjusted continiously in between full-
position and intermediate position.

Summary of Contents for CE1312BU5388

Page 1: ...DY THIS MANUAL BEFORE PUTTING THIS GRILL INTO USE OR HAVING IT PUT INTO USE Subject to modifications Naomi Grills B V Model EC U has a bottom motor D NER KEBAP GRILLS MODELS ec u gas v ersion elec t r...

Page 2: ...gas knob 37 5 x 37 5 x 51cm Weight 11 kg Motor 230 V 50 Hz 4 W 1 Revolution per minute technical data Type EC U 1 E Number of electrical elements 1 Mains 230 V 50 Hz Current 10 8 A Power consumption...

Page 3: ...fety instructions for the User page 7 2 Connecting 2 1 Connecting Gas EC U 1 G page 8 2 2 Table of Gas types EC U 1 G page 8 2 3 Connecting Mains EC U 1 E page 9 2 4 Connecting Mains Motor page 9 3 in...

Page 4: ...infrared gas burner with thermocouple and burner wire gauze 7 side doors 8 guide rails for the housing with adjusting knob 9 gas connection 10 gas tap with off intermediate and full position 11 housin...

Page 5: ...se also have the technician carefully read through this manual before carrying out maintenance or repairs to this grill When you let others operate this grill they too HAVE TO study this MANUAL carefu...

Page 6: ...ith all national regional and local requirements and regulations The grill may only be connected and used in accordance with all applicable requirements and regulations Before connecting check if the...

Page 7: ...han it has been designed for The area in which the unit is used must be well ventilated If there is any problem or doubt about the operation of the unit turn off the main gas supply immediately EC U 1...

Page 8: ...h the low setting control Contact the supplier where the new device was bought Have connections and modifications only done by qualified professionals 2 3 Table Gas sorts EC U 1 G Category I2E I2H Nat...

Page 9: ...ust be grounded If the available electrical supplies are not suitable contact an accredited installer and or your electricity supply company The device must be connected by permanent direct connection...

Page 10: ...eep the gas knob pressed after ignition until the burner wire gauze becomes red hot keep pressed for at least 20 seconds though The gas knob then can be adjusted continuously in between full position...

Page 11: ...osition may be set continuously By selecting the appropriate position the meat may be grilled quickly or slowly or kept warm taking into account the kind of meat the thickness and height of the meat o...

Page 12: ...ing the spit Slide the housing 11 as far back as possible and tighten the adjusting knob 8 EC U 1 G 13 EC U 1 E Move the housing 11 to place it at the required distance from the meat and fasten the ad...

Page 13: ...p or scratching objects Do not allow water or other fluids to penetrate the device Never use a water jet The grill may not be immersed It is essential to maintain the grill regularly considering hygie...

Page 14: ...igations expire All obligations also expire if non qualified professionals installed maintained or repaired this grill if any part of this grill has been replaced by non original Naomi Grills B V part...

Page 15: ...Grills Naomi Grills B V Anton Philipsweg 9 11 1422 AL Uithoorn The Netherlands Telephone 31 297 560 170 Telefax 31 297 560 187 e mail info naomi grills com www naomi grills com Subject to modification...

Reviews: