Nanoleaf AURORA Instruction Manual Download Page 3

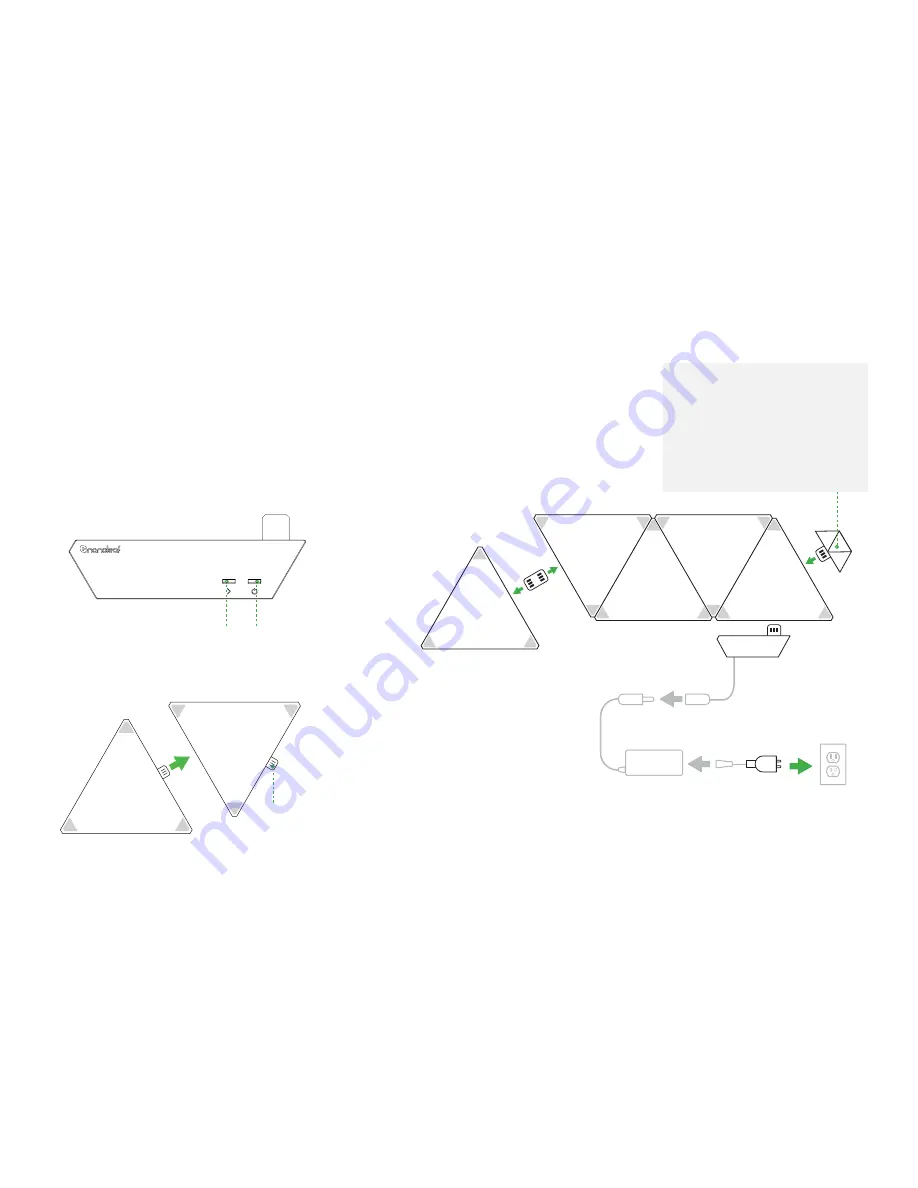
To connect the panels together, insert a linker into the linker port on 
the reverse of the Aurora panels. Ensure that the metal contacts are 
aligned, and gently connect the panels together.

Connect the controller to any free linker port 
on any panel. Then connect the power supply 
to the wire coming out of the controller. Use 
the included mounting tape to securely attach 
the panels and controller to your desired flat 
surface. Visit nanoleaf.me/myaurora to watch 
an instructional video on how to install the 
panels using the provided mounting tape. Once 
everything is set up, connect the power cable to 
an AC outlet in order to boot up your Aurora.

RECOMMENDED INSTALLATION

This device should only be installed in an indoor environment on a flat surface that can support the weight of the panels. 
Make sure that the surface is dry and clean from any dust, debris, or oil. Note that installations using mounting tape on 
textured, porous, popcorn and ceiling surfaces is not recommended, the optional Aurora Screw Mount Kit will be better for 
these surfaces. For optimal performance it is recommended that Nanoleaf Aurora be installed in a location that provides 
sufficient airflow around the panels. It is recommended that the Nanoleaf Aurora be installed away from other devices 
designed to receive or transmit radio signals. Locate your Aurora within 20 meters from your wireless access point or 
router (WiFi). To ensure a strong signal, there should be at most one wall between the Aurora’s controller and your router.

AURORA RHYTHM

Included in the Aurora Rhythm Smarter Kit, also sold separately 
to upgrade any Aurora. Insert the Rhythm unit into an 
unoccupied linker port on any Aurora panel. Make sure that the 
‘V’ shaped multipurpose button is facing you (not the wall).

A 3.5mm audio cable and splitter can be used to connect the 
Rhythm module to an audio source and eliminate interference 
from ambient noise in a room. Audio cables and splitters are sold 
separately, and can be purchased from most electronics stores.

IMPORTANT: The Aurora Rhythm required controller firmware 
version 2.1. You can update your firmware in the app if 
connected to the same WiFi network as your Aurora.
 

Toggle Button:


Cycle through existing 
color or music scenes.

Power Button:


Turn the Aurora 
panels on or off

Linker


HARDWARE 

SETUP

Slow down tiger! Before you stick the panels 
onto the wall, be sure to plug it in and try it 
out on a table or floor first.

Multipurpose Button: 


Press once to activate the Rhythm (indicator 
light will be lit up when active).
When active, press this button again to change 
the Rhythm scene. 

To deactivate the Rhythm, turn your Aurora 
off with the button on the Aurora controller, or 
change to a Color Scene in the app.

Summary of Contents for AURORA

Page 1: ...Instruction Manual Setup Videos nanoleaf me myaurora AURORA Modular Smart Lighting AURORA RHYTHM Visualize Your Music...

Page 2: ...ble lighting displays by snapping together panels with ease Remember you can purchase Expansion Packs to grow the Aurora and unleash your creativity to the fullest Without further ado let the exciteme...

Page 3: ...from other devices designed to receive or transmit radio signals Locate your Aurora within 20 meters from your wireless access point or router WiFi To ensure a strong signal there should be at most on...

Page 4: ...g across it Boot up time for your Aurora is about one minute 1 Download the Nanoleaf Smarter Series app from the Apple App Store or Google Play Store and launch it 2 Go through the setup steps in the...

Page 5: ...igurations for your Aurora to display on the panels There are four main components to a scene CONTROL VIA APP 2 Palette this is the set of colors you use to create your scene We ve included a few in t...

Page 6: ...ggles Delayed transitions where each color will have a half second delay before changing to the next color on the palette Color Transitions Curvy Squiggles Smooth transitions between colors on the sel...

Page 7: ...sitions between colors on the selected palette Block Squiggles Delayed transitions where each color will have a half second delay before changing to the next color on the palette Repeat You have the o...

Page 8: ...e Name or Device Name Set my Device Name to 50 Google Assistant Okay Google Turn on off Device Name Turn on off the lights in Room Name Turn on off all my lights Brighten dim Device Name Brighten dim...

Page 9: ...lowing this c Unlit WiFi is configured and connected to your router d Flashing 4s interval WiFi is configured but the Aurora cannot connect to the target network It will continue trying unless you res...

Page 10: ...about 7 seconds the wifi status LED will start to flash rapidly Once the flashing begins you can release the buttons You must then wait 3 minutes for the Aurora to reset itself to factory default set...

Page 11: ...ce must accept any interference including interference that may cause undesired operation of the device Le pr sent appareil est conforme aux CNR d ISEDC applicables aux appareils radio exempts de li c...

Page 12: ...th the linker still attached Do not attach the panels together with anything other than its original panel linkers Do not puncture the panels with any nails or screws during installation Do not attach...

Page 13: ...finity The Matrix Crown The Sparkly Nemo The Huggable Sloth The Wiggly Worm The Lobster Claw The Epicurious Eight The Cutesy Cactus The Snickering Snackhole The Free Bird The Lovey Dovey The Snuggling...

Page 14: ...Share your masterpiece with us Let your voice be heard Leave a review for this product by visiting nanoleaf me myaurora GET SOCIAL...

Reviews: