background image

7


2.2.1 Connecting the Rear Facing Camera


1.

  Clean the inside of your rear window ensuring there is no dust on the window.


2.

  Remove the protective film from the Rear Facing Camera’s 3M sticker and place the camera in the desired position on the 

inside of your rear window, ensuring that the rear camera’s mount is above the rear camera’s camera lens.


3.

 Hold the mount firmly against the glass for 30 seconds.


4.

 Connect the camera to the 6M Extension cable.


5.

  Run the cable tidily along or underneath your vehicles trim up to the Mirror DVR.


6.

  Making sure that the Mirror DVR is powered off, connect the USB plug to the Mirror DVR’s port marked 

USB


2.2.2 Adjusting the angle of the Mirror DVR camera lens


1.

  Using the camera lens on the rear of the Mirror DVR, move the camera field of 

view to the desired position.


2.2.3 Connecting to Power


Only use the included charger to power and charge the Mirror DVR.


  1. 

 Once the Mirror DVR is securely installed onto your vehicles rear view mirror, 
plug the 12V DC charger into your vehicles cigarette lighter adapter or power 
source.


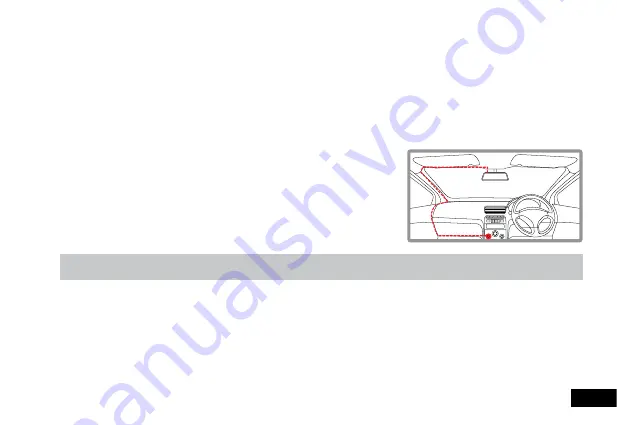
2.

  Run the cable along your vehicles console and windscreen and plug it into the 

Mirror DVR port marked 

DC-IN

.

Note:


1.

 Make sure that the cameras view is not obstructed by any window tint or any other objects.


2.3  Powering the Mirror DVR On/Off


2.3.1 Auto Power On/Off


 When the Mirror DVR is correctly installed and connected to your vehicles’ 12V DC power supply, the Mirror DVR will 
automatically power on and start recording when the car’s accessories are activated. The Mirror DVR will automatically stop 
recording and shutdown when your vehicle is powered off.


2.3.2 Manual Power On/Off and Reset


2.3.2.1 Manual Power On


Press and hold the Power button on the front of the Mirror DVR until the Nanocam Plus start up screen appears.

Summary of Contents for NCP-MIRDVRHD2

Page 1: ...USER MANUAL CLIP ON MIRROR MONITOR WITH BUILT IN DASH CAM DVR REAR CAMERA NCP MIRDVRHD2...

Page 2: ...owering the Mirror DVR On Off 7 2 3 1 Auto Power On Off 7 2 3 2 Manual Power On Off and Reset 7 2 3 2 1 Manual Power On 7 2 3 2 2 Power Off 8 2 3 2 3 Reset the device 8 2 4 Playing back Video on PC 8...

Page 3: ...hite Balance 13 3 1 3 Exposure 13 3 1 4 Date Stamp 14 3 2 Setting Menu 14 3 2 1 Date Time 14 3 2 2 Language 14 3 2 3 Format 15 3 2 4 Default Settings 15 3 3 Playback Screen 16 3 3 1 Deleting Photos Vi...

Page 4: ...e of the internal battery Never dismantle the Mirror DVR or expose the internal battery Do not dispose of the Mirror DVR in fire Dispose of the Mirror DVR observing local regulations being mindful of...

Page 5: ...the vehicle Please read through these instructions before attempting to install this product For the latest manual updates please see www nanocamplus com au or www nanocamplus co nz 1 1 Features Front...

Page 6: ...off then push the memory card until a click is heard and then release the card to eject Note 1 Do not remove or insert the memory card while the Mirror DVR is turned on as this may damage the memory...

Page 7: ...position 2 2 3 Connecting to Power Only use the included charger to power and charge the Mirror DVR 1 Once the Mirror DVR is securely installed onto your vehicles rear view mirror plug the 12V DC cha...

Page 8: ...file on your computer before attempting to playback This will reduce any delay in playback 2 5 Initial Settings Before using the Mirror DVR we recommend Formatting the Inserted Micro SD Card and Sett...

Page 9: ...r from the cigarette lighter adapter or power source when not in use 2 The recording loop length can be configured to save a video file for every 1 3 or 5 minutes of recording For information on how t...

Page 10: ...e the camera is recording Please stop the recording before attempting to access the menu 2 Higher resolution clips will create larger files which will fill the Micro SD Card faster 2 7 2 Loop Recordin...

Page 11: ...se follow the instructions below 1 Press the Button to stop the Mirror DVR from recording 2 Press and hold the Button for 2 seconds to enter the Menu 3 Use the and Buttons to navigate the Menu and hig...

Page 12: ...erations eg bumpy roads and opening and closing doors 2 7 7 Park Mode The Parking mode setting is used to activate a recording after you have parked your vehicle To adjust the key beep settings follow...

Page 13: ...to enter the Menu 3 Use the and buttons to navigate the Menu and highlight the White Balance setting and press to select 4 Use the and buttons to highlight your required White Balanee setting then pre...

Page 14: ...the highlighted setting 3 2 1 Setting the Date Time Setting the Time and Date allows you to stamp your footage with the time as a reference 1 Press the button to stop the Mirror DVR from recording 2...

Page 15: ...s cannot be accessed while the camera is recording Please stop the recording before attempting to access the menu 2 Formatting your Micro SD Card will delete all files from the card Once these files h...

Page 16: ...Playback Screen 2 In the Playback Screen use the and buttons to select the photo or video that you want to delete if you want to delete all unlocked photos and videos select any unlocked Photo or Vid...

Page 17: ...HITE BALANCE AUTOMATIC INCANDESCENT SUNNY FLUORESCENT CLOUDY CONTRAST 0 3 1 4 2 5 EXPOSURE 3 1 2 2 1 3 0 MENU AUTO RECORD OFF ON SCREEN AUTO OFF 10 SECONDS 30 SECONDS 20 SECONDS OFF MUTE AUDIO OFF ON...

Page 18: ...LUTION 2M 3M 5M 8M 10M 12M 18M PHOTO FORMAT JPG MOTION DETECTION YES CYCLE RECORDING YES MEMORY CARD TYPE MICRO SD CARD CLASS 6 10 CAPACITY UP TO 32GB USB PORT MINI USB POWER PORT DC In FREQUENCY 50HZ...

Page 19: ...y is only valid where you have used the product in accordance with any recommendations or instructions provided by NanoCam Plus This warranty excludes defects resulting from alterations of the product...

Page 20: ...www nanocamplus com au www nanocamplus co nz NanoCam Plus 2016...

Reviews: