Page 13
5. INSTALLATION
WARNING If the location site of this machine has a polished floor it is recommended
that rubber pads are fitted under the level adjusters to prevent the
machine sliding on the floor.
5-1 Fitting the Header Assembly
The Header Assembly has a forward centre of gravity, so it is important that
at least two people are used to fit or remove the Header Assembly.
The fitting position of the Header Assembly is very high, and it is important
that a means of reaching the height safely, without stretching, is available.
(e.g. steps, step stools etc.)
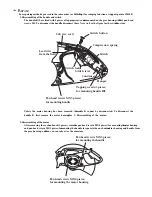
1.
Place the Header Assembly on to the monitor cabinet, connect the connectors
and pass the connectors in to the cabinet, slide the header back ensuring that
it engages fully in to the retaining brackets at the front of the monitor cabinet.
2.
Fit the 2off M6x25 Hex Head Screws, Spring and Flat washers to retain the
Header Assembly to the cabinet.
Summary of Contents for Alpine Racer
Page 10: ...Page 12 4 MAJOR COMPONENTS...
Page 41: ...Page 43...
Page 43: ...Page 45...
Page 45: ......
Page 47: ...Page 49 10 SCHEMATICS...
Page 48: ...Page 50...
Page 49: ...Page 51...
Page 50: ...Page 52...