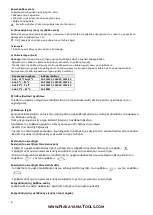
Temperature for use
Degree of oil viscosity
From -10
C to 0
C
SAE 10W or 10W-30,10W-40
From -0
C to 25
C
SAE 20W or 10W-30,10W-40
From -25
C to 35
C
SAE 30W or 10W-30,10W-40
From -35
C to 45
C
SAE 40W
b).Gear box oil.
Gear oil has been filled at the
works. c).Fuel(Fig.4)
Use automotive gasoline(unleaded
or lowleaded is preferred to minimize
combustion chamber deposits).
Never use an oil/gasoline mixture or dirty
gasoline.
Avoid getting dirt,dust or water in the fuel
tank.
-Open the tank cap1
-turning it in an anti-clockwise direction -
Fill the tank up to a maximum of 3cm
beneath the cap.
-close the tank cap by turning it in
a clockwise direction.
Adjustment
Before start the engine,please do the
adjustment,which is introduced in
upper content.
Start the engine
Cold engine start-up
- Line the throttle lever up with the symbol
- Pull energetically on the ignition knob2
(Fig.E1) and release it once the engine
has started.
- After a few seconds, position the throttle
lever in an intermediate position between
the symbol
and the symbol
Hot engine start-up
- Put the throttle lever in an intermediate
position between
-
- Pull energetically on the ignition knob and
release it once the engine has started.
Switching on the cutter bar
Unlock the safety catch8(Fig.A) .Fully depress the
cutting clutch lever7(Fig.A) and hold it tight.
Engaging the wheel drive
Squeeze the forward clutch lever9(Fig.A)
and hold tight to the handlebar
Disengaging the wheel drive
Release the forward clutch lever.
Switching off the cutter bar
Release the cutting clutch lever
Switching off the engine
Move the throttle lever to “O” position.
Maintenance and servicing
Before carrying out any maintenance or
cleaning work, pull off the spark plug
connector!
Do not spray the mower with water. Water that
enters the ignition system or the carburettor may
lead to malfunctions. Clean the mower with a
cloth, hand brush, etc.
Replacing the engine oil
Check the oil level on a daily basis and top up if
necessary.Replace the oil after the first month
or after the first 20 hours of use. Then replace it
every 6 months or after every 80 hours of use.
Spark plug
Check it every 3 months or after every 50
hours of use, and replace it if necessary.
See the specification in reference to the
spark plug type.
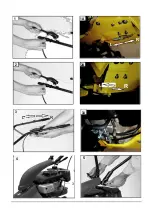
6. Remove the cap5 (Fig. E1) and unscrew
the spark plug with the relative spanner.
7. Examine the spark plug and remove any
carbon residue with a metal brush. Replace
the spark plug if the electrodeis excessively
worn or the insulation is damaged.
8. Measure the distance between the electrodes: it
should be between 0.7 and 0.8 mm (Fig. E1).
9. Screw the spark plug back in by hand.
10.
Secure a used spark plug with around
VA turn of the spanner, and a new one with
around V2 turn of the spanner.
Summary of Contents for SM8700
Page 1: ...Sm8700 Owner s manual Art Nr 013440 WWW NAKAYAMATOOLS COM...
Page 2: ...13 1 2 6 7 3 4 5 8 9 10 11 7 10 11...
Page 3: ...1 1A L 2 2A R L R 3 3A LL R 4 5 1 3...
Page 4: ...6 1 2 8 1 10 2 1 12 1 2 7 1 2 9 1 2 11 1 2 13 1...
Page 11: ...3 WWW NAKAYAMATOOLS COM GR 16 10...
Page 12: ...4 WWW NAKAYAMATOOLS COM Service 16...
Page 13: ...5 WWW NAKAYAMATOOLS COM 1 2 3 4 5 6 7 8 9 10 11 6 7 8 9 10 2 11 1 L 2 1 L 2 0 R 1A 0 L 1A 12...
Page 15: ...7 WWW NAKAYAMATOOLS COM O 20 6 80 3 50 6 7 8 0 7 0 8 mm 9 10 3 50 7 8 9 10 11 12...


