WWW.NAKAYAMATOOLS.COM
EN
9
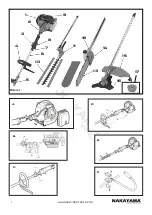
Main Parts (Picture 1)
1. Muffler
2. Throttle cable
3. Throttle set button
4. Loop handle
5. Quick Joint
6. Shaft tube
7. Suspension point
8. Throttle trigger
9. Air filter
10. Trimmer blade
11. Transmission
12. Transmission
13. Bar and chain
14. Chain cover
15. Guard
16. 3T Blade
17. Nylon head
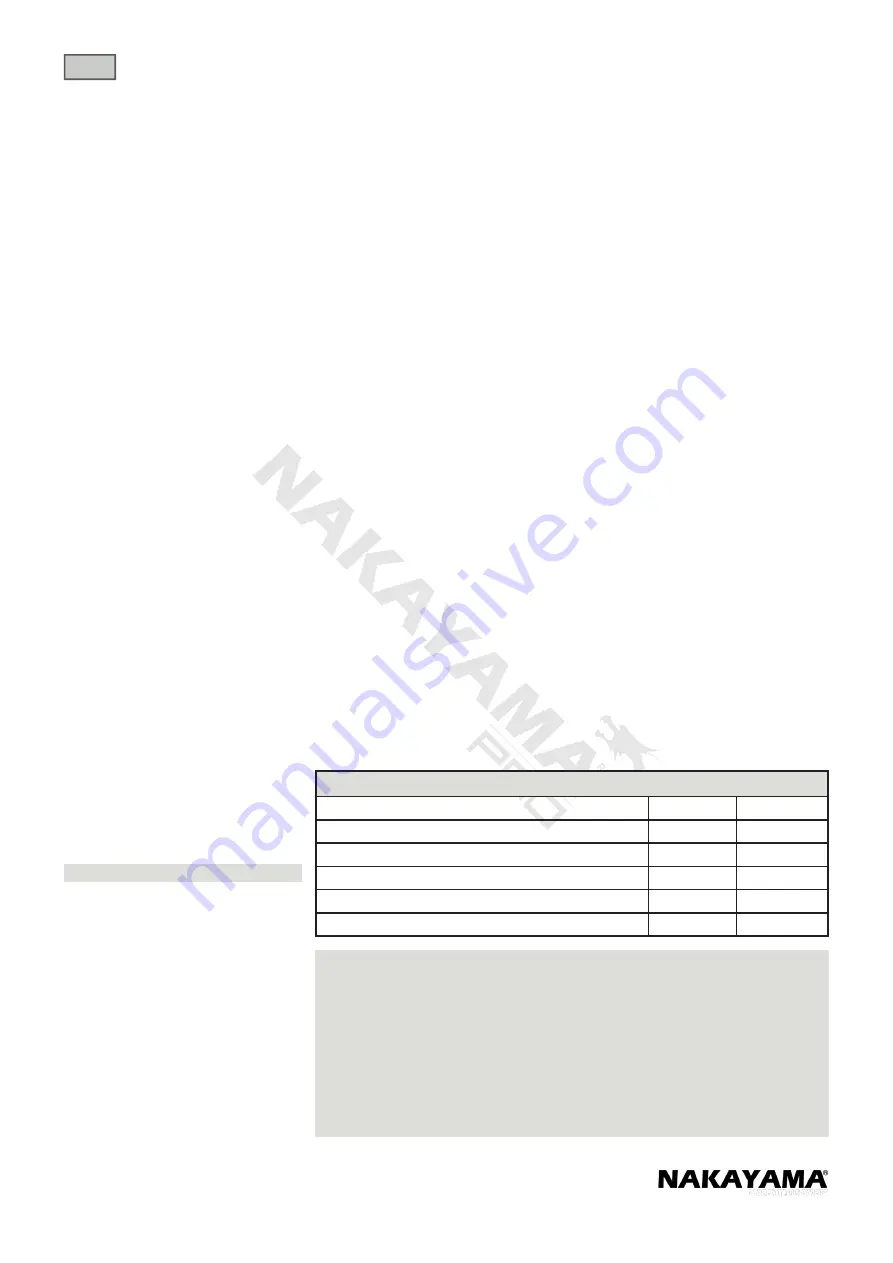
Technical Data
Model:
PS3100
PS5100
Displacement:
26cc
43cc
Power:
1Hp
1.7Hp
Bar Length:
25cm
25cm
Bar and chain type:
3/8LP, 1,3mm
3/8LP, 1,3mm
Pipe diameter:
26mm
26mm
•Under no circumstances should you ever take apart the product or alter it in any way. Doing so might result in the product becoming damaged during opera
-
tion or the product becoming unable to operate properly.
Handling fuel
•The engine is designed to run on a mixed fuel, which contains highly flammable gasoline. Never store cans of fuel or refill the tank of the unit in any place
where there is a boiler, stove, wood fire, electrical sparks, welding sparks, or any other source of heat or fire which might ignite the fuel.
•Never smoke while operating the unit or refilling its fuel tank.
•When refilling the tank, always turn off the engine and allow it to cool down. Take a careful look around to make sure that there are no sparks or open flames
anywhere nearby before refuelling.
•Wipe spilled fuel completely using a dry rag if any fuel spillage occurs during refuelling.
•After refuelling, screw the fuel cap back tightly onto the fuel tank and then carry the unit to a spot 3 m or more away from where it was refuelled before
turning on the engine.
Transport and Storage
•When you finish cutting in one location and wish to continue work in another spot, turn off the engine, lift up the unit and carry it paying attention to the
blade.
•When transporting or storing the machine always fit the cutting device guard or guide bar cover.
•When hand-carrying the product, cover over the cutting part if necessary, lift up the product and carry it paying attention to the blade.
•Never transport the product over rough roads over long distances by vehicle without removing all fuel from the fuel tank. If doing so, fuel might leak from
the tank during transport.
•Protect the machine from damage when transporting it.
Kickback safety precautions for chain saw users
1. Kickback may occur when the nose or tip of the guide bar touches an object, or when the wood closes in and pinches the saw chain in the cut. Tip contact
in some cases may cause a lightning fast reverse reaction, kicking the guide bar up and back towards the operator. Pinching the saw chain along the top of the
guide bar may push the guide bar rapidly back towards the operator. Either of these reactions may cause you to lose control of the saw, which could result in
serious personal injury.
2. Do not rely exclusively on the safety devices built into your saw. As a chain saw user you should take several steps to keep cutting jobs free from accident or
injury.
•With a basic understanding of kickback you can reduce or eliminate the element of surprise. Sudden surprise contributes to accidents.
•Keep a good grip on the saw with both hands, the right hand on the rear handle, and the left hand on the front handle, when the engine is running. Use a firm
grip with thumbs and fingers encircling the chain saw handles. A firm grip will help you reduce kickback and maintain control of the saw.
•Make certain that the area in which you are cutting is free from obstructions. Do not let the nose of the guide bar contact a log, branch, or any other obstruc
-
tion which could be hit while you are operating the saw.
•Cut at high engine speeds.
•Follow the manufacturer’s sharpening and maintenance instructions for the saw chain.
•Only use replacement bars and chains specified by the manufacturer or the equivalent.
•Make sure the chain and guide bar are correctly adjusted before operating the equipment (see page 8 for adjustment procedures). Never attempt chain
adjustment with the engine running!
•Always make sure the cutting attachment is properly installed and firmly tightened before operation.
•Never use a cracked or warped guide bar: replace it with a serviceable one and make sure it fits properly.
•If a saw blade should bind fast in a cut, shut off the engine immediately. Push the branch or tree to ease the bind and free the blade.
•Do not operate the pole pruner with the muffler removed.
•When cutting a limb that is under tension, be alert for spring back so that you will not be struck by the moving limb.
•Always stop the engine immediately and check for damage if you strike a foreign object or if the machine become entangled. Do not operate with damaged
or broken equipment.
Do not make unauthorized modifications or substitutions to the guide bar or chain.
Never allow the engine to run at high R.P.M. without a load. Doing so could damage the engine. Keep the pruner as clean as possible. Keep it free of loose
vegetation, mud, etc.
* The manufacturer reserves the right to make minor changes to product design and technical specifi
-
cations without prior notice unless these changes significantly affect the performance and safety of the
products. The parts described / illustrated in the pages of the manual that you hold in your hands may also
concern other models of the manufacturer’s product line with similar features and may not be included in
the product you just acquired.
* Please note that our equipment has not been designed for use in commercial, trade or industrial applica
-
tions. Our warranty will be voided if the machine is used in commercial, trade or industrial
businesses or for equivalent purposes.
* To ensure the safety and reliability of the product and the warranty validity, all repair, inspection, repair
or replacement work, including maintenance and special adjustments, must only be carried out by techni
-
cians of the authorized service department of the manufacturer.
Summary of Contents for PS3100
Page 1: ...en el WWW NAKAYAMATOOLS COM ART NO PS3100 PS5100 029106 029090...
Page 3: ...3 WWW NAKAYAMATOOLS COM i l g 1 j h k m n o...
Page 4: ...4 WWW NAKAYAMATOOLS COM t p q u V W TIGHTEN LOOSEN r s...
Page 5: ...5 WWW NAKAYAMATOOLS COM 6 5 3 0 6 0 9mm 4 2...
Page 6: ...6 WWW NAKAYAMATOOLS COM 14 15 18 19 16 17...
Page 7: ...7 WWW NAKAYAMATOOLS COM 22 21 22 20...
Page 17: ...17 WWW NAKAYAMATOOLS COM EL 1 2 3 4 5 15...
Page 18: ...18 WWW NAKAYAMATOOLS COM EL 60 3 m 1 2...
Page 23: ...23 WWW NAKAYAMATOOLS COM EL 3 5mm X 1 2 1 2 Y 1 40 1 2...
Page 24: ...24 WWW NAKAYAMATOOLS COM EL Z 1 ON OFF OFF 2 1 2 3 Z1 1 Z2 1 25 50 100 0 6 0 7mm ON OFF...
Page 26: ...26 WWW NAKAYAMATOOLS COM EL Z17 1 Z18 1 2 Z19 1 2 Z20 1 2 3 4 Z21 0 3mm 1 1 0 6 0 7 mm 2...
Page 27: ......


