EN
11
WWW.NAKAYAMATOOLS.COM
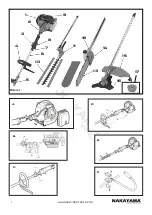
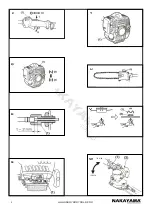
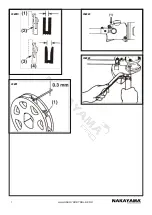
Attaching the trimming mechanism (J)
(1) Main pipe
(2) Trimming mechanism
(3) Screw hole
(4) Screw
(5) Fastening bolt
1. Remove the screw screwed into the end of the trim ming mechanism.
2. Insert the end of the trimming mechanism into the main pipe.
3. Line up the hole on the end of the trimming mecha nism into which the screw is to be inserted with the hole on the main pipe, and screw the screw firmly in.
4. Using a wrench, screw in the bolt provided to fix the trimming mechanism into place.
Balance unit
1. Put on strap and attach unit to strap.
2. Depending on the working posture, slide clamp up or down until unit balances and the strap fits your body.
Attaching the pruning mechanism (K), (L), (M), (N), (O)
(1) Main pipe
(2)Transmission
(3) Screw hole
(4) Fastening bolt
(5) Bolt
1. Remove the cap on the end of the main pipe.
2. Remove the screw screwed into the end of the trans mission.
3. Insert the end of the gear case into the main pipe.
4. Line up the hole on the end of the transmission into which the screw is to be inserted with the hole on the main pipe, and screw the screw firmly in.
5. Using a wrench, screw in the bolt provided to fix the mechanism into place (L).
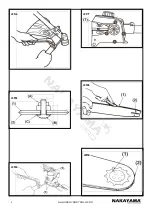
(1) Guide bar
(2) Saw chain
(3) Transmission
(4) Sprocket
(5) Chain tension adjust screw
(6) Nut
(7) Chain tensioner nut
(8) Chain cover
Install the guide bar and the saw chain on the transmis sion as follows:
Warning: The saw chain has very sharp edges. Use protec tive gloves for safety.
1. Loosen a nut and remove the chain cover.
2. Mount the guide bar then f it the saw chain around the bar and sprocket.
Warning: Pay attention to the correct direction of the saw chain.
3. Fit the chain tensioner nut into the lower hole of the guide bar, then install the chain cover, and fasten the mounting nut to finger tightness (M).
(1) Hole
(2) Moving direction
(3) Chain tensioner nut
4. Adjust the chain tension by turning the tensioner screw until the tie straps just touch the bottom side of the bar rail (N).
(1) Chain tension adjusting screw
(a) Loosen
(b) Tighten
5. Tighten the mounting nut securely with the bar tip held up (torque: 8.9- 11.7 Nm./90 - 120 kg-cm). Then check the chain for smooth rotation and correct
ten sion while moving it by hand. If necessary, readjust (O).
(1) Tighten
Warning: It is very important to maintain the proper chain tension. Rapid wear of the guide bar or the chain coming off easily can be caused by improper ten-
sion. Especially when using a new chain, take good care of it since it should expand when first used.
Balance unit
1. Put on strap and attach unit to strap.
2. Depending on the working posture, slide clamp up or down until unit balances and the strap fits your body.
Fuel and chain oil
Warning: Gasoline is very flammable. Avoid smoking or bringing any flame or sparks near fuel.
Wipe up all spills before starting the engine.
Make sure to stop the engine and allow it cool before starting the engine.
Keep open flames away from the area where fuel is handled or stored.
Important: Never use oil for 4 cycle engine use or water cooled 2-cycle engine.
Never use “FUEL WITH NO OIL (RAW GASOLINE)”.
Never use fuel laced with water.
Mixed fuel which have been left unused for period of one month or more may clog the carburettor or result in the engine failing to operate properly. Put re
-
mained fuel into an air-tight container and keep it in the dark and cool room.
Please ask for “mixed gasoline for air-cooled 2-cycle engines” at your nearest gas station, or use fuel made by putting unleaded 95 octane gasoline and air-
cooled 2-cycle special engine oil into a mixing container in accordance with the following ratios and then shaking to mix well.
Mixing ratios:
Use a special type 2-cycle oil (
30
ml of oil for each 1L of unleaded gasoline 95).
Summary of Contents for PS3100
Page 1: ...en el WWW NAKAYAMATOOLS COM ART NO PS3100 PS5100 029106 029090...
Page 3: ...3 WWW NAKAYAMATOOLS COM i l g 1 j h k m n o...
Page 4: ...4 WWW NAKAYAMATOOLS COM t p q u V W TIGHTEN LOOSEN r s...
Page 5: ...5 WWW NAKAYAMATOOLS COM 6 5 3 0 6 0 9mm 4 2...
Page 6: ...6 WWW NAKAYAMATOOLS COM 14 15 18 19 16 17...
Page 7: ...7 WWW NAKAYAMATOOLS COM 22 21 22 20...
Page 17: ...17 WWW NAKAYAMATOOLS COM EL 1 2 3 4 5 15...
Page 18: ...18 WWW NAKAYAMATOOLS COM EL 60 3 m 1 2...
Page 23: ...23 WWW NAKAYAMATOOLS COM EL 3 5mm X 1 2 1 2 Y 1 40 1 2...
Page 24: ...24 WWW NAKAYAMATOOLS COM EL Z 1 ON OFF OFF 2 1 2 3 Z1 1 Z2 1 25 50 100 0 6 0 7mm ON OFF...
Page 26: ...26 WWW NAKAYAMATOOLS COM EL Z17 1 Z18 1 2 Z19 1 2 Z20 1 2 3 4 Z21 0 3mm 1 1 0 6 0 7 mm 2...
Page 27: ......


