background image

21

Stereo Music System

CD Playback (Advanced)

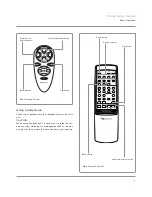
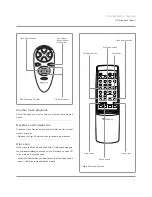
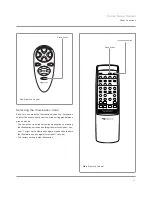
Remote Control Unit

Power

Tuner

FM/Mono

Disc 1

Random

M.Clear

Mute

Select

Loud

Call

Repeat

D.Scan

Time

Memory

Disc 2

Disc 3

Tune

CD

AM

P.Scan

Tape

Aux

Disc

Preset

Volume

Sleep

Illumi.

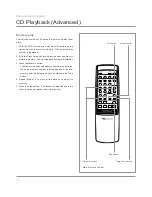
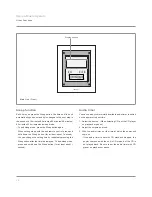
Memory Call button

Memory Clear button

Time button

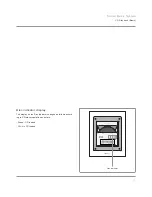
Check the contents of the program

With CD playback stopped, press the Memory Call button.

- Each time you press the Memory Call button, you can check

the memory number, memory disc number, and memory track

on the main unit display.

- When the memory number is displayed, the total time until

then is displayed while the Time button is held down.

...............................................................................................

Change the contents of the memory number

Press the Memory Call button and display the memory num-

ber you wish to correct, then store the correct track into that

memory location according to Steps 1-3 for memory play.

...............................................................................................

Clear the memory program

Press the Memory Clear button.

- The Memory indicator goes out.

- When you take out a CD, the contents of memory are auto-

matically erased.

- If the contents of memory have not been erased, normal play-

back (Page 18), random play (Page 22), and all repeat play

(Page 23) are not possible.

...............................................................................................

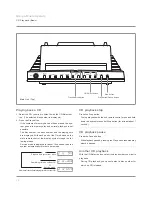
Checking the memory remaining time

During memory play, you can display the memory remaining

time by pressing the Time button.  To end this display, press

the Time button until the display returns to time mode.

Main Remote Control

Summary of Contents for SoungSpace 5

Page 1: ...1 Stereo Music System Stereo Music System Owner s Manual R...

Page 2: ...ications or changes to the unit EXCEPT as that specified by Nakamichi in this manual Failure to comply with this gov ernment regulation could void your authority to operate the equipment This digital...

Page 3: ...country in accordance with its applicable warranty 2 Should a Nakamichi product require servicing in a country other than the one in which it was originally purchased the end user may seek to have re...

Page 4: ...s The power Cord of the appliance should be unplugged from the outlet when left unused for a long period of time 18 Object and Liquid Entry Care should be taken so that objects do not fall and liquids...

Page 5: ...d ser vice personnel Caring for the Exterior Panels Caring for the exterior panels of the unit should be limited to wiping with a soft dry cloth Avoid using solvents or alcohol based cleaners Note to...

Page 6: ...refully wipe all fluid off the battery compartment and in sert new batteries If battery fluid has come into contact with skin immediately wash thoroughly with water About Remote Control Do not expose...

Page 7: ...inding process near the center hole or the outer circumference Remove any such remnants before using the disc otherwise it may not be possible to eject the CD properly or skipping may occur CDs bearin...

Page 8: ...ar Mute Select Loud Call Repeat D Scan Time Memory Disc 2 Disc 3 Tune CD AM P Scan Tape Aux Disc Preset Volume Sleep Illumi Track Tune Volume Source Mute Select D PS D PS Loud Power Off FM AM Stop Mon...

Page 9: ...e making the connections Place each unit on furniture or the like or hang it from the wall Changing the speaker grill In addition to the standard speaker grills gray the speakers for this system come...

Page 10: ...r of the speaker units to the left and right Speaker terminals on the rear of the main unit 2 Connect the 5 pin connector for the power supply unit to the Power Input terminal of the main unit 3 Conne...

Page 11: ...ain connected also when using an outdoor antenna CAUTION If an outdoor AM antenna is used grounding must be pro vided for protection against lightning FM Antenna AM Antenna 75 Unbal GND GND Loop Suppl...

Page 12: ...low Often multipath reflections of broadcast signals by nearby buildings etc will occur which degrades sound quality Also heavy traffic railroads or high voltage power lines in the vicinity of the re...

Page 13: ...To Digital Output terminal To Line Output terminal To Line Input terminal Commonly available RCA pin plug cable Audio device Commonly available RCA pin plug cable MD player or cassette deck Commonly a...

Page 14: ...e source as when it went off CAUTION Even when the power is switched off power is supplied to some of the circuits in this system When you will be leaving the system unused for a long time for example...

Page 15: ...unit CAUTION When using headphones be careful not to raise the vol ume too high Listening for prolonged periods at volumes so high that they irritate the ears can harm your hearing Sub Remote Control...

Page 16: ...er in which you wish to load the CD You cannot select a disc number in which no CD is loaded for CD playback Stop playback before selecting a disc number 2 Press the Eject button to open the Dust cove...

Page 17: ...on the Disc indicator changes as follows accord ing to CD player operation and state Green CD loaded Off No CD loaded Disc Indicator Disc 1 Disc 2 Disc 3 ST Preset FM AM Disc Track Remaining Time Mem...

Page 18: ...ess the Stop button To stop playback with the sub remote control press and hold down the sub remote control Stop button for at least about 1 second CD playback pause Press the Pause button With playba...

Page 19: ...rward cue Press the Track Search button and hold it down for at least about 1 second Release the Track Search button to resume the playback Disc scan If you press the Disc Scan button with CD playback...

Page 20: ...ory indicator and memory number are displayed When the memory number is being displayed the total memory time is displayed while you hold down the Time button 4 Repeat Steps 1 3 to store all the track...

Page 21: ...yed while the Time button is held down Change the contents of the memory number Press the Memory Call button and display the memory num ber you wish to correct then store the correct track into that m...

Page 22: ...switch the source Skip to the next track If you press the Random button during random play the rest of the current track is skipped over the next track is selected randomly and random play continues...

Page 23: ...lashing to being lit All repeat play All the CDs loaded in this unit are played back over and over in order of disc number and track number 1 Start normal playback Page 18 2 Press and hold down the Re...

Page 24: ...ning buttons to tune in the frequency of the station you wish to listen to Preset Memory 1 Use manual or automatic tuning to tune in the station you wish to preset 2 When you press the Memory button o...

Page 25: ...preset scan stops and the selected station is received Stereo mono switching If the amount of noise in an FM broadcast you are listening to becomes bothersome press and hold down the Mono button for a...

Page 26: ...n MID is displayed and for the high range when TRE is dis played When BAL is displayed pressing the button emphasizes the left side Audio mute Pressing the Mute button instantaneously lowers the volum...

Page 27: ...ging the Source Display You can change the display for AUX mode or tape mode to match the external input source The factory settings for these displays are AUX and TAPE 1 Press the AUX button Tape but...

Page 28: ...he Sleep button for at least about 1 second You can change the setting time by repeatedly pressing the Sleep button after the time is displayed To end sleep mode press and hold down the Sleep button f...

Page 29: ...ton Sleep button Illumination button Selecting the Illumination Color Each time you press the Illumination button the illumination color for the window sections of the main unit toggles between green...

Page 30: ...ce is set correctly Hum is heard Verify that all connections are established properly Some apparent malfunctions may be remedied by simple checks as described below If the problem persists please cont...

Page 31: ...eception is noisy Adjust position and or orientation of antenna Increase distance between this unit and other electrical equip ment Troubleshooting Remote control cannot be operated Verify that power...

Page 32: ...nse 5 20 000 Hz 0 5 dB Total Harmonic Distortion 0 005 or less 1 kHz 0 dB Signal to Noise Ratio Better than 95 dB IHF A WTD Dynamic Range Better than 95 dB Channel Separation Better than 90 dB Optical...

Page 33: ...240 V 50 60 Hz According to country of sale Power Consumption 95 W max Dimensions Main Unit 220 W X 270 H X 94 D mm 8 11 16 W X 10 5 8 H X 3 11 16 D inches Speaker Unit 220 W X 270 H X 95 D mm 8 11 16...

Page 34: ...l endast utf ras av kvalificerad servicepersonal HUOMAUTUS Jos nuppeja kytkimi ja s timi ym s det n tai laitetta k ytet n toisella tavalla kuin on selostettu tuloksena saattaa olla vaarallista lasers...

Page 35: ...an turvallisuutesi vuoksi on t rke noudattaa tarkasti tarrassa olevia ohjeita kun k yt t lasers teit l hett vi laitteita Tarra osoittaa ett laite sis lt lasers teit l hett vi osia M rkaten er anbragt...

Page 36: ...hone 1 310 538 8150 Fax 1 310 324 7614 Nakamichi Canada 276 S W Marine Drive Vancouver B C V5X 2R4 Canada Phone 1 604 324 7535 Fax 1 604 324 7919 Nakamichi Asia 8 F The Grande Bldg 398 Kwun Tong Rd Ko...

Reviews: