background image

12

CD5

11 Installation and Operation

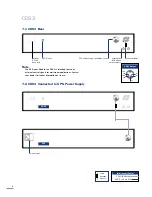
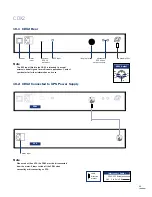
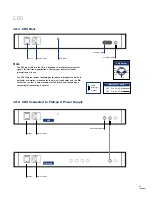
The CD5 CD Player can be operated either from its internal power supply alone or, for

improved performance, with an additional external Supercap, Hi-cap or Flatcap 2 Power

Supply. Connection of a Flatcap 2 is illustrated in Diagram 12.2

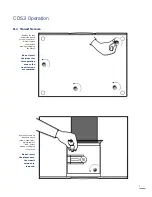
The CD5 should be installed on a dedicated equipment stand intended for the purpose.

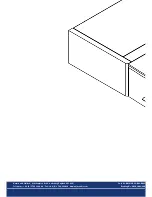
Care should be taken to ensure that the player is level. Two transit screws on the

underside of the CD5 case should be removed before use and must be replaced if the

unit is to be re-packed and shipped. These transit screws must not be used in any other

Naim product. The transit screw locations are illustrated in Diagram 13.1.
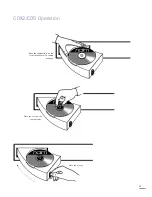
11.1 disc loading

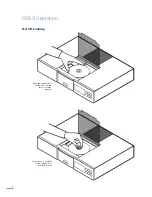
Disc loading is illustrated in Section 13.2. To load a compact

disc pull open the CD drawer using the handle on the left

hand side of the player. Place the disc on the platter followed

by the magnetic puck. Do not use a puck from any other

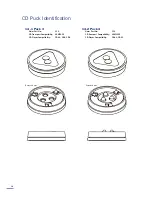
Naim CD player. Different Naim CD players use dissimilar

pucks. The illustration in Section 14 will help identify the

correct puck for the CD5.

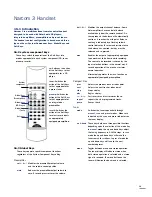
11.2 player controls

previous:

With a disc loaded but not playing the 

previous

button searches the disc contents backwards,

either one track at a time, or sequentially if the

button is held. While a disc is in play, the

previous

button searches the table of contents

backwards. Play resumes with the selected

track when the button is released.

next:

The 

next

button operates in the same way as

the 

previous

button, but moving forwards

through the disc instead of backwards.

stop:

Stops play and resets the player to its start

condition.

play:

Plays a loaded disc from track one unless

another track has been selected. The 

play

button operated while a track is playing will re-

start that track.

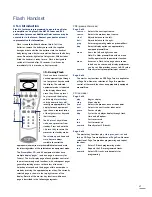
All CD control functions are duplicated on the 

NARCOM 3

and 

Flash

remote handsets. The handsets also provide CD

programming facilities. See Sections 15 and 16 for more

information.

11.3 front panel control mode selection

The CD5 has an optional front panel control mode. This

multi-function mode provides an alternative front panel

interface in which fast forward, fast reverse and pause are

selected by pressing and holding 

next

previous

and 

play

respectively.

To select multi function mode press and hold 

next

while the

player is switched on. To select the standard control mode

press and hold 

previous

while the player is switched on.

11.4 player display and indicators

The alphanumeric display indicates track and index numbers,

time in minutes and seconds, or various system messages.

The full stop on the right of the display window illuminates

when the player receives a signal from the remote handset.

On the far left of the display are four indicators.

pause:

Illuminates to show that pause has been 

selected from the remote handset.

time:

Illuminates to indicate display of total disc time 

or elapsed time of track being played.

repeat:

Illuminates to show that repeat has been 

selected from the remote handset. 

prog:

Illuminates to indicate that a program has been 

stored. Further information on play list 

programming can be found in Sections 15 and 16.

11.5 power supply upgrade

The CD5 can be upgraded through the addition of an

external Power Supply. The external supply works with the

internal power supply of the CD5 to offer both a greater

number of separate supplies and more sophisticated

voltage regulation. The Power Supply is connected to the

CD5 via a five pin DIN cable. Switch off both the Power

Supply and CD5 when making connections. Connect the

supply cable ensuring that the connectors are securely

attached. Switch on both the CD5 and the Power Supply

from their respective power buttons.

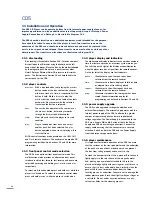
11.6 player maintenance

It is important for reliable operation of the CD5 to ensure

that the surfaces of the transport platter and the underside

of the puck are free of dust or debris which can prevent

the disc from sitting properly and cause it to slip.

To clean the transport platter, take a piece of Blu-tack and

lightly apply it to the top surface of the magnetic metal

hub, picking up any material attached to it. Brush the

plastic outer edge lightly with your finger or a soft brush to

ensure that it is dust and particle free. Similarly, clean the

puck with Blu-tack, to remove debris from the three

locating pins on its underside. Take care not to damage the

rubber pressure pads. Brush them lightly with your finger or

a soft cloth. Do not, under any circumstances, use any

solvents or fluids for the cleaning process.

Summary of Contents for CD5 - ISSUE 2

Page 1: ...W O R L D C L A S S H I F I O W N E R S M A N U A L CD Players CDS3 CDX2 CD5 I S S U E 2 ...

Page 2: ... even if you live outside their immediate vicinity Your dealer is responsible for making sure that the system sounds exactly as it should and information given here is not intended to reduce this responsibility in any way Introduction Naim Audio products are always conceived with performance as the top priority and careful installation will help ensure that their full potential is achieved This ma...

Page 3: ...t be resolved Some Naim equipment is made in special versions for different territories and this makes it impracticable to arrange international guarantees Please establish the guarantee arrangements with your own dealer at the time of sale We are always available to offer help and advice It is essential that repairs and updates are only carried out by an authorised Naim dealer or at the factory b...

Page 4: ...bol or coloured green or green and yellow The wire which is coloured BLUE must be connected to the terminal in the plug which is marked with the letter N or coloured black The wire which is coloured BROWN must be connected to the terminal in the plug which is marked with the letter L or coloured red 5 2 non rewireable mains plugs If a non rewireable plug is cut from a mains lead for whatever purpo...

Page 5: ...dio equipment Care should be taken to ensure that the player is level Transit screws on the underside of the CDS3 case and beneath its transport lid should be removed before use and must be replaced if the unit is to be moved or re packed and shipped The transit screw locations are illustrated in Section 8 1 The transit screws must not be used in any other Naim product Do not invert the player onc...

Page 6: ...set disp function handset in CD mode or front panel disp button until the CD player prog indicator flashes Further operations of the disp function will now cycle through each combination of the two socket types DIN only phono only or both The selected option is indicated on the CD player display as shown below Socket Option Player Display DIN O Phono o 0 Both O o 0 Press and hold the disp function...

Page 7: ...arker ch1 out ve nc nc ch2 out CDS3 Output 7 1 CDS3 Rear 7 2 CDS3 Connected to XPS Power Supply XPS CDS3 alternative RCA phono output sockets RC5 input Note The RC5 input fitted to the CDS3 is intended to accept external control signals for multi room applications Contact your dealer for further information on its use optional RS232 data port ...

Page 8: ...ing or shipping the player Do not invert the player for this operation or once the transit screws are removed Remove the two cd transport transit screws keep safe Always replace them before moving or shipping the player Do not invert the player once the transit screws are removed 8 1 Transit Screws ...

Page 9: ...8 CDS3 Operation Place the compact disc on the platter Make sure it is seated properly Place the puck centrally on the compact disc and close the lid 8 2 CD Loading ...

Page 10: ... Audio equipment Care should be taken to ensure that the player is level A transit screw on the underside of the CDX2 case should be removed before use and must be replaced if the unit is to be re packed and shipped This transit screw must not be used in any other Naim product The transit screw location is illustrated in Diagram 13 1 Do not invert the player once the transit screw is removed 9 3 f...

Page 11: ... CDX2 via a heavy duty Burndy cable Switch off both the XPS and CDX2 when making connections Remove the CDX2 mains cable Connect the Burndy cable ensuring that the connectors are securely attached and their twist lock mechanisms are engaged Switch on the XPS from its front panel power button After a short while the CDX2 will function as normal 9 7 player maintenance It is important for reliable op...

Page 12: ...the CDX2 must be disconnected from the mains Always switch off the CDX2 when connecting or disconnecting an XPS 10 1 CDX2 Rear 10 2 CDX2 Connected to XPS Power Supply XPS CDX2 alternative RCA phono output sockets RC5 input Note The RC5 input fitted to the CDX2 is intended to accept external control signals for multi room applications Contact your dealer for further information on its use optional ...

Page 13: ...d pause are selected by pressing and holding next previous and play respectively To select multi function mode press and hold next while the player is switched on To select the standard control mode press and hold previous while the player is switched on 11 4 player display and indicators The alphanumeric display indicates track and index numbers time in minutes and seconds or various system messa...

Page 14: ...om applications Contact your dealer for further information on its use The CD5 features various technologies to reduce microphonic effects in particular a compliant mounting for the main circuit boards and the DIN sockets on the rear Some movement of the board and sockets when connecting disconnecting is normal mains input power link plug removed mains input power Flatcap 2 CD5 cable direction mar...

Page 15: ...14 CDX2 CD5 Operation Remove and retain the transit screw s One on the CDX2 two on the CD5 Always replace the screws before transit or shipping Open the drawer 13 2 CD Loading 13 1 Transit Screw ...

Page 16: ...15 CDX2 CD5 Operation Place the compact disc on the platter Make sure it is seated properly Place the puck on the compact disc Close the drawer ...

Page 17: ... 14 2 Puck 4 Naim Part No CC4 CD Transport Compatibility VAM1250 CD Player Compatibility CDS3 CDX2 14 1 Puck 3 Naim Part No CC3 CD Transport Compatibility VAM1205 CD Player Compatibility CDS2 CDX CD5 Extended pins Recessed pins ...

Page 18: ...subsequent pages generally providing access to those less often used Selection of second and third pages within each mode is made by pressing the appropriate preset key The currently selected page is shown in the top right corner of the display Details of the master key functions within each page is described in the following paragraphs Flash Handset Preset keys Master keys Volume and mute keys Nu...

Page 19: ...input setup mode spkr Switches the AV processor into speaker setup mode enter Confirms option selection during OSD control clear Clears option selection during OSD control numeric No function Flash Handset 15 3 cd track programming In CD mode the prog key display Page Two enables specific CD tracks and their play order to be programmed To program a play order select a track number from the numeric...

Page 20: ...search for stations In preset mode the up and down keys will tune to the next numbered preset mono Toggles between mono and stereo operation The tuner display will indicate stereo when both stereo operation is selected and a stereo signal is received The mono button on the tuner will illuminate when mono is selected 16 1 Introduction Narcom 3 is a multi functional remote control handset designed t...

Page 21: ...ck press and hold the prog key until the prog indicator in the CD display illuminates then delete the track or tracks using the numeric keypad followed each time by a further operation of the prog key During deletion the track number indicated in the player display will be followed by either C or or no display C indicates that the track is already deleted indicates that the track can be deleted wh...

Page 22: ...pment In accordance with CISPR 16 1 Radio disturbance and immunity measuring apparatus CISPR 16 2 Methods of measurement of disturbances and immunity IEC 801 2 8KV air gap 4KV contact performance criterion B IEC 801 3 3V m 20dB performance criterion A IEC 801 4 1KV AC lines 0 5KV signal lines performance criterion B Acknowledgement HDCD system manufactured under license from Pacific Microsonics In...

Page 23: ...Naim Audio Limited Southampton Road Salisbury England SP1 2LN Telephone 44 0 1722 332266 Fax 44 0 1722 412034 www naim audio com Part No OWMCD 12 001 0041 Drawing No NA101003 400 ...

Reviews: