background image

VIDEO FORMAT CONVERSION

The T 775 is equipped with a Video Format Converter. This allows for a 
simplified video connection between the T 775 and your TV Monitor when 
using multiple video formats such as Composite (CVBS), S-Video, and 
Component (YUV). This format change is accomplished by encoding the 
analog video signal into a digital signal using a very high quality digital 
encoder to maintain the best possible picture quality.

Once in digital format, the video input signal could also be available at the 
other Monitor output jacks including HDMI MONITOR OUT. Thus, you do 
not have to necessarily assign the video output of a composite video input 
signal to MONITOR OUT (Composite video). The composite video input 
signal can be viewed also at HDMI MONITOR OUT at a resolution setting 
dependent upon your TV/Monitor’s resolution capability. With a composite 
video input, the corresponding video resolution at HDMI MONITOR OUT 
will be at 480i/576i or 480p/576p. Some TV/Monitors will automatically 
display the video signal at 480p/576p if they are not capable of displaying 
480i/576i.

If your TV/Monitor does not have HDMI input, select the highest quality 
video format available on your TV/Monitor and utilize this as T 775’s 
preferred Monitor OUT. In most cases, this will be Component Video, but on 
some older TVs, S-Video maybe the best quality connection.

NOTES

•  HDMI resolution cannot be downsampled. You must connect T 775’s 

HDMI MONITOR OUT to your TV/Monitor HDMI input when using an 
HDMI source.

•  With a component video input, the corresponding output at HDMI 

MONITOR OUT will be dependent upon the resolution setting of the 
source.

•  All three monitor outputs (Composite, S-Video and Component Video) 

will always be active no matter what the source format is.

A/V PRESET

A particular Source can be assigned a stored Preset. The parameters set up 
in the selected Preset number will be adopted into the particular Source it 
is assigned (Please refer to the separate section on ‘A/V Presets’ for further 
understanding of Preset settings).

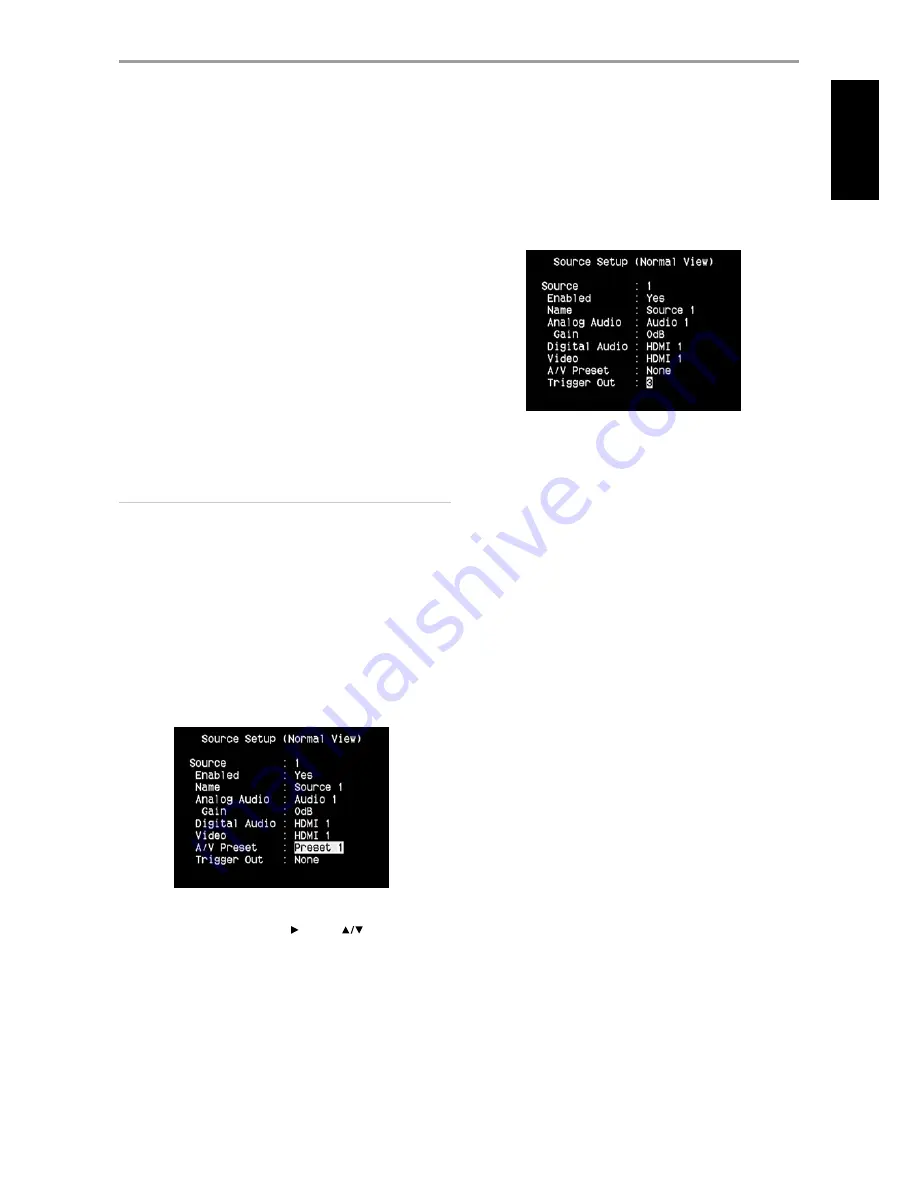
Scrolling to ‘A/V Preset’ and by pressing   and then 

 keys, a Source 

could be assigned a Preset number ranging from Preset 1 to 5. 
 
If it is desired not to assign the particular Source a Preset setting, select 
‘None’. 

TRIGGER OUT

The Trigger Out for a particular Source is dependent on the configurations 
done in a separate menu on Trigger Setup (See ‘Trigger Setup’ below). If all 
three available Trigger outputs are assigned to ‘Source Setup’ in the separate 
‘Trigger Setup’ window, a particular Source can have the following Trigger Out 
combinations

Trigger Out


 1 

 2 

 1 + 2 

 3 

 1 + 3 

 2 + 3 

 1+2+ 3

These combinations are dependent on the assignment of ‘Source Setup’ for 
‘Trigger 1 Out, Trigger 2 Out or Trigger 3 Out’ at the Trigger Setup menu. 
Another option is ‘None’ whereby the particular Source is not assigned any 
Trigger Out.

For ‘Trigger Out’ to become enabled and assignable at ‘Source Setup 
(Normal View)’ menu, make sure to carry out or note the following 
beforehand

• 

In the separate ‘Trigger Setup’ menu, assign ‘Trigger 1 Out, Trigger 2 Out 
or Trigger 3 Out’ to ‘Source Setup.’

• 

‘Trigger Out’ will not appear as an option at the Source Setup (Normal 
View) menu if at the separate ‘Trigger Setup’ menu, ‘Trigger 1 Out, 
Trigger 2 Out or Trigger 3 Out’ are all assigned to ‘Main, Zone 2, Zone 3, 
Zone 4, or Zone 2+3+4’; with not even one ‘Trigger Out’ port allocated 
to ‘Source Setup.’

OPERATION

USING THE T 775 – SETUP MENU

19

EN

G

LI

SH

FR

ANÇ

AIS

ESP

AÑOL

IT

ALIANO

DEUT

SCH

NEDERL

ANDS

SVENSK

A

РУ

ССКИЙ

Summary of Contents for T775

Page 1: ...ENGLISH FRANÇAIS ESPAÑOL ITALIANO DEUTSCH NEDERLANDS SVENSKA РУССКИЙ Owner s Manual Manuel d Installation Manual del Usuario Manuale delle Istruzioni T775 AV Surround Sound Receiver ...

Page 2: ...le 810 of the National Electrical Code ANSI NFPA 70 provides information with regard to proper grounding of the mast and supporting structure grounding of the lead in wire to an antenna discharge unit size of grounding conductors location of antenna discharge unit connection to grounding electrodes and requirements for the grounding electrode NOTE TO CATV SYSTEM INSTALLER Thisreminderisprovidedtoc...

Page 3: ...ion to the mains supply If this product is not provided with a mains plug or one has to be fitted then follow the instructions given below IMPORTANT DO NOT make any connection to the larger terminal which is marked with the letter E or by the safety earth symbol or colored GREEN or GREEN AND YELLOW The wires in the mains lead on this product are colored in accordance with the following code BLUE N...

Page 4: ... UPGRADABILITY 5 ABOUT THE HTR 3 SYSTEM REMOTE CONTROL 5 GETTING STARTED 6 WHAT S IN THE BOX 6 INITIAL SETUP 6 CHOOSING A LOCATION 6 QUICK START 6 DEALING WITH HUM AND NOISE 7 identification of controls FRONT PANEL 8 REAR PANEL 10 operation USING THE T 775 MAIN MENU 13 ABOUT THE ON SCREEN DISPLAY OSD 13 MAIN MENU 13 Listening Mode 13 Adjusting Listening Modes 14 DSP OPTIONS 15 Tone Controls 16 Zon...

Page 5: ...ts design is uniquely simple for so sophisticated a component and the HTR 3 universal remote control is equally understandable as are the T 775 s own front panel and on screen displays Its simple yet powerful system of presets permits you to fine tune your listening setup for different conditions sources or listeners and to recall these multiple parameters with a single key press INTEGRATION The T...

Page 6: ...t of heat but nothing that should trouble adjacent components It is perfectly possible to stack the T 775 on top of other components but the reverse usually should be avoided Nonetheless it is generally preferable that the T 775 stand alone It is especially important that sufficient ventilation be provided If you are contemplating on locating the T 775 within a cabinet or other furniture consult y...

Page 7: ... can be used to burnish copper and gold plated contacts to ensure good low resistance contact specialized contact cleaners can also be useful Avoid unnecessary unplugging and re plugging since the gold or copper contact plating of typical cable connectors even very high quality ones is very thin and easily worn Track down hum noise problems one component at a time working backwards from the A V Re...

Page 8: ...tton to cycle through Preset Name RDS name and RDS text 4 AM FM DB Toggle this button to select either AM FM DAB 230V version only or XM 120V version only tuner functions 5 TUNER MODE In FM mode this button will toggle between FM Stereo and FM mono Select FM Mono FM stereo and FM Mute icons at VFD are extinguished for stations that have too much interference or are too weak In DAB 230V version onl...

Page 9: ...Controls under Setup Menu discussions 15 TONE DEFEAT Tone Controls are enabled or disabled by pressing this button Tone controls are bypassed at Tone Defeat while at Tone Active the tone controls are enabled again See also section about Tone Controls under Setup Menu discussions 16 FRONT INPUT MP Use this button to directly select Front Input and Media Player Toggle button to switch between Front ...

Page 10: ...ally a DVD player and terrestrial or satellite HDTV tuner Connect Component Video OUT to the Component Video input of a compatible video monitor TV Be sure to observe consistency in connecting the Y Pb Pr jacks to the corresponding sources inputs The routing of the component video inputs is fully configurable via the Setup Menu The T 775 s component video inputs and outputs are fully wideband and ...

Page 11: ...low analog signal transfer Typically these sources will produce 5 1 channel output in which case the Surround Back jacks are left unconnected The signals present at these jacks may be heard by selecting Source 7 External 7 1 audio input is defaulted to this Source There is no bass management or other processing other than master volume control available to this 7 1 CH Input While the multi channel...

Page 12: ... 3 remote control 16 AUDIO PRE OUT The Audio PRE OUT makes it possible to use the T 775 as a pre amplifier to external power amplifiers for some or all channels Connect FRONT L FRONT R CENTER SURR R SURR L SURR BL and SURR BR to the respective channel input of a power amplifier or amplifiers driving the corresponding applicable speakers Unlike the full range channels there is no power amplifier bu...

Page 13: ...ns set forth at Listening Mode DSP Options and Tone Controls are carried over whenever they are enabled during A V Preset setting Please see the section AV Presets for reference Listening Mode The T 775 offers distinct listening modes tailored for different types of recording or program material With a two channel Stereo source the following listening modes can be selected Stereo All output is dir...

Page 14: ...jazz and folk genres as well as numerous examples from others Its virtues include realistic stable front stage sonic imaging and spacious but unexaggerated ambient virtual acoustics that remain faithful to the original recording Enhanced Stereo All recordings are reproduced in stereo via the maximum speaker complement configured in the current Speaker Configuration Enhanced stereo can be useful fo...

Page 15: ... to octave balance and surround impression remained the same despite changes in volume Audyssey Dynamic EQ is designed to work in conjunction with Audyssey MultEQ Dynamic EQ determines the proper loudness compensation based on the sound pressure level measurements MultEQ provides Audyssey Dynamic EQ working in tandem with Audyssey MultEQ provides the right listening conditions for every listener a...

Page 16: ...to the next parameter or exit the parameter setting altogether Zone Controls Depending on the settings made at the separate Zone Setup menu under the Setup Menu section discussion the applicable Zone can be configured and managed via this Zone Controls window Select On to activate the applicable Zone When activated the Source input for the particular Zone can be allocated by selecting through the ...

Page 17: ...ns set forth in the parameters for that particular Source window To change or toggle through the Sources scroll to Source press button and then ENTER or to move up or down the Source selections NOTE Source 5 is defaulted to iPod For Source 5 to be changed and allocated for other inputs go to iPod Setup menu under the Source Setup menu At iPod Setup menu set Enabled to No you can now assign Source ...

Page 18: ...Digital Audio input for the T 775 These areHDMI Optical and Coaxial digital inputs A fourth option is Off whereby no incoming digital audio signal is selected by the particular Source The desired digital audio input for a particular Source can be selected by scrolling to Digital Audio press and then to step through the desired digital input source After finalizing the desired type of Digital Audio...

Page 19: ...ce All three monitor outputs Composite S Video and Component Video will always be active no matter what the source format is A V Preset A particular Source can be assigned a stored Preset The parameters set up in the selected Preset number will be adopted into the particular Source it is assigned Please refer to the separate section on A V Presets for further understanding of Preset settings Scrol...

Page 20: ...ns the Speaker Setup menu will guide you on how to manage and setup your speakers in order to achieve optimum sound acoustics in your listening environment The following are the Speaker Setup Menu sections AUDYSSEY AUTO CALIBRATION It has been shown that many if not most surround sound systems are not accurately setup and calibrated To be done properly calibration requires special knowledge and in...

Page 21: ... undertaking the displayed instructions re start the Audyssey calibration again When the measurements are finalized Audyssey calculates the ideal system response for your particular room and speaker setup Note The test tone emitted during measurement is loud This maybe bothersome for you and may affect your other household members as well and even your neighbor Next a Target Curve must be chosen B...

Page 22: ...nnected to the T 775 s SUBW1 or SUBW2 output jack Enhanced Bass When the subwoofer is set to ON and Front is set to Large Enhanced Bass is also available Normally with speakers set to Large the subwoofer is not active The Enhanced Bass option allows full range operation of the speakers with the additional bass contribution of the subwoofer This feature is particularly useful when one wants to expe...

Page 23: ...any should be set with its integral crossover defeated or if undefeatable set to its highest possible frequency if you are using the T 775 s Subwoofer output Final subwoofer level adjustment by ear using music and film sound material is frequently useful Due to the effects of room acoustics matched pair speakers front surround back will not always calibrate to exactly the same level offset reading...

Page 24: ...one 2 Volume is set to a preset dB level and thereafter the Zone s volume can be varied via the volume control of the separate amplifier it is fed into Mode Zone 3 and Zone 4 can be configured into two modes Record Out and Zone Audio Only If the selected mode is Record Out the audio and applicable video signal of the assigned Source are directly sent out to the applicable Audio Video Output See It...

Page 25: ...one 4 as described above will all be activated given a 12V DC input at Trigger IN Warning If Auto Trigger IN at Trigger Setup menu is assigned to Main or All and the TRIGGER switch is set to AUTO mode the Standby button in the front panel as well as the corresponding ON OFF function keys in the HTR 3 remote control will be disabled effectively handing this function to an external controller Switch...

Page 26: ...additional channel you will experience improved dynamics and a better sensation of movement within the sound field If media sources recorded in Dolby Digital EX are decoded with a Digital EX decoder the format is detected automatically and the Dolby Digital EX mode is selected However some media sources recorded in Dolby Digital EX can be detected as simple Dolby Digital media sources In this case...

Page 27: ...that can reproduce sound faithfully as intended by the creator of music or movies DTS ES EXTENDED SURROUND DTS ES This is a new multi channel digital format which greatly improves the 360 spatial sensation of the Surround impression thanks to the greater space expansion of the surround signals providing high compatibility with the conventional DTS format In addition to the 5 1 channels the expande...

Page 28: ...hown Listening Mode Selected Listening Mode is shown Audio Src Format Shows the active Source s detected audio format Audio Codec Displays the detected audio stream format like Analog PCM Surround Dolby TrueHD DTS HD Master Audio and other formats Video Mode Show the video resolution of the active input source Details shown include the video resolution with frame rate Deep Color bit rate and the l...

Page 29: ...ely include in the particular Preset any of the above mentioned parameter settings by choosing Yes If you decide not to include in the particular Preset a certain parameter setting select No Now in order to save the settings chosen for the particular Preset number scroll down to Save Current Setup to Preset and press the key If you chose to load instead the default settings scroll down to Load Def...

Page 30: ...E for more than 2 seconds to search up or down the T 775 s tuner will stop at the next sufficiently strong signal it encounters Pressing the TUNE during the search process will stop the search 3 After first pressing TUNER yellow lettering at the Device Selector page of HTR 3 to set the remote to control Tuner functions press TUNE or TUNE yellow lettering on the HTR 3 toggle in to perform slow manu...

Page 31: ...dio The T 775 is XM Ready which means that with the addition of separately sold XM Mini Tuner CPC 9000 and XM Mini Tuner Home Dock it has everything you need to listen to live XM Everything else is built right in Just subscribe to the XM service and your T 775 will be ready to receive XM content Notes When using the HTR 3 to carry out XM commands ensure that the DEVICE SELECTOR is set to TUNER In ...

Page 32: ...o is available on the HTR 3 remote control and front panel then the reference to said button is applicable to both the HTR 3 remote control and front panel The same condition applies to their equivalent buttons NOTES When using the HTR 3 remote control to carry out DAB commands ensure that the DEVICE SELECTOR is set to TUNER HTR 3 S FM MUTE ENTER and are the equivalent remote control keys for the ...

Page 33: ...annel list DRC The level of compression of stations can be set to eliminate the differences in dynamic range or sound level between radio stations Popular music would normally be more compressed than classical music resulting in possible different audio levels when changing from one station to the other Setting the DRC to 0 means no compression 1 2 indicates medium compression and 1 shows maximum ...

Page 34: ...s shown This is the default display DLS Dynamic Label Segment DLS is the scrolling text supplied by the broadcasting station It may contain information on music titles or details regarding the program or station Channel and frequency The channel and frequency of the currently tuned DAB broadcast are displayed Ensemble name The name of the ensemble that is broadcasting the program is displayed Prog...

Page 35: ...on of the buttons NOTES The iPod player s click wheel and controls will not operate when it is properly connected to the T 775 via the NAD docking station To exit from the iPod Menu at Source 5 press bringing you to Menu Select OSD Follow the instructions as shown CONTROL FEATURES AND SETTINGS The following control functions and settings are selectable or enabled using the front panel and HTR 3 re...

Page 36: ...NTER Press ENTER to select an option or start playback REPEAT Toggle to initiate repeat mode as follows repeat one song repeat all songs or cancel repeat mode RANDOM Toggle to initiate playback in random order There are three random modes Shuffle Song Shuffle Album or Shuffle Off TO VIEW VIDEOS OR PHOTOS LOADED IN YOUR iPod Videos or photos uploaded in your iPod can be viewed directly via the T 77...

Page 37: ...necessary to re program any keys on the HTR 3 AMP page However in order for the HTR 3 to control your specific NAD brand components you may need to load one or more different code libraries see Loading Code Libraries below Controlling the T 775 The HTR 3 is divided into two main sections Eight Device Selector keys at the top AMP DVD TV and so on set the handset s remaining keys to a page of comman...

Page 38: ... Note The HTR 3 s VOL keys are pre programmed as punched through for all Device Select pages VOL will operate the T 775 s master volume regardless of the currently selected device The SURR CENTER and SUB Channel Volume controls similarly are pre programmed as punched through To set a punch through after entering the Learning Mode and pressing the desired key to be punched through simply press the ...

Page 39: ...ess AMP press ON press 1 Input or Source 1 press DVD press Play the Learn LED blinks as each step is added Press MACRO again to exit the macro record mode To clear a macro perform the above steps without entering any functions Executing Macros To execute a macro press and release MACRO its key illumination lights for 5 seconds While it remains lit press an HTR 3 key to which a macro has previously...

Page 40: ... layers back down to the default library command on any key removing learned commands punched through functions and copied keys Note The default library commands cannot be deleted so you need not worry that using Delete Mode might cause irreparable changes To enter Delete Mode simultaneously press and hold for 3 seconds both the desired key s Device Selector key and the RTN key until the Learn LED...

Page 41: ...7 118 401 TAPE Deck A 108 L53 500 TV 280 109 L73 501 MR13 110 Stereo Receiver Amplifier 502 MR20 111 Stereo Second Zone 503 PMR45 112 Txx5 Series 600 T535 T562 T585 M55 200 CD Player 601 T550 L55 201 CD Player old 602 T512 T531 T532 T571 T572 202 5170 5240 5340 603 L70 L73 DVD 203 5325 604 L56 204 5060 605 T513 T514 T515 T517 T524 T533 T534 205 M5 606 L53 DVD Search Mode If none of the codes from ...

Page 42: ...ent Display VFD Each consecutive press increases the sleep time in 15 minute increments from 15 to 90 minutes To cancel the sleep mode continue pressing the HTR 3 sSLEEP button until SLEEP OFF displays on the VFD Switching the T 775 to standby from either the HTR 3 s OFF or the T 775 s STANDBY button will also cancel the sleep mode Using the ZR 4 Remote Control The ZR 4 remote control is a discret...

Page 43: ...ogic IIx Music mode Center set to OFF on Speaker Configuration menu Correct Speaker Configuration or Speaker Levels settings Center level set too low on Speaker Levels menu No Dolby Digital DTS Source s digital output is not connected to a T 775 digital input Check connections Source component not configured for multichannel digital output Check source component setup T 775 does not respond to HTR...

Page 44: ...lude feet volume knob and extended speaker terminals Specifications are subject to change without notice For updated documentation and features please log onto www NADelectronics com for the latest information about T 775 Manufactured under license under U S Patent s 5 451 942 5 956 674 5 974 380 5 978 762 6 226 616 6 487 535 7 212 872 7 333 929 7 392 195 7 272 567 other U S and worldwide patents ...

Page 45: ...45 ENGLISH FRANÇAIS ESPAÑOL ITALIANO DEUTSCH NEDERLANDS SVENSKA РУССКИЙ ...

Page 46: ...ll rights reserved NAD and the NAD logo are trademarks of NAD Electronics International a division of Lenbrook Industries Limited No part of this publication may be reproduced stored or transmitted in any form without the written permission of NAD Electronics International T 775 Manual Issue 2 5 06 09 ...

Reviews: