background image

9

• Depending on your TV and other equipment you wish to connect,

there are various ways you could connect the player. Use only one of
the connections described below.

• Please refer to the manuals of your TV, VCR, Stereo System or other

devices as necessary to make the best connections.

• For better sound reproduction, connect the player’s AUDIO OUT

connectors to the audio in connectors of your amplifier, receiver,
stereo or audio/video equipment. See “Connecting to Optional
Equipment” on page 10.

CAUTION

• Make sure the DVD Player is connected directly to the TV. Tune the

TV to the correct video input channel.

• Do not connect the DVD Player’s AUDIO OUT jack to the phono in

jack (record deck) of your audio system.

• Do not connect your DVD Player via your VCR. The DVD image could

be distorted by the copy protection system.

CONNECTING TO A TV

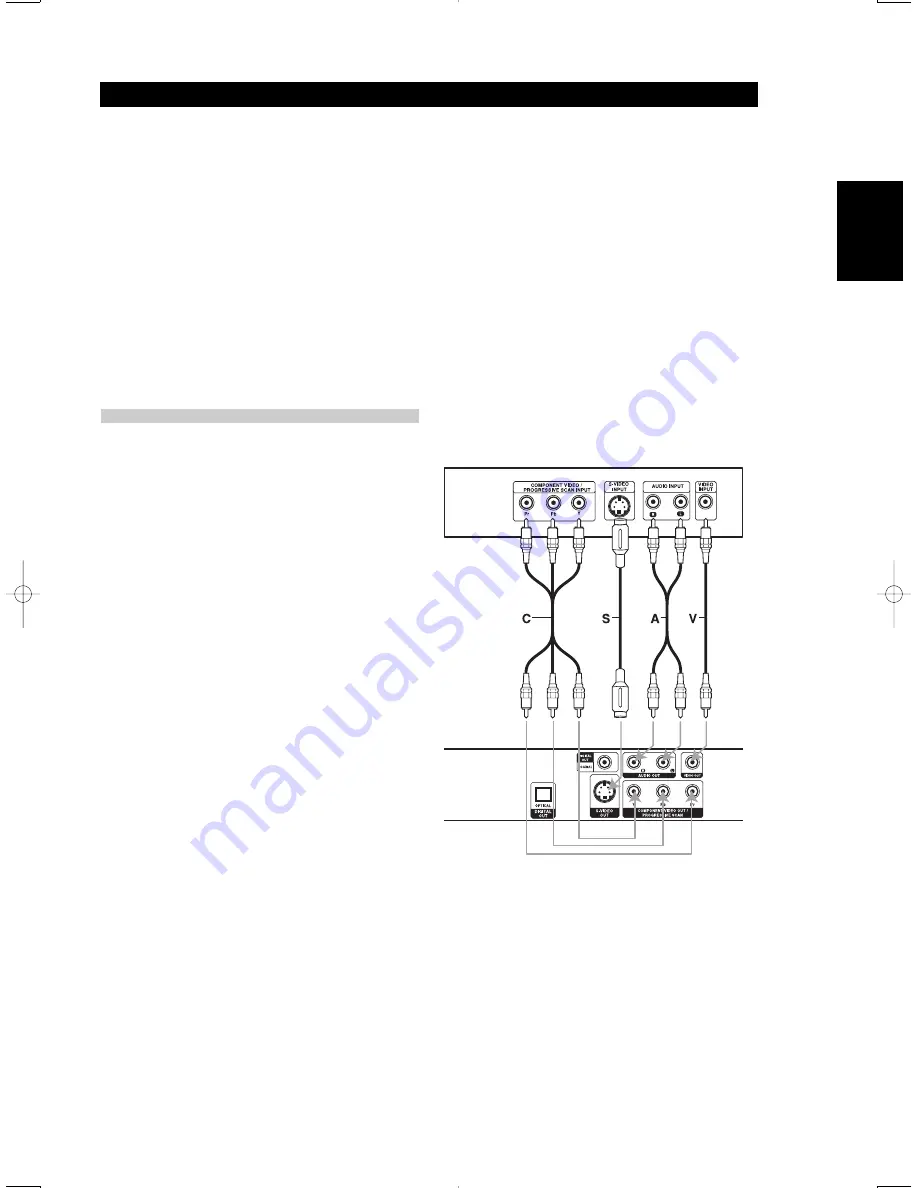
• Make one of the following connections, depending on the

capabilities of your existing equipment.

VIDEO CONNECTION

1

Connect the VIDEO OUT jack on the DVD Player to the video in jack
on the TV using the video cable 

(V)

.

2

Connect the Left and Right AUDIO OUT connectors of the DVD
Player to the audio left/right in connectors on the TV using the audio
cables 

(A)

.

S-VIDEO CONNECTION

1

Connect the S-VIDEO OUT jack on the DVD Player to the S-Video in
jack on the TV using the S-Video cable 

(S)

.

2

Connect the Left and Right AUDIO OUT connectors of the DVD
Player to the audio left/right in connectors on the TV using the audio
cables 

(A)

.

COMPONENT VIDEO (COLOR STREAM®) CONNECTION

1

Connect the COMPONENT VIDEO OUT/ PROGRESSIVE SCAN
connectors on the DVD Player to the corresponding in connectors on
the TV using an Y / Pb / Pr cable 

(C)

.

2

Connect the Left and Right AUDIO OUT connectors of the DVD
Player to the audio left/right in connectors on the TV using the audio
cables 

(A)

.

PROGRESSIVE SCAN CONNECTION 

• If your television is a high-definition or “digital ready” television, you

may take advantage of the DVD Player’s progressive scan output for
the highest video resolution possible.

• If your TV does not accept the Progressive Scan format, the picture

will appear scrambled if you try Progressive Scan on the DVD Player.

1

Connect the COMPONENT VIDEO OUT/ PROGRESSIVE SCAN
connectors on the DVD Player to the corresponding in connectors on
the TV using an optional Y Pb Pr cable 

(C)

.

2

Connect the Left and Right AUDIO OUT connectors of the DVD Player
to the audio left/right in connectors on the TV using the supplied
audio cables 

(A)

.

NOTES

• Set the Progressive to “On” on the setup menu for progressive

signal, see page 13.

• Progressive scan does not work with the analog video connections

(yellow VIDEO OUT jack).

Rear of TV

Rear of DVD player

CONNECTIONS

Preparation

ENGLISH

FRANÇAIS

DEUTSCH

NEDERLANDS

ESP

AÑOL

IT

ALIANO

POR

TUGUÊS

SVENSKA

T514_eng.qxd  11/9/2004  1:01 PM  Page 9

Summary of Contents for T 514DVD

Page 1: ...T 514 DVD CD MP3 Player ENGLISH ESPA OL ITALIANO PORTUGU S SVENSKA Owner s Manual...

Page 2: ...dcast via cable play in public or rent copyright material without permission This product is equipped with copy protection measures developed by Macrovision Copy protection signals are recorded on som...

Page 3: ...14 Speaker selection 14 Others 15 Parental Control 15 OPERATION Operation with DVD and Video CD 17 Playing a DVD and Video CD 17 General Features 17 Special DVD Features 19 Playing a DVD VR format Dis...

Page 4: ...a region code label even though their playback is prohibited by area limits DISC RELATED TERMS TITLE DVD VIDEO DISCS ONLY The main film content accompanying feature content additional feature content...

Page 5: ...e contact your nearest dealer NOTES ON DISCS HANDLING DISCS Do not touch the playback side of the disc Hold the disc by the edges so that fingerprints will not get on the surface Do not stick paper or...

Page 6: ...o out jack Connect to digital optical audio equipment AUDIO OUT Left Right Connect to an amplifier receiver or stereo system VIDEO OUT Connect to a TV with video inputs AC Power Cord Plug into the pow...

Page 7: ...Power button Switches the player on and to standby Display window Shows the current status of the player NAD PLAY PAUSE OPEN CLOSE STOP DVD CD MP3 Player T 514 MP3 SVCD CD ALL A B CHP TRK DVD PAUSE Pa...

Page 8: ...subtitle language ANGLE Selects a DVD camera angle if available REPEAT Repeat chapter track title and all RPT A B Repeat sequence RANDOM Plays tracks in random order MARKER Marks any point during pla...

Page 9: ...in jack on the TV using the S Video cable S 2 Connect the Left and Right AUDIO OUT connectors of the DVD Player to the audio left right in connectors on the TV using the audio cables A COMPONENT VIDEO...

Page 10: ...igital multi channel connection provides the best sound quality For this you need a multi channel Audio Video receiver that supports one or more of the audio formats supported by your DVD Player MPEG...

Page 11: ...hibited or not available NOTES Some discs may not provide all of the features on the on screen display example shown below If no button is pressed for 10 seconds the on screen display disappears BEFOR...

Page 12: ...rack number total number of tracks and PBC On mode and skip to the desired track number or Numbers ENTER Time Shows the elapsed playing time Display only Items Function Press to select desired item Se...

Page 13: ...n the Pan Scan style is played back in that style Both sides of the picture are cut off PROGRESSIVE SCAN Progressive Scan Video provides the highest quality pictures with less flickering If you are us...

Page 14: ...Frequency setting first select the desired Digital Audio Output as indicated as above If your receiver or amplifier is NOT capable of handling 96 KHz signals select 48 KHz When this choice is made thi...

Page 15: ...Setup menu using the buttons 2 While Rating is selected press 3 When you have not yet entered a password Enter a 4 digit password using the numbered buttons to create a personal 4 digit security pass...

Page 16: ...ing 2 Enter the old code and then press ENTER 3 Select Change using buttons then press ENTER 4 Enter the new 4 digit code and then press ENTER 5 Enter exactly the same code a second time and verify by...

Page 17: ...ve to another title group as follows Press DISP then press the appropriate numbered button 0 9 to select a title group number MOVING TO ANOTHER CHAPTER TRACK When a title on a disc has more than one c...

Page 18: ...ack Group Off 1 To repeat the currently playing track press REPEAT The Repeat Track icon appears on the TV screen 2 To repeat the group currently playing press REPEAT a second time The Repeat Group ic...

Page 19: ...R SEARCH menu will appear on the screen 2 Press to select the Marker number that you want to erase 3 Press CLEAR The Marker number will be erased from the list 4 Repeat steps 2 and 3 to erase addition...

Page 20: ...s This DVD player may not support this disc format created on some DVD recorders and will display CHECK DISC What is CPRM CPRM is a copy protection using encryption technology so that to only allow th...

Page 21: ...ator which creates an ISO9660 file system 5 A single session disc requires MP3 WMA files in the first track If there is no MP3 WMA file in the 1st track it cannot playback MP3 WMA files If you wish to...

Page 22: ...A B again at your chosen end point The Repeat icon and A B appears on the menu screen and the sequence begins to play repeatedly 3 To exit the sequence and return to normal play press RPT A B again T...

Page 23: ...P during slide show The player will now go into PAUSE mode 2 To return to the slide show press PLAY or press PAUSE STEP again TO FLIP THE PICTURE Press during showing a picture to flip the picture hor...

Page 24: ...ed Playback with Audio CD and MP3 WMA disc on left 4 To resume normal playback from programmed playback press PROGRAM PROG indicator disappears in the display window REPEAT PROGRAMMED TRACKS To repeat...

Page 25: ...the video mode To change the video mode press and hold DISP about 3 seconds during disc playback The new video mode number selected is displayed on the TV screen Check whether the video quality has i...

Page 26: ...r The remote control is too far from the DVD player There is an obstacle in the path of the remote control and the DVD player The batteries in the remote control are exhausted CORRECTION Plug the powe...

Page 27: ...atar 6678 Bengali Bangla 7387 Hebrew 7869 Nepali 8469 Telugu 6890 Bhutani 7273 Hindi 7879 Norwegian 8472 Thai 6672 Bihari 7285 Hungarian 7982 Oriya 6679 Tibetan 6682 Breton 7383 Icelandic 8065 Panjabi...

Page 28: ...Bahamas GY Guyana MZ Mozambique TO Tonga BT Bhutan HK Hong Kong NA Namibia TP East Timor BV Bouvet Island HM Heard and McDonald NC New Caledonia French TR Turkey BW Botswana Islands NE Niger TT Trinid...

Page 29: ...DEO OUT Y 1 0 V p p 75 ohms negative sync RCA jack x 1 Pb Pr 0 7 V p p 75 ohms RCA jack x 2 Audio output digital audio 0 5 V p p 75 ohms RCA jack x 1 Audio output optical audio 5 V p p 75 ohms Optical...

Page 30: ...TERNATIONAL A DIVISION OF LENBROOK INDUSTRIES LIMITED All rights reserved No part of this publication may be reproduced stored or transmitted in any form without the written permission of NAD Electron...

Reviews: