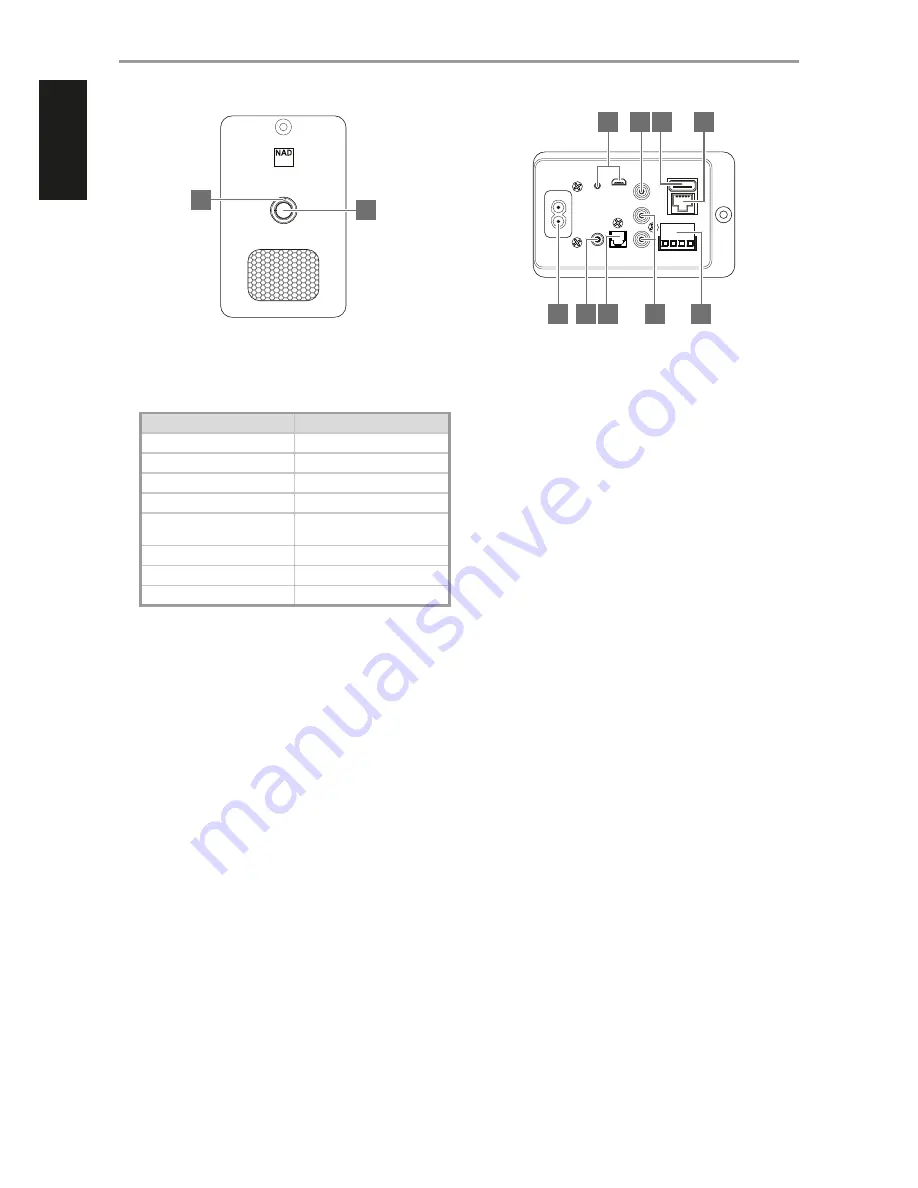
1 STATUS INDICATOR
This is an indicator of network connectivity. Below is a table of the LED
blink codes and their corresponding descriptions.
LED BLINK CODE
DESCRIPTION
Short blue flash, then red
Powering up, rebooting
Solid red
Booting up
Solid red
Cannot boot up; drive error
Solid white
Indexing
Solid blue
Connected to network – ready to
use with Blu
OS
App
Red pulse
No internet gateway
Alternate flashing red and green
Upgrade mode
Flashing red
Factory reset in progress
2 STANDBY BUTTON
•
Press and hold this button to bring the CI 720 to standby mode.
3 AC MAINS INPUT
•
The CI 720 comes supplied with two separate AC mains power
cords. Select the AC mains power cord appropriate for your
region. An adaptor may be necessary in certain regions.
•
Always disconnect the plug from the wall outlet first, before
disconnecting the other end from CI 720’s AC
Mains input socket
.
4 IR IN
•
This input is connected to the output of an IR (infrared) repeater
(Xantech or similar) or the IR output of another component to allow
control of the CI 720 from a remote location.
•
To program IR Remote commands into your CI 720 via IR IN, select
from the App the
Settings Menu
-
Player-IR Remote
. Simply
select the function desired from the
IR Remote Menu
, point an IR
remote control at the IR repeater and press the button to perform
that function. Once programmed, a check-mark will appear in the
Configure IR Trigger function list.
5 OPTICAL IN
•
Connect to the corresponding optical digital output of sources such
as CD or BD/DVD players, digital cable box, digital tuners and other
applicable components. The source will appear as an Optical Input
in the navigation drawer of the BluOS App.
6 ANALOG IN
•
Input for line level sources such as CD player, tuner or any
compatible devices. Use a twin RCA-to-RCA lead to connect the
source device’s left and right “Audio Output” to this input. The source
will appear as an Analog Input in the navigation drawer of the BluOS
App.
7 SPEAKER OUT
•
Connect the speaker cables to the supplied speaker terminal block
with reference to CI 720’s speaker terminal markings on the rear
panel.
•
Connect CI 720s Right speaker terminals marked “R +” and “R-” to
the corresponding “+” and “-“ terminals of your designated right
speaker. Repeat the same for CI 720’s Left speaker terminals and
corresponding left speaker.
8 SERVICE/USB
•
Use the SERVICE port in conjunction with USB (Type B mini) to
manually load firmware to the CI 720. This is not for consumer use.
Only authorized service personnel can access this USB port and
SERVICE button.
9 SUBW OUT
•
Connect SUBW OUT to a powered subwoofer.
Low frequency
information up to 150 Hz is sent to SUBW OUT.
10 LAN
•
A wired Ethernet connection is required to setup the CI 720. Using
the supplied Ethernet cable, connect one end of the Ethernet cable
to CI 720’s LAN port and the other end to the corresponding LAN
port of your wired Ethernet broadband router.
11 USB (Type A)
•
Connect a USB mass storage device to the USB input. Typical USB
mass storage device compatible with CI 720 include portable flash
memory devices and external hard drives (FAT32 recommended).
•
A notification will be shown in the App if a USB device is inserted.
Click on USB in the navigation drawer to browse content.
IDENTIFICATION OF CONTROLS
Network Stereo Zone Amplifier
CI 720
© NAD CI720
© NAD CI720
100-120V
220-240V ~
50/60Hz
IR IN
ANALOG IN
SUBW OUT
SERVICE
USB
LAN/USB
L
+
+
–
–
L
R
R
SPEAKER OUT
OPTICAL
IN
1
2
3
8
4
9
5
10
6
11
7
6
ENGLISH
FR
ANÇ
AIS
ESP
AÑOL
IT
ALIANO
DEUT
SCH
NEDERL
ANDS
SVENSK
A
РУ
ССКИЙ


