background image

23

8.3. Set up of Microsoft account


To share files or settings with other devices running Windows 10, or 


download/buy apps from the Microsoft Store, you need to set up your 


Microsoft Account.  


To set up the Microsoft account, open the settings menu, select Your Account, 


select Sign in with a Microsoft account and then follow the instructions to


register your account information.

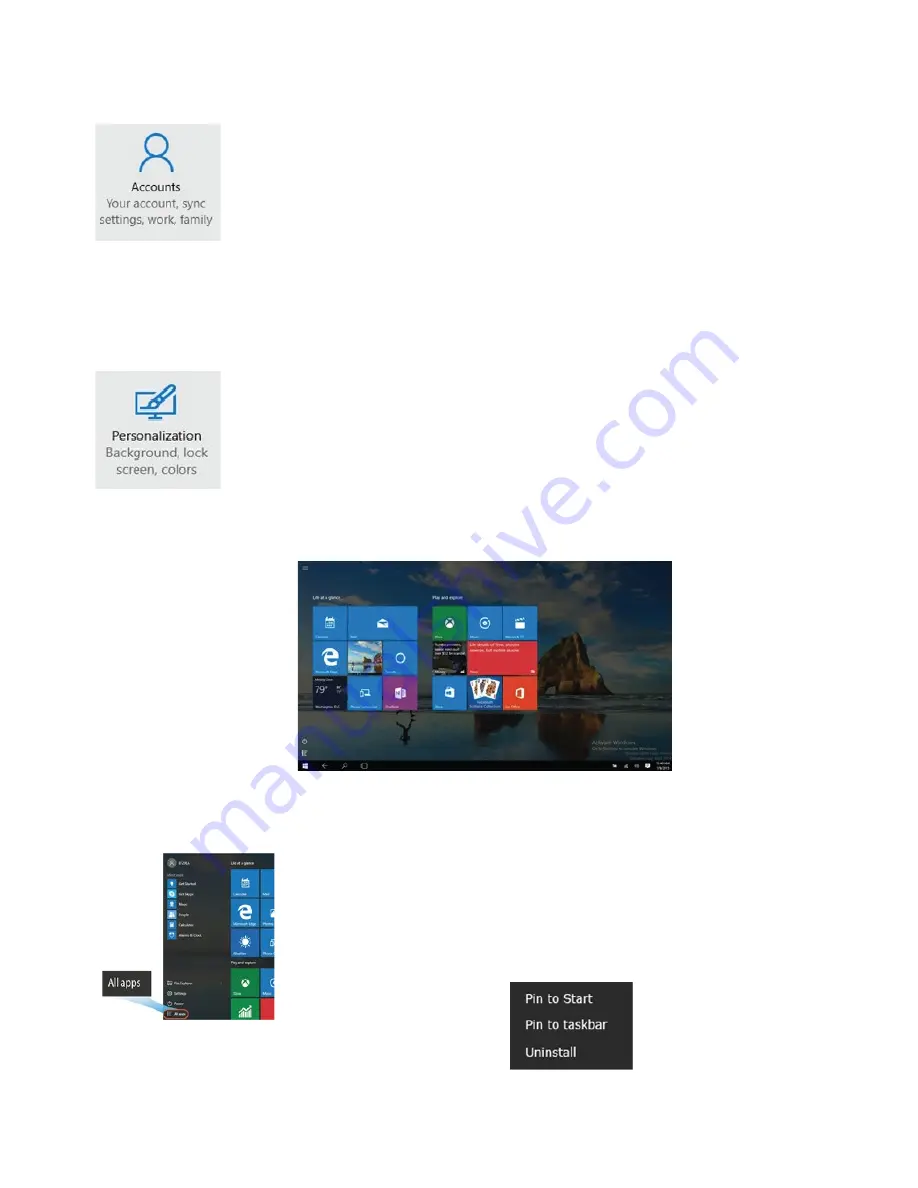
8.4. Replacing Desktop with Start Screen 


If you are more familiar with the Windows 8 interface, you can set up your 


device to show the Start screen instead, every time you turn on your device. To 


do so please follow the steps below:


 •     Open the Settings screen


 •     Select “Personalization”


 •     In the personalization screen, enable the option "Use Start full screen"


This steps will enable you to see the Start screen every time you turn on your 

  device.

8.5. Pin and unpin your app


To pin an app to the Start menu or Taskbar follow the below steps:


 •     Select the Start Menu and "All Apps" 


 •     Right click on the wanted app and a new option menu appears. 


 •     Click "Pin to Start" or "Pin to taskbar" to add the app to the


       Start menu/Taskbar.

To remove an app, right click on the app you want to remove form the Start menu/taskbar. Next 
click on the "Unpin from Start" or "Unpin from taskbar" to remove the app.

Summary of Contents for turn t201

Page 1: ...USER GUIDE EN www mymaga eu TURNT201 V 1 0 ...

Page 2: ...ction keys 10 4 7 Folding the Keyboard 11 4 8 Your rotatable camera 11 4 9 Installing Microlens 11 4 10 Installing Thermal Probe 11 5 CHARGING YOUR DEVICE 12 5 1 Battery charge status 12 5 2 Saving battery power 13 6 TURN ON YOUR DEVICE 14 6 1 Turn on for the first time 14 6 2 Turn Off Your Device 14 6 3 Sleep mode 14 6 4 Waking up 15 6 5 Basic touchpad operations 15 6 6 Basic touchscreen operatio...

Page 3: ...7 Connecting a Memory Card 24 8 8 Connecting an External Device 25 9 HELP AND TROUBLESHOOTING 26 9 1 Troubleshooting 26 9 2 Display and screen problems 26 9 3 Sleep problems 27 9 4 Sound problems 27 9 5 Other problems 27 10 AGENCY REGULATORY NOTICES 28 10 1 Declaration of Conformity 28 10 2 Specific Absorption Rate SAR Certification Information 30 10 3 Elimination of Private Equipment by Users in ...

Page 4: ...ion ikES please consult www ikes jpik com Any information must be requested to JP Sá Couto S A Rua da Guarda 675 4455 466 Perafita Portugal E mail support mymaga eu Notes Screen displays and illustrations may differ from those you see on the actual product mymaga are professional educational products eligible to be purchased by Educational institutions Administrative offices and Boards of educatio...

Page 5: ...r radiators The device may explode when overheated Follow all local regulations when disposing of used devices Do not leave the device plugged in or on when enclosed in a non vented container such as school backpack as overheating may occur Do not place heavy objects to add heavy pressure on the device Avoid exposing your device to very cold or very hot temperatures Extreme temperatures can damage...

Page 6: ...ge or misuse of sensitive information While using your device be sure to back up important data Our devices are not responsible for the loss of any data When disposing of your device back up all data and then reset your device to prevent misuse of your personal information Carefully read the permissions screen when downloading applications Be particularly cautious with applications that have acces...

Page 7: ...fe of your device or cause it to malfunction They may also result in a fire or cause the battery to explode Our devices cannot be responsible for the user s safety when using accessories batteries or supplies that are not approved by the manufacturer 2 2 Warning Volume Level Headphones and Earphones Listening to music at high volume levels and for extended periods of time can damage hearing To red...

Page 8: ...3 PACKAGE CONTENTS One laptop One microlens One universal AC Adapter Quick Guide Digital pen Thermal Probe 1 2 3 1 2 3 8 ...

Page 9: ...Type C supported devices here Plug the provided adapter here to charge the battery Charging indicator It shows charging status of your laptop It shows blue when the battery is fully charged Micro SD card slot Plug your micro SD card here USB Type A Plug your USB devices here Combo Audio jack for microphone headphone Plug your 3 5mm headphone here Speakers The sound system has two speakers for play...

Page 10: ...s the display brightness F6 Increases the display brightness Opens the Settings screen F7 Play or Pause F8 F9 Push here to talk to Cortana if available Eraser button With the button being pressed the tip of your digital pen acts like an eraser and enables you to erase the content previously made on the touch screen This button may require the support from your application Barrel button This button...

Page 11: ...llow the below steps Gently press the microlens over the rear facing camera Make sure the bottom of the lens is fitted into the outer rim of the camera Activate the camera app Gently put the lens on the object s you want to observe 4 10 Installing Thermal Probe 11 Form the angle at which the camera facing forward you can adjust the camera angle downward to make it facing down at an angle of 35 deg...

Page 12: ...attery After fully charged the battery Life reaches 6 hours on full HD video playback Note If the remaining power in your battery capacity is 90 or above plugging the adapter will not fully charge your battery Inspecting your battery status In Desktop move the cursor to the battery icon in the taskbar A pop up dialog box appears and shows you the remaining battery percentage as shown below The fol...

Page 13: ...the battery for a long time you must store it after charging we recommend you to charge it at least until 30 or 40 of its capacity This will extend the battery life time of your device By customizing some options you can use the device during longer periods of time between charges Close unnecessary applications Deactivate the Bluetooth if not needed Deactivate the Wi Fi option if you are not using...

Page 14: ... to complete the initial setup 6 2 Turn Off Your Device Before turning off your device save all your data To turn off your device follow the below steps 1 Click the Windows icon in the left corner of the Desktop or press the Windows key on the keyboard 2 In the start menu click on the Power option and select Shut Down from the power option menu as below 6 3 Sleep mode While away from your device i...

Page 15: ...click double click actions However the actual available actions are application dependent Tap once on the touchpad surface or press once on the low left corner of the touchpad Left clicking or Clicking Press once on the low right corner of the touchpad Right clicking Press and continue to hold down the left corner and then move drag your finger across the touchpad surface Drag two fingers vertical...

Page 16: ... Tap Press and hold Double tap Pinch Rotate Slightly press twice with your finger to select an item Press and leave your finger on an item This brings up detailed information or opens a menu with more options for the item This is similar to a right click with the mouse Move two fingers together or apart while touching the screen This is to zoom in and out on visual apps such as pictures and maps P...

Page 17: ...etup 1 Open the Settings page and select Accounts 2 In the Accounts page select Sign in options Note Before setting your fingerprint sign in option you need to set your password first if you have not set one yet 3 In the Fingerprint field click Setup This will activate a feature called Windows Hello 4 Click Get started here and the system will ask you to swipe your finger with the popup box as sho...

Page 18: ...s process for several times Here you may be asked to set your PIN in case that the Windows Hello becomes unavailable for some reasons After you follow the instructions shown on the screen you are able to login to your laptop with your fingerprint ...

Page 19: ...installed applications also referred to as apps at one glance To launch the features click the app icon or press at the same time the Window key and TAB key on the keyboard 7 2 Taskbar The black bar on the bottom of your desktop is called a Taskbar It provides several key features Start Menu Search Box App shortcuts area Notification area ...

Page 20: ...e Search Box Cortana Next to the start menu you can find the search box When selecting this box a new window will pop up This is the Cortana icon Cortana is a new virtual built in assistant for Windows 10 Cortana can be controlled either by keyboard or by voice commands It is used to perform intelligent searches and more After Cortana is set up the search box will look like ...

Page 21: ...f the taskbar holds several icons that show you the status of your device as shown below This is an area called Notification Area Click here to show more hidden status icons Shows the current battery status Shows the status of the wireless network connection Click here to see the system notifications and several shortcuts ...

Page 22: ...ws icon in the low left corner of the Desktop or press the Windows key on the keyboard Select Settings to open settings menu 8 2 Activate Windows Here you can activate your Microsoft account To do that in the settings menu click Update security and then select Activate Follow the following steps to register and activate Windows ...

Page 23: ...een instead every time you turn on your device To do so please follow the steps below Open the Settings screen Select Personalization In the personalization screen enable the option Use Start full screen This steps will enable you to see the Start screen every time you turn on your device 8 5 Pin and unpin your app To pin an app to the Start menu or Taskbar follow the below steps Select the Start ...

Page 24: ...then on Connect Note Some networks require a network security key or password for connection If necessary ask the network administrator or the Internet service provider ISP for the required information 8 7 Connecting a Memory Card You can utilize the Micro SD Cards as removable disks and exchange data with digital devices such as digital camera camcorder MP3 etc To insert the micro SD card follow ...

Page 25: ...t performing any additional steps Note If Windows requires you to install the driver before connecting check the documentation provided by the device s manufacturer before connecting the device To disconnect a USB storage device make sure you click the Safely Remove Hardware icon in the notification area of the taskbar As well make sure that all data transfer has finished Finally a notification wi...

Page 26: ...n Plug your device to a wall socket to charge it for at least one hour 9 2 Display and screen problems When I turn on the device nothing appears on the screen If the screen is blank make sure that The AC adapter is connected to the device and the power cord is plugged into a working electrical outlet The device is turned on press the power button again for confirmation for 6 seconds to force the t...

Page 27: ...red off connect the AC adapter first and then press the power button to resume operation 9 4 Sound problems No sound can be heard from the speaker even when the volume is turned up Make sure that The Mute function is off The combo audio jack is not being used Speakers are selected as the playback device 9 5 Other problems Your device does not respond To turn off your device press and hold the powe...

Page 28: ...ernice 2014 53 EU Česky Czech J P Sá Couto S A tímto prohlašuje že tento TURN T201 je ve shodě se základními požadavky a dalšími příslušnými ustanoveními směrnice 2014 53 EU Lietuvių Lithuanian šiuo J P Sá Couto S A deklaruoja kad šis TURN T201 atitinka esminius reikalavimus ir kitas 2014 53 EU Direktyvos nuostatas Dansk Danish Undertegnede J P Sá Couto S A erklærer herved at følgende udstyr TURN ...

Page 29: ... de grunnleggende krav og øvrige relevante krav i direktiv 2014 53 EU Eesti Estonian Käesolevaga kinnitab J P Sá Couto S A seadme TURN T201 vastavust direktiivi 2014 53 EU põhinõuetele ja nimetatud direktiivist tulenevatele teistele asjakohastele sätetele Magyar Hungarian Alulírott J P Sá Couto S A nyilatkozom hogy a TURN T201 megfelel a vonatkozó alapvetõ követelményeknek és az 2014 53 EU irányel...

Page 30: ...power of your device is automatically decreased when full power is not needed for the call The lower the power output of the device the lower its SAR value Organizations such as the World Health Organization and the US Food and Drug Administration have suggested that if people are concerned and want to reduce their exposure they could use a hands free accessory to keep the wireless device away fro...

Page 31: ...V 1 0 EN www mymaga eu TURNT201 ...

Reviews: