background image


Basic Operations


Because your service provider is providing subscription-based services, and the STB must always be 

authorized to receive these services, at least one tuner must be tuned to a channel that is provided directly 

from your service provider at all times. Therefore, you cannot simultaneously watch and record two programs 

that are not from your service provider. 

5.


Watching Recorded Video  via the PVR 

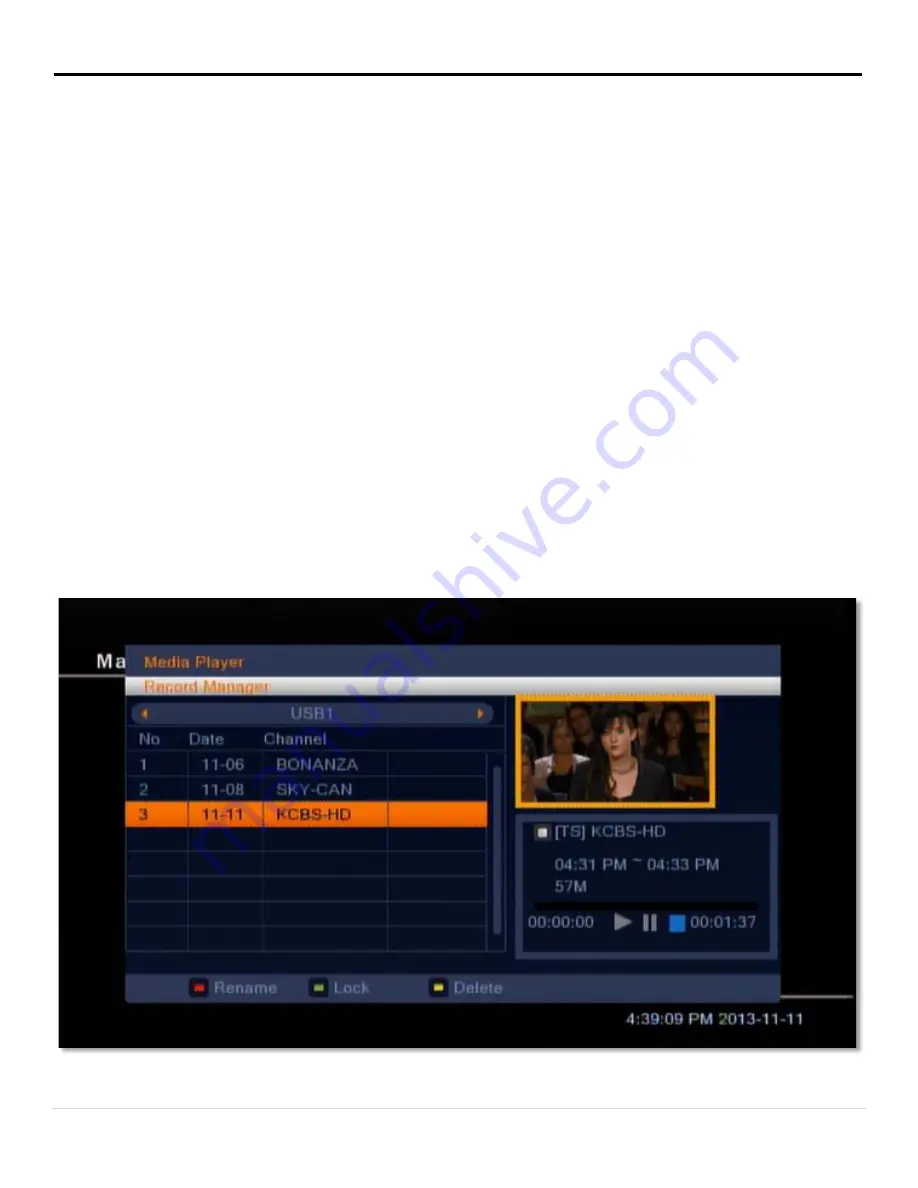
To play and modify recorded programs, press [PVR] on the remote or navigate to the Main Menu > Media 

Player > PVR. Highlight a program with [CH 

/

] and select with [OK] to begin playback. Details on how to 

operate other functions of the PVR can be found in 

III. Advanced Operations

 under 

1.1. PVR

While playing a recorded program, press [PLAY/PAUSE 

II] to pause the program. Press again to continue 

playback. To navigate forward and backward, use [REW 

◄◄

] and [FFW 

►►

]. 

While controlling playback, the Video navigation window will appear and display program information as well 

as your current progress (indicated by a green vertical marker) and the speed of the recorded media. While 

this window is visible, you can use [VOL 

/

] to navigate along the progress bar. An orange vertical marker 

will appear and move horizontally in the interval set for the Jump setting under Main Menu > PVR Setting. 

Press [OK] to jump to the point indicated by the orange marker. 

To return to the PVR menu, play the recording until it ends or press [STOP 

] to stop playback. 

Figure 7: The PVR menu 

12 | 

P a g e


Summary of Contents for ATSC Digital Receiver

Page 1: ...ATSC Digital Receiver User Guide mvtvwireless com 320 564 4807 v0 0 1 4 185 ...

Page 2: ...is equipment has been tested and found to comply with the limits for a Class B digital device pursuant to part 15 of the FCC Rules These limits are designed to provide reasonable protection against harmful interference in a residential installation This equipment generates uses and can radiate radio frequency energy and if not installed and used in accordance with the instructions may cause harmfu...

Page 3: ...tenance personnel must use the appropriate tools and replacement parts as specified by the manufacturer Note Do not open the housing to avoid the unit direct exposure to radiation Unit Cleaning After the unit power is turned off you can clean the housing panel and remote control with a soft cloth lightly moistened with a mild detergent solution Attachments Never add any attachments and or equipmen...

Page 4: ...d room If the moisture forms inside the unit it may not operate properly To correct this problem turn on the power and wait about two hours for the moisture to evaporate Parts Replacement When parts need to be replaced user should make sure the service technician use the replacement parts specified by the manufacturer or having the same characteristics as the original part Unauthorized replacement...

Page 5: ...ormation 6 3 2 Controlling Playback with Timeshift 8 3 3 Using the Electronic Program Guide 8 3 4 Favorite Groups 9 4 Recording Live Video 11 4 1 Dual Tuning Capabilities 11 5 Watching Recorded Video via the PVR 12 III Advanced Operations 14 1 Media Player 14 1 1 PVR 14 1 2 Video 15 1 3 Music 15 1 4 Image 15 2 Edit Channels 15 2 1 TV Channel List 15 2 2 Delete All 16 3 Installation 16 3 1 ATSC Cha...

Page 6: ... Settings 23 4 8 Favorite Groups 23 4 9 PVR Storage 23 4 10 PVR Settings 24 4 11 Other 24 5 Tools 25 5 1 Information 25 5 2 Factory Settings 25 5 3 Software Upgrade by OTA 26 5 4 Remove USB device safely 26 6 Conditional Access 27 6 1 Token Status 27 6 2 About CA 27 IV Troubleshooting 28 V Technical Specifications 30 2 P a g e ...

Page 7: ... controls menus left right 4 CH Changes channels or controls menus up down 5 OK Selects an item in the menu or brings up a channel list window during video playback 6 Status LEDs Indicates whether the unit is powered detects signal or is recording 7 Display Displays the current channel number while operating or the time Standby mode 8 Remote Sensor Receives the remote control s infrared signal 3 P...

Page 8: ...annel 3 or 4 2 VIDEO Composite video output 3 OPTICAL S PDIF Optical S PDIF for LPCM or Bitstream audio output 4 AUDIO L R RCA stereo audio outputs 5 HDMI HDMI output 6 ATSC IN Off air antenna input 7 AC IN Power input 8 POWER ON OFF Switches power on or completely off 4 P a g e ...

Page 9: ...rding STOP Stops recording playback or Timeshift REC Starts recording current channel PVR Opens the Personal Video Recorder PVR menu CH Moves the highlight bar or changes channel up down VOL Moves the highlight bar or changes volume left right Also jumps forward or backward in the current program OK Selects a program highlight line or parameter value Also shows the channel list while watching TV M...

Page 10: ... to your STB navigate to the Main Menu Installation ATSC Installation ATSC Auto Scan details on how to operate the Main Menu and advanced menu functions can be found in III Advanced Operations under 4 Installation To begin scanning highlight the Search option with the navigation buttons and select with OK Now the STB will start scanning channels While the STB is scanning you should see the progres...

Page 11: ...Basic Operations Figure 1 Scanning channels via ATSC Auto Scan Figure 2 Live TV with information window 7 P a g e ...
Page 12: ...ctronic Program Guide EPG with detailed information about programs such as name description start and finish time rating and more This information is provided live via your ATSC connection and is thus dependent on each channel s provider To open the EPG press GUIDE while watching live TV 1 You can highlight channels with CH and navigate through past current and upcoming events with VOL The highlig...

Page 13: ...bottom left of the window should now be highlighted grey 3 Highlight a channel with the navigation buttons then press OK to bring up the Favorite Group list 4 Highlight a Group with the navigation buttons and press OK to add the channel to the selected Group Repeat this step for every Group where you want this channel to be listed 5 When you are finished press MENU or BACK to return to the TV Chan...

Page 14: ...Basic Operations Figure 6 Adding Channels to Favorite Groups Figure 5 Switching between Favorite Groups 10 P a g e ...

Page 15: ...ding Live Video In TV mode pressing the REC button will open a dialog asking if you would like to record the current program Select Yes to begin recording While the STB is recording the uppermost status indicator LED on the front of the STB will show a solid red light You must have a Verimatrix smartcard and a USB storage device inserted into the unit in order to enable recording PVR functionality...

Page 16: ...ns of the PVR can be found in III Advanced Operations under 1 1 PVR While playing a recorded program press PLAY PAUSE II to pause the program Press again to continue playback To navigate forward and backward use REW and FFW While controlling playback the Video navigation window will appear and display program information as well as your current progress indicated by a green vertical marker and the...

Page 17: ...Basic Operations Figure 8 Recorded video with the video navigation window 13 P a g e ...

Page 18: ...item 1 Media Player In this menu you can choose between the following menu items PVR Video Music and Image 1 1 PVR In this menu you can browse through and play previously recorded content from the USB storage device provided by your service provider Also you can perform the following file operations Rename select a recording and press Red ZOOM to bring up the rename text box Input the desired name...

Page 19: ...rowse through and play music files on an attached USB storage media provided by your service provider and perform basic file operations 1 4 Image In this menu you can browse through and view image files on an attached USB storage media provided by your service provider and perform basic file operations 2 Edit Channels In this menu you can choose between the following menu items TV Channel List and...

Page 20: ...ncel the operation 3 Pressing Menu at any time before selecting OK to delete all channels will bring you back to the Menu screen without saving 3 Installation In this menu select ATSC Installation with OK to display the following menu items ATSC Channel Scan and ATSC Auto Scan 3 1 ATSC Channel Scan In this menu you can manually scan channels into the STB by setting the following parameters Figure ...

Page 21: ...Advanced Operations Figure 11 The Installation menu Figure 12 The ATSC Channel Scan menu 17 P a g e ...

Page 22: ...tion in this menu Once you ve highlighted the Channel No option use VOL to cycle through frequencies in 1 KHz increments Highlight Search and select with OK to begin scanning 3 2 ATSC Auto Scan Refer to the information in II Basic Operations under 2 Adding Channels to Your STB on how to operate this menu 4 System Setup In this menu you can choose between the following menu items Language TV System...

Page 23: ...o Resolution In SD Mode you can choose between Auto PAL PAL M PAL N and NTSC In HD Mode you can choose between Auto 720P_60 1080I_30 Press VOL to switch to the desired mode 2 Aspect Mode You can choose between Auto 4 3 PS 4 3 LB 16 9 using VOL 3 RF Channel You can set the output channel for the TV modulator output to either 3 or 4 using VOL 4 Digital Audio Output You can choose between LPCM Linear...

Page 24: ...set to Off 6 Daylight Savings Time Use VOL to switch between On and Off 4 5 Timer Settings In this menu you can set up to 8 independent timers for either playing a channel or recording a program Select a timer with OK to open the Timer Setting window for that timer 1 Timer Mode Choose with VOL whether the timer runs Once or Daily or switch the timer Off 2 Timer Function Choose with VOL whether the...

Page 25: ...tion unit is one minute Once you are finished navigate to Save and select with OK to confirm your settings Press Cancel to leave the Time Setting menu without saving your settings 4 6 Parental Lock In this menu you can set a password for anyone who wishes to operate the Installation menu You can also set a password to lock channels Before opening this menu you must input the current password for t...

Page 26: ...x types of settings which the STB can lock if the current program has a particular TV rating and are labeled as such Age When set to Lock the STB will lock whenever any content with that row s TV rating or greater i e more mature is detected Selecting this box with OK will automatically toggle the Lock for the current row and every row beneath FV When set to Lock the STB will lock whenever content...

Page 27: ...you to the Main Menu 4 7 OSD Settings In this menu you can change the following settings 1 OSD Timeout This setting determines the duration the info window is displayed on the screen when you change channels Press VOL to set the time between 1 to 10 seconds 2 OSD Transparency This setting determines the transparency of the menus above currently playing content Press VOL to cycle between 10 20 30 4...

Page 28: ...ngs Timeshift Use VOL to switch between ON or OFF Jump Use VOL to switch between 1 min 5 min 10 min 30 min and 30 sec for the jump interval when using VOL while the Video navigation window is visible 4 11 Other In this menu you can change the following settings Channel Play Type Switch between All Free and Scrambled using VOL Beeper Switch between On or Off using VOL Auto Standby Switch between On...

Page 29: ...SB and Remove USB Device Safely 5 1 Information In this menu you can view information about the STB 5 2 Factory Settings In this menu you can restore all settings on your STB to their factory defaults After entering your password the default password is 0000 answer Yes for the next prompt to factory reset the STB Figure 18 The Tools menu 25 P a g e ...

Page 30: ... 4 Highlight to the Start option and select with OK to begin download 5 4 Remove USB device safely In this menu can safely eject attached USB devices from the STB so they can be removed without the risk of corrupting storage data To safely remove your USB device 1 Select the partition of the device you would like to eject with VOL 2 Select OK to eject the device Select Cancel or press MENU or BACK...

Page 31: ... menu items will be greyed out 6 1 Token Status In this menu you can find information about current tokens status This information may assist a technician while troubleshooting 6 2 About CA In this menu you can find information about the currently inserted smartcard This information may assist a technician while troubleshooting Figure 20 The Conditional Access menu 27 P a g e ...

Page 32: ... between the cable connection and the STB Audio is muted Press the MUTE button TV power is off Turn your TV on Wrong TV input Make sure the TV has been set to the correct video input For example if you have connected the unit to the Video 1 input of the TV then you need to select the corresponding input of the TV Usually this is done using the AV or Input button of the TV s remote No picture The S...

Page 33: ... up No USB storage device is detected Open the Remove USB Device Safely menu under the Main Menu Tools If the USB device is listed select OK to safely eject the device unplug it from the USB port and plug it back it The USB storage device is full Delete media from the USB device via the Media Player menu PVR Video Music Image 29 P a g e ...

Page 34: ...Layer 2 and AC3 Audio Modes Mono Left Right Stereo TUNER RF Input Range 54 MHz 864 MHz Sensitivity 5 dBm 83 dBm Input Connector F type female 75 Ohm Demodulation 8 16 VSB ITU T J 83 Annex B 64 256 QAM Payload Data Rate 19 4 Mbps 6 MHz RF MODULATOR Output Channel CH 3 4 TV Standards NTSC M RF Connector F type female 75 Ohm FRONT PANEL Display 4 digit LED display Buttons 7 Standby CH CH VOL VOL MENU...

Page 35: ...d Verimatrix POWER SUPPLY Type Switching Mode Input Voltage 100 to 240V 50 60Hz Consumption Max 15W Protection Internal Fuse PHYSICAL SPECIFICATIONS Size W x H x D 10 8 x 8 6 x 2 1 Net weight 3 lbs Operation Temp 32 104 F Storage Temp 4 140 F 31 P a g e ...

Reviews: