background image

VJ-1304 INSTALLATION MANUAL

VJ1304E-I-00

6

1

2

2

1

2

1

2

1

2

2

1

1

2

2

1

1

2

1

2

3

4

4

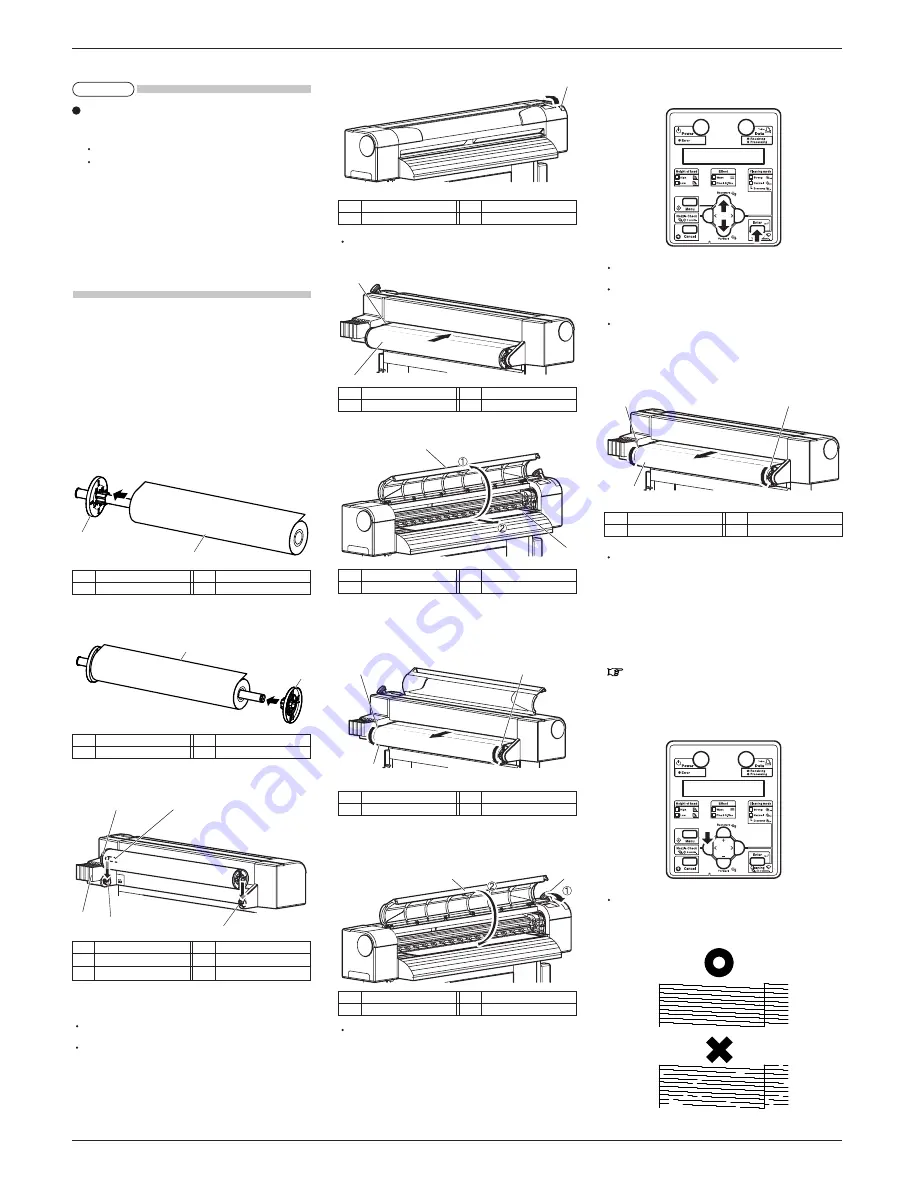
6. Push the media loading lever backward.

The operation panel displays "Lever Up".

7. Feed the roll media into the media feed slot.

8. Open the front cover, and pull out the roll media.

9. Press and hold the front edge of the roll media and 

wind it back with the scroller to remove a media 

bend or slant.

10. Return the media loading lever to the front and 

close the front cover.

The operation panel displays the media type setup 

menu.

11. Press the [+] key or [-] key on the operation panel to 

select the type of the loaded media and press the [En-

ter] key.

This confirms the media type.

The operation panel displays "Media Initial", and 

media initial operation starts.

After the media initial operation is completed, the 

operation panel displays "Ready to Print", and the 

display enters normal status.

12. Wind back the roll media with the scroller to remove 

a media bend.

The media loading is complete.

9 Checking printing conditions

Check the condition of the print head after the ink re-

plenishment.

1. Turn ON the printer and load the roll media.

8 Loading the roll media

2. Confirm that the printer functions normally.

3. Press the [<] key on the operation panel for two 

seconds or more.

Nozzle check printing starts.

4. Check the sample print for blurred or missing 

parts in the check pattern.

(Continue to next)

(Cont'd)

If the Nozzle check printing is performed immediately 

after the ink replenishment is complete, the following 

results may occur.

Printed line becomes blurred.

The data is partially not printed.

In such cases, follow the Operation Manual "6.2.3 

Head cleaning" and charge a small amount of ink. 

Then, check the printing result.

If there is no improvement in the print result even 

after refilling a small amount of ink, leave the printer 

for one hour or more, and refill a small amount of 

ink again.

If there is still no improvement, contact MUTOH 

local dealer.

8  Loading roll media

This section explains how to load roll media.

Follow the steps below to load roll media.

1.  Set roll media in the scroller so that the roll media 

gets winded up in the direction of anti-clockwise 

when viewed from the fixed flange side.

2.  Push the roll media until its core hits the right 

edge of the fixed flange.

3.  Attach the movable flange so that it is firmly at-

tached to the roll media core.

4. Set the scroller onto the scroll receiver with the 

fixed flange side facing the ink cartridge slots.

5. Turn ON the product.

The product starts the initial operation.

The operation panel displays "Media End".

No.

Name

1

Media loading lever

No.

Name

1

Roll media

No.

Name

2

Media feed slot

No.

Name

1

Front cover

No.

Name

2

Roll media

No.

Name

1

Media loading lever

No.

Name

2

Front cover

No.

Name

1

Roll media

No.

Name

2

Scroller

No.

Name

1

Roll media

No.

Name

2

Scroller

No.

Name

1

Fixed flange

No.

Name

2

Roll media

No.

Name

1

Movable flange

No.

Name

2

Roll media

No.

Name

1

Scroller

2

Fixed flange

No.

Name

3

Ink cartridge slot

4

 Scroller receiver

NOTE

Summary of Contents for VJ-1304

Page 1: ...stallation are shown below There are instructions for each section beginning on the next page 1 Unpacking boxes 1 1 Unpacking the printer box 1 2 Unpacking the stand box 2 Confirming bundled items 2 1 Items in the printer box 2 2 Items in the accessory bag 2 3 Items of Waste fluid tank box 2 4 Items in the stand box 3 Assembling 3 1 The stand assembling procedure 3 2 Assembling the stand 3 3 Detac...

Page 2: ... the printer and the stand Make sure to unpack this product with three persons or more While taking out the printer from the box make sure to remove the vinyl sheet and hold the handles on the printer side If the printer is lifted with the vinyl sheet attached there is a possibility that the printer might slip from your hands and be damaged 1 1 Unpacking printer box Unpack the printer box in accor...

Page 3: ...ach the book holder to the right side of the stand 7 Confirm that each component is fastened firmly by gently shaking the stand 3 2 Assembling the stand Attach the stand to the printer in accordance with the following steps 1 Lock two casters on the front side 2 Hold the following positions when lifting the prod uct Panel side two grips under the product Opposed side two rubber grips under the pro...

Page 4: ...0 mm d 1000 mm e 1440 mm f 3000 mm g 2660 mm 4 1 3 Installation procedure Install this product to the installation place in accord ance with the list shown below Please check that the butterfly bolts are not loose before after carrying this product When transferring or carrying outside separate the printer and the stand 1 Check that the two butterfly bolts attaching the stand and the printer are n...

Page 5: ...e slots Install the cleaning cartridge with mark facing to the product Insert the cartridge all the way into the product The product starts filling cleaning fluid 4 After the cleaning fluid is filled take out the clean ing cartridge The operation panel displays During washing and the product starts head cleaning After the head cleaning the operation panel dis plays Insert InkCartridges 5 After the...

Page 6: ...check printing is performed immediately after the ink replenishment is complete the following results may occur Printed line becomes blurred The data is partially not printed In such cases follow the Operation Manual 6 2 3 Head cleaning and charge a small amount of ink Then check the printing result If there is no improvement in the print result even after refilling a small amount of ink leave the...

Page 7: ...er to the Operation Manual 7 Troubleshooting and perform required procedures 6 Perform nozzle check again and check the condi tion of the print head 10 Manual composition This product includes the following three manuals Installation Manual this manual This manual explains the procedures of unpacking in stalling and the basic set up Quick Reference Quick Reference is excerpts of functions used dai...

Page 8: ...toh co jp MUTOH AMERICA INC Tel 1 480 968 7772 Fax 1 480 968 7990 E mail sales mutoh com http www mutoh com MUTOH EUROPE N V Tel 32 0 59 561400 Fax 32 0 59 807117 E mail mutoh mutoh be http www mutoh be MUTOH DEUTSCHLAND GmbH Tel 49 0 2159 913430 Fax 49 0 2159 913456 E mail Mutoh Sales t online de ...

Reviews: