There are 2 options to add IP Camera.
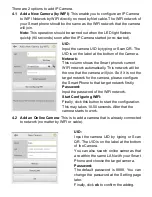
4.1 Add a New Camera (by WIFI)
: This enable you to configure an IP Camera
to WIFI Network by WIFI directly, no need by Net cable. The WIFI network of
your Smart phone should be the same as the WIFI network that the camera
will join.
Note:
This operation should be carried out when the LED light flashes
quickly (90 seconds) soon after the IP Camera started (or re-started).
UID:
Input the camera UID by typing or Scan QR. The
UID is on the label at the bottom of the Camera.
Network:
This column shows the Smart phone’s current
WIFI network automatically. This network will be
the one that the camera will join. So if it is not the
target network for the camera, please configure
the Smart Phone to that target network firstly.
Password:
Input the password of the WIFI network.
Start Configuring WIFI:
Finally, click this button to start the configuration.
This may takes 10-50 seconds. After that the
camera starts to work.
4.2 Add an Online Camera
: This is to add a camera that is already connected
to network (no matter by WIFI or cable).
UID:
Input the camera UID by typing or Scan
QR. The UID is on the label at the bottom
of the Camera.
You can also search online cameras that
are within the same LAN with your Smart
Phone and choose the target camera.
Password:
The default password is 8888. You can
change the password at the Setting page
later.
Finally, click
ok
to confirm the adding.


