background image

-- 26 --

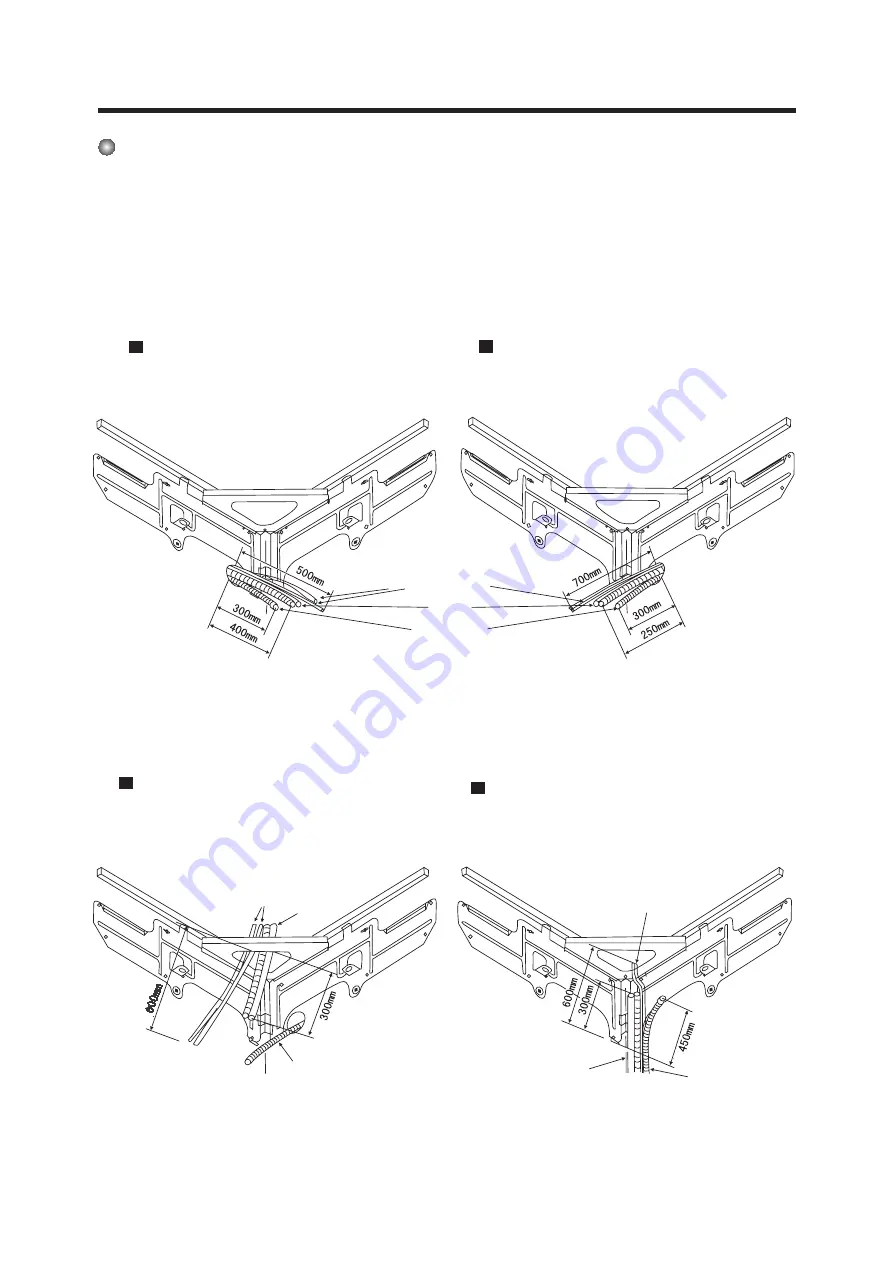
Installation of piping

1. After installation of the wall mounting frame, to locate a declining pipeing hole.

2. Choose the suitable way for piping and stretch the pipe and wire.

3. Ensure to fix a piping-hole sleeve in order to protect piping and cable escape from damage while go

through the wall.

Installation of left piping(rear)

Assemble of upper tube

connection wire (including singal wire)

Installation of right piping(rear)

Assemble of downside tube.

Connection pipe
(Singal wire)

drain hose

tubing

tubing

drainage hose

tubing

drainage hose

connection wire (including singal wire)

Summary of Contents for MUR-12 C

Page 1: ...MUND CLIMA CORNER SPLIT User s manual COOL ONLY HEAT PUMP MUR 12 C MUR 12 H...

Page 2: ...e the same socket with other electrical appli ances or it will cause electric shock overheating or fire Never operate with wet hand or it will cause electric shock Never make firgers or stock into the...

Page 3: ...ating of electrical wire Chemical Spray should be placed be one meter away from the units or it will cause fire or explosion Keep an eye on the chassis of outside unit is damage or not If ignore the d...

Page 4: ...3 Name and funciton of each part Indoor unit Outdoor unit Big small air intake grill louver liquid crystral displayer Power plug drainage hose front grille remote controller big handle Air in Air in...

Page 5: ...When it is pressed the louvers start to rotate automatically and stop when repressed TEMP button SET TEMP increases 1o C by pressing button once and decreases 1o C by press ing button once At COOL mod...

Page 6: ...stopping press TIME ON but ton set ON TIME in range of 0 to 24 hour at the interral of 0 5h to start the unit automatically Name and Function Remote control Remove the cover This type of remote contro...

Page 7: ...n mode 1 Plug in press 1 0 button then air conditioner is turned on COOL mode operation procedure 1 0 According to difference between room temp and set temp microcomputer can control cooling on or not...

Page 8: ...air conditioner is turned on 2 Press MODE button set operation mode 1 0 If room temp is lower than set temp compressor runs at HEAT mode If room temp is higher than set temp compressor and outdoor fan...

Page 9: ...ng If room temp is higher than set temp it s at COOL mode SET TEMP should be in range of 16o C to 30o C 3 Press SWING button the louvers start to rotate au tomatically and stop when repress it 4 Press...

Page 10: ...ard SET TEMP is 25o C for COOL mode and 20o Cfor HEAT mode 1 Plug in Press 1 0 button then air conditioner is turned on 2 Press MODE button set AUTO operation mode According to room temp microcomputer...

Page 11: ...pping press TIME ON button set ON TIME in range of 0 to 24 hour to start the unit automatially TIMER OFF button At operating press TIME OFF button set OFF TIME in range of 0 to 24 hour to stop the uni...

Page 12: ...ation is set SET TEMP would decrease 1o C in 1 hour and 2o C in 2 hours 4 Press FAN button set fan speed 3 Press SWING button the louvers start to rotate automatically and stop when repress 6 SLEEP bu...

Page 13: ...atteries Two AAA dry cell batteries and press button ACL 3 Re attach the cover NOTE Don t confuse the new and worn or different batteries Remove batteries when not in use for a long time 2 Insert the...

Page 14: ...le and it has enough capacity leakage breaker and air switch 16A Don t connect the earth wire to gas or water pipes lightening rods or telephone earth wire Set an appropriate room temparatrue overcold...

Page 15: ...Splashing water on the air conditioner can cause an electric shock and mal function Air conditioner should be operated with stable voltage in range of 198 242V 1ph other wise compressor would vibrate...

Page 16: ...big air intake grill enable to clean it Draw it along horizontal and slighthy downward Take down the hook enable to clean Notices Don t let grill hit with wall and other things to avoid surface damag...

Page 17: ...of leftside grill into the left fastener Place small air intake grill facing central panel Installation groove inseting slightly downward and horizontlly Press the fastener of rightside body as follo...

Page 18: ...the air filter Assemble the air filter fix into the air filter along the di rection groore Placing two buttons into the hole Assemble the big air intake grill Drag the grill horizontally then push int...

Page 19: ...wing draw the grill outside then it will fall down from the body Disassenble the air cleaner Hold the handles of air cleaner then pull it along the direction groove rechange the air conditioner Press...

Page 20: ...own rapidly by the cold wind and it looks like the fog Creaking noise can be heard when start or stop the unit This is caused by the deformation of plastic due to the change of temperature Air condi t...

Page 21: ...ter of in following situations Unusual noise can be heard during operation Power fuse or switch often breaks Carelessly splash water or something into air conditioner Electrical lines and power plug a...

Page 22: ...its weight Kg R22 0 85 R22 1 20 Water proof level IP20 Indoor IP24 Outdoor Noise Inside Outdoor dB A 41 57 Climate type T1 Protection of electrical shock I Quality Kg 15 32 Size cm Indoor 23 0 x 72 5...

Page 23: ...wer connection cable Signal control cable Wall mountingframe Tapping screw Drain hose Gum type sealer Piping hole sleeve Bind strip Connection pipe Thermal insulation hose Memo Specification ST4 2X25...

Page 24: ...thismanual ensuringthenormaluseofit 2 Please contact with local service center before installation the malfunction in the process of it caused by no specific center may be diffiaut to deal with 3 Remo...

Page 25: ...the filter 10 Be sure that the distance from the location to the ground is more than 2 3m Outdoor unit 1 Select location from which noise and outflow air emitted by unit will not disturb neighbors 2...

Page 26: ...ng frame Ripht wall mounting frame Left wall mounting frame Outlet of indoor unit Space to certring Space to wall Piping hoel Piping hoel Wall frame fixed screw Upper wall mounting frame Rightside wal...

Page 27: ...fix a piping hole sleeve in order to protect piping and cable escape from damage while go through the wall Installation of left piping rear Assemble of upper tube connection wire including singal wir...

Page 28: ...don t intrude into into water 3 You should use heat insulation material when connect long drain hose 4 The drainage panel has two waterspout you can chose which one to drain the water according to act...

Page 29: ...some space between the wire Noices All the electrical work must be done by qualified personnel according to be local rules and this manual The rated votlage and exclusive the unit must be used Be sur...

Page 30: ...g hole of indoor unit and hook of wall mount ing frame then fixed it with screws 2 Insert the hook of right framework of grill and hole of indoor units then fix it with screw To installation of below...

Page 31: ...ith the indoor units 3 Fix the power connection cable and singal cable then connect the corresponding connectoor After clamping the wire clamp ensure there is some space between wires 4 Ensure the wir...

Page 32: ...function of some electrical parts After the installation of cable ensuring there is space between connection place and fixed place The diagrams of unit wiring Power conncction cable Power conncction c...

Page 33: ...ghten the bonnet using suds or leak detector to test whather leakage happens in the pontes of outdoor unit and pipeline 9 If condition permits excluding the air from check valve by vacuum pump Let the...

Page 34: ...top Test item after installation Item and to be tested Is it installed reliably Has leakage test or not Is it enough heat insulation Is it drain the water smoothly Is the power voltage conforms to the...

Page 35: ...Heating mode procedure Drying mode procedure Automaticoperationmodeprocedure Timer operation mode procedure Sleep operation mode procedure Replace the batteries of the remote controller Optimumusage U...

Reviews: