


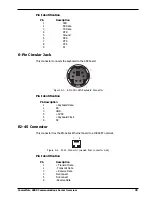


30
CommPlete 4000 Communications Server Overview
d. Replace top cover (7 screws).
e. (Two people are needed.) Replace CommPlete 4000 into rack enclosure.
Hard Disk Drive Removal/Replacement
1 Remove the CommPlete 4000
from rack enclosure (two people are needed). Follow the
procedure Disconnecting Cables and Removal from Enclosure presented above.
Summary: after powering down the unit and disconnecting all power and signal cables,
employ two persons to remove its rack-mounting screws and lift the unit out of the rack.
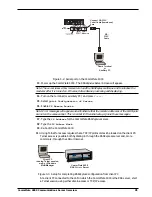
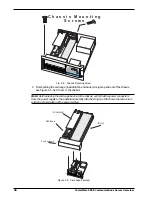
2 Remove the top cover from the CommPlete 4000
by removing the seven cover mounting
screws located in the back of the CommPlete 4000. See figure 4-3.
Note
: If you are simply adding a hard drive and not replacing the existing hard drive, proceed
to step 6.
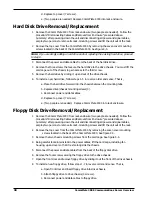
3 Disconnect the power and data cables from the back of the hard disk drive.
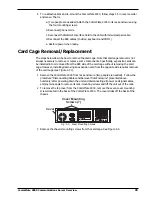
4 Remove the three screws that secure the hard drive to the drive chassis. You must lift the
card cage out of the chassis to gain access to the third screw.
5 Remove the hard drive by sliding it up and out of the drive chassis.
6 To install a new hard drive, follow steps 1-5 in reverse order and sense. That is,
a. Place the hard drive forward into the chassis between the mounting tabs.
b. Replace drive/chassis mounting screws(3).
c. Reconnect power and data cables.
d. Replace top cover (7 screws).
e. (Two people are needed.) Replace CommPlete 4000 into rack enclosure.
Floppy Disk Drive Removal/Replacement
1 Remove the CommPlete 4000
from rack enclosure (two people are needed). Follow the
procedure Disconnecting Cables and Removal from Enclosure presented above.
Summary: after powering down the unit and disconnecting all power and signal cables,
employ two persons to remove its rack-mounting screws and lift the unit out of the rack.
2 Remove the top cover from the CommPlete 4000 by removing the seven cover mounting
screws located in the back of the CommPlete 4000. See figure 4-3.
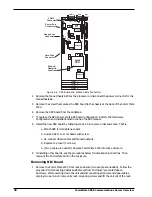
3 Remove the two chassis mounting screws from the card cage. See figure 4-4.
4 Being careful to maintain slack in the power cables, lift the card cage, including fan
housing, up and over so that it rests along side the chassis.
5 Disconnect the power and data cables from the back of the floppy disk drive.
6 Remove the four screws securing the floppy drive to the drive chassis.
7 Open the front door and remove floppy drive by sliding it out the front of the drive chassis.
8 To install a new floppy drive, follow steps 1-7 in reverse order and sense. That is,
a. Open front door and insert floppy drive into drive chassis.
b. Attach floppy drive to drive chassis (4 screws).
c. Reconnect power and data cables to floppy drive.
Summary of Contents for CommPlete 4000
Page 1: ...CommPlete 4000 Communications Server User Guide...
Page 5: ...CommPlete 4000 Communications Server Overview 5 1 System Overview...
Page 10: ...10 CommPlete 4000 Communications Server Overview...
Page 11: ...CommPlete 4000 Communications Server Overview 11 2 Installing Your CommPlete 4000...
Page 16: ...16 CommPlete 4000 Communications Server Overview...
Page 17: ...CommPlete 4000 Communications Server Overview 17 3 Getting Started with RASExpress...
Page 23: ...CommPlete 4000 Communications Server Overview 23 4 Hardware removal Replacement...
Page 33: ...CommPlete 4000 Communications Server Overview 33 5 Troubleshooting...
Page 36: ...36 CommPlete 4000 Communications Server Overview...
Page 37: ...CommPlete 4000 Communications Server Overview 37 6 Service Warranty and Technical Support...
Page 41: ...CommPlete 4000 Communications Server Overview 41 Appendices...