background image


18 - English 

7. Configuration and connection check 


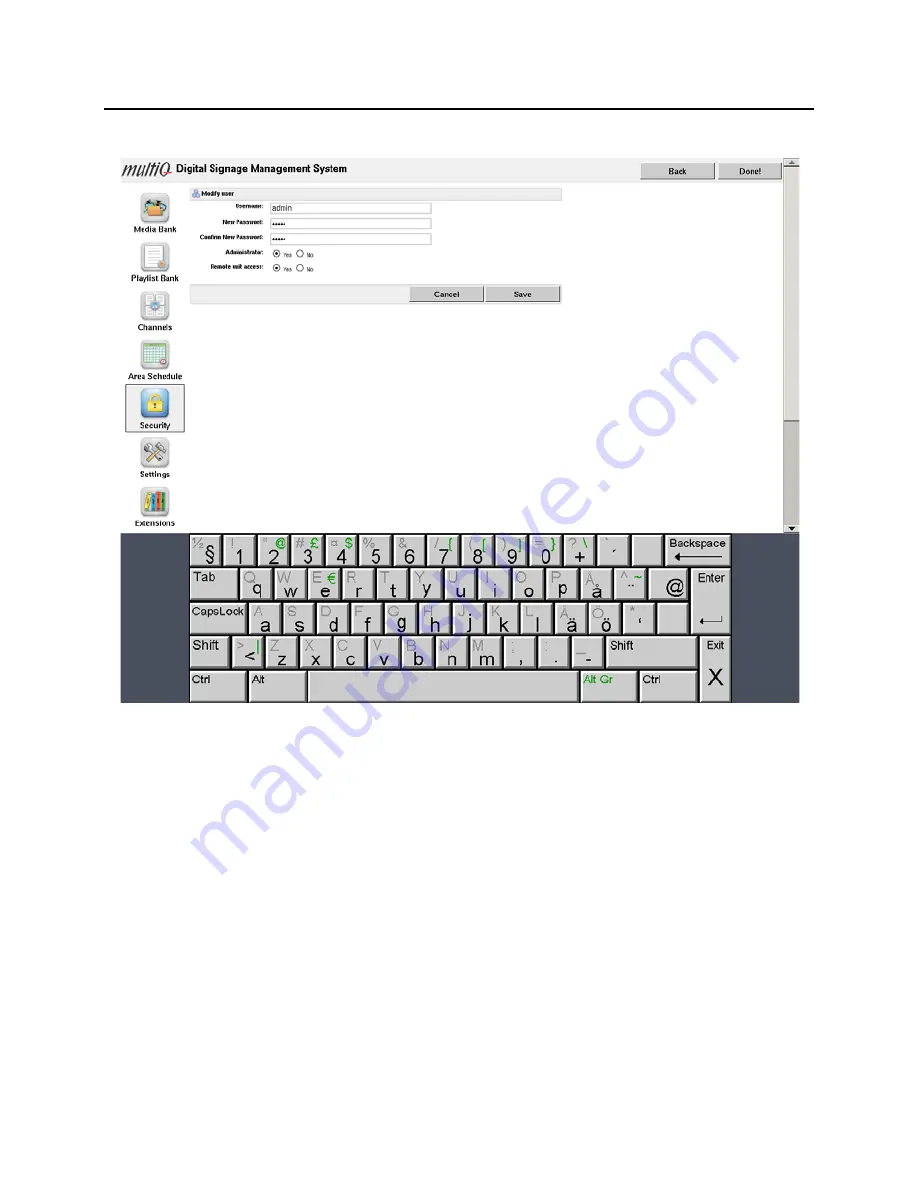
Figure 11. The administrator password can be changed by ticking the “Administrator“ checkbox and 
then clicking the “Modify” button. 

 
By connecting your PC to the same subnet as the media monitor it is now possible to log 
in to the server from your PC or MAC. Just put the IP address of your media monitor on 
the address line of your web browser and log in to the media monitor web server using 
the password that you have chosen. Using your web browser you can now manage the 
content that is to be used in the media monitor. 

7-5. Centrally managed network setup 

If the media monitor is to be used in a centrally managed digital signage network you 
should choose “Managed” in the configuration menu. Add the media monitor ID and the 
URL of the server (Account URL) along with the username and the password that have 
been provided by the network administrator. Then click the “Test connection” button to 
verify that a script file is received from the management server.    

Summary of Contents for Media Monitor 4

Page 1: ...g Started Guide MultiQ Media monitor 4 5 6 and 7 MultiQ Products AB Axel Danielssons Väg 261 SE 215 82 Malmö Sweden www multiq com World wide service support www multiq com support multiq com info multiq com ...

Page 2: ...n with the furnishing performance or use of this material Equipment Modifications This equipment must be installed and used in strict accordance with the instructions given in the user documentation This equipment contains no user serviceable components Unauthorized equipment changes or modifications will invalidate all applicable regulatory certifications and approvals Trademark Acknowledgments A...

Page 3: ...chever is longest When a Product or part is exchanged the replacement hardware becomes the property of the Purchaser and all hardware or part thereof that is replaced shall become the property of MultiQ This Limited Warranty is applicable in all European and North American countries and may be utilised by the Purchaser through entering a warranty claim on MultiQ s website www multiQ com This warra...

Page 4: ...th the Product Failure to comply with any of the aforementioned requirements will invalidate this Limited Hardware Warranty THE WARRANTY AND REMEDIES PROVIDED ABOVE ARE EXCLUSIVE AND IN LIEU OF ALL OTHER EXPRESS OR IMPLIED WARRANTIES INCLUDING BUT NOT LIMITED TO THE IMPLIED WARRANTIES OF MERCHANTABILITY OR FITNESS FOR A PARTICULAR PURPOSE CERTAIN JURISDICTIONS DO NOT ALLOW THE EXCLUSION OF IMPLIED...

Page 5: ... instructions 11 6 6 Recommendations for embedded built in use 11 7 Configuration and connection check 12 7 1 Configuration 12 7 2 Touch Calibration 12 7 3 Basic configuration 13 7 4 Stand alone setup 14 7 5 Centrally managed network setup 18 7 6 Flash installation 20 7 7 Image retention 20 8 Troubleshooting 21 9 Specification 22 9 1 Key features 22 9 2 Media monitor software 23 9 3 Media monitor ...

Page 6: ...RE HIGH VOLTAGE EXISTS ON THE BACK LIGHT POWER LEAD OF THIS MONITOR BEFORE SERVICING DETERMINE THE PRESENCE OF HIGH VOLTAGE BY CONNECTING THE H V METER BETWEEN THE BACK LIGHT POWER LEAD AND CHASSIS ONLY WARNING To prevent overturn when moving transport the equipment on flat surface only Do not put in unstable position ...

Page 7: ...nce to radio or television reception which can be determined by turning the equipment off and on the user is encouraged to try to correct the interference by one or more of the following measure Reorient or relocate the receiving antenna Increase the separation between the equipment and the receiver Connect the equipment into an outlet on a circuit different from that to which the receiver is conn...

Page 8: ... for Europe The device complies with the requirements of the ECC directive 89 336 EEC as amended by 92 31 EEC and 93 68 EEC Art 5 with regard to Electromagnetic compatibility and 73 23 EEC as amended by 93 68 EEC Art 13 with regard to Safety ...

Page 9: ...éliorera l avenir de la planète et créera un environnement de vie de qualité pour les générations futures Wichtige Hinweise zum Recycling Dieses Mülleimer Warnsymbol gibt an dass die Objekte nicht mit dem regulären Hausmüll entsorgt werden dürfen Bitte halten Sie sich an die örtlichen Bestimmungen und entsorgen Sie die Objekte über Recycling und Sammelstellen in Ihrer Nähe Detaillierte Information...

Page 10: ... pro budoucí generace Ważna informacja dotycząca recyklingu Symbol przedstawiający pojemnik na odpadki informuje że oznaczone nim obiekty nie mogą być usuwane razem z ogólnymi odpadami Należy stosować się do lokalnego prawa i wykonywać zalecenia dotyczące dalszego przetwarzania takich odpadów poprzez umieszczanie ich punktach gromadzenia odpadów w danym kraju lub okręgu Dalsze informacje dotyczące...

Page 11: ...should be operated from the type of power source indicated on the AC DC adapter Do not install this monitor near a motor or transformer where strong magnetism is generated Images on the monitor will become distorted and the colour irregular Do not allow metal pieces or objects of any kind to fall into the monitor through ventilation holes Do not attempt to service this unit yourself Removal of the...

Page 12: ...n soft line free cloth This removes dust and other particles 2 If still not clear apply a small amount of non ammonia non alcohol based glass cleaner onto a clean soft line free cloth and wipe then screen To clean the case 1 Use a soft dry cloth 2 If still not clean apply a small amount of a non ammonia non alcohol based mild non abrasive detergent onto a clean soft line free cloth and wipe the su...

Page 13: ...luded in the package and in good condition If you find that any items damaged or missing please contact your retailer immediately One media monitor AC DC adapter with 12V DC output AC power cord This quick start guide 6 2 Mounting Mounting and attachment hardware is not included The monitor has a VESA 75 x 75 mm interface Please contact your MultiQ reseller if you wish to mount your media monitor ...

Page 14: ...anel with operating buttons and indication LEDs Buttons Power on button buttons to adjust brightness LED indications Power This led will be lit when the media monitor is on Blue Status This led indicates activities and result of activities Flashing between red and green ongoing activity as starting up shutting down or download in progress Green download succeeded Red communication with digital sig...

Page 15: ...arp objects similar but not limited to sharp pens and sharp finger nails is not covered by warranty 6 6 Recommendations for embedded built in use MultiQ do in general not recommend that the monitors are embedded into walls kiosks or similar We recommend the use of floor stand table stands ceiling or wall mounts that enables air to flow freely around the monitor If the monitors regardless of the ab...

Page 16: ...bration procedure Follow the instructions on the screen and press the red and white marking in one of the corners When pressed the red and white marking will move to another corner Press the red marking until all four corners have been calibrated The calibration is now completed and the media monitor will continue to boot At first start up the media monitor will automatically present the configura...

Page 17: ...on you can rotate the menu system to fit the orientation of the monitor Figure 4 By pressing the centre button the configuration menu can be rotated When the proper orientation of the menu system has been chosen the language setting menu will appear By choosing the language also the language keyboard setting is selected Press Next to proceed Figure 5 The language settings menu ...

Page 18: ... press the Standalone button default In most cases media players are connected to a local network that provides an IP address automatically If so press DHCP Then press Test connection Figure 6 Standalone setup with DHCP selected Before proceeding to the next menu a Test connection should be made Clicking the test connection button will provide you with the IP address that the unit has acquired fro...

Page 19: ...ill provide you with the IP address of the media monitor Next is the setup menu login page You will find see the virtual keyboard at the bottom of the page By default the username is admin and the password is admin Figure 8 Use the virtual keyboard to enter username and password ...

Page 20: ...f the media monitor can be handled using the onscreen menus However in order to upload content files and for more practical handling of the unit you are recommended to log in to the media monitor from your PC To log in to the unit you need to know its IP address To be able to log in to the unit you also need to remove the web server lock For security the web server is by default locked from inboun...

Page 21: ... removed and the password can be changed Another thing that should be done at an early stage is to change the administrator password In the Security menu Figure 10 tick the Admin checkbox and then click the Modify button to change the administrator password After entering the new password press Save Finally press Done to leave the onscreen menu system ...

Page 22: ...to the media monitor web server using the password that you have chosen Using your web browser you can now manage the content that is to be used in the media monitor 7 5 Centrally managed network setup If the media monitor is to be used in a centrally managed digital signage network you should choose Managed in the configuration menu Add the media monitor ID and the URL of the server Account URL a...

Page 23: ...D is defined in the digital signage management system If the connection test fails start by checking the parameters once more to see that everything is correctly set Also check the LAN cabling When everything is working correctly press Next to save the settings After the reboot the media monitor will automatically start downloading the files decided by the digital signage management system While d...

Page 24: ...7 Image retention All monitors are more or less sensitive to image retention Temporary or permanent image retention visible tracks of previously shown images is caused by long time display of static images Especially static images containing hard contrast transitions may cause image retention Therefore it is recommended not to display the configuration menu or other static content during a long pe...

Page 25: ... settings in the configuration menu and make a connection test Check the Ethernet connection Make sure that the outbound ports 21 80 and NTP 123 are left open in the firewall Check with the digital signage management system operator if any content is assigned to the media monitor The media monitor displays the wrong content Check the Unit ID in the configuration menu Interactivity between media mo...

Page 26: ...g local play content with live web content retrieval on the same screen Local play saves bandwidth Web kiosk feature with virtual keyboards The media monitor may be used as a web kiosk that allows for full interactivity and transactional capabilities This feature makes it possible to interface with e commerce and other transactional systems Standard fully featured virtual keyboards are available i...

Page 27: ...al signage application MultiQ Client Control software including screen region control scheduling and device management such as embedded software upgrades Video format support Hardware accelerated using internal player The media monitor can play the following video file formats with or without audio MPEG 1 MPEG 2 MPEG 4 part 10 h 264 MPEG 4 part 2 Video format support Using the web browser SWF requ...

Page 28: ...t side network functionality verification tools verifies web source availability and initiates alternative handling in case of network problems URL access limitations enables administrator to lock web browser access from and to specific URLs A soft transition between URLs Loader indication clearly notifies end user that downloads of new content to browser is in progress Web server Apache 2 2 11 or...

Page 29: ...time 8 ms GTG typ System Media Monitor 4 5 CPU Intel Atom 1 1 GHz 512 kB RAM 2 GB Flash 1 GB available for user files Media Monitor 6 7 CPU Intel Atom 1 6 GHz 1 MB RAM 4 GB Flash 3 GB available for user files Touch panel Media Monitor 5 Resistive touch panel Media Monitor 7 SAW Surface Acoustic Wave touch panel Audio output 3 5 mm analogue stereo line output S PDIF digital electrical interface Net...

Page 30: ... mm Weight 7 25 kg shipping weight total 10 05 kg External power supply Input AC 100 240 V 50 60 Hz Output 12 V DC 5 0A Power usage 45 46 W typical 50 W max excl USB devices 55 W max inc USB load Operating temperature 0 40 C Approvals Power supply CE UL TUV GS FCC Media monitor CE Environmental RoHS WEEE ...

Page 31: ...ld be used if the media monitor is to be temporarily used without connection to the Internet for demonstration purposes default is No Encrypted communication set to Yes will make the media monitor use the HTTP S and the FTP S protocols default is No Obtain DNS automatically set to Yes will make the media monitor to obtain a DNS address from a DHCP server default is Yes Obtain host name automatical...

Reviews: